Singer Futura Quartet SEQS-6000 Support Question
Singer Futura Quartet SEQS-6000 Support Question
Find answers below for this question about Singer Futura Quartet SEQS-6000.Need a Singer Futura Quartet SEQS-6000 manual? We have 1 online manual for this item!
Question posted by reneewindell on June 3rd, 2015
Seqs 6000
can't seem to connect to laptop. error message says check that usb cable is connected and power switch is turned on. Did follow directions and when turn the machine on the light is blinking and error message appears.
Current Answers
Answer #1: Posted by TommyKervz on July 1st, 2015 1:33 PM
TommyKervz

Member since:
January 10th, 2013 Points: 17,776,803

Member since:
January 10th, 2013 Points: 17,776,803
Either the USB cable is broken or not connected properly' try another USB cable and make sure it is properly connected.
Related Singer Futura Quartet SEQS-6000 Manual Pages
Instruction Manual - Page 2

...this manual. "To disconnect, turn switch to break." 17. "Keep fingers away from outlet." 11. "Attention the following ."
"T his appliance is required around the sewing machine needle." 14. Unplug the ...Read all moving parts. SINGER and FUTURA QUARTET are being administered." 10. If the plug does not fit fully in . "Never sew with relevant National legislation relating to...
Instruction Manual - Page 3
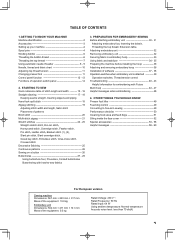
... is attached 39 Operation switches, Thread tension control Troubleshooting 40 - 43 Helpful information for embroidering with hard-to free-arm sewing 49 Performance checklist 50 Cleaning hook area and feed dogs 51 Oiling inside the face cover 52 Special accessories 53 - 58 Helpful messages 59 - 60
For European version
Sewing machine Dimensions: 567 mm ×...
Instruction Manual - Page 4

GETTING TO KNOW YOUR MACHINE
MACHINE IDENTIFICATION
2
1
8
1. Threading lever
5. Extension table (Accessory box)
5
10
8. Bobbin winder latch 10. Operation buttons
6
11. Power/light switch
15. Needle bar
14
18
26. Needle clamp screw
29. Hoop bracket 39. Large hoop 42. Hoop mounting plate
41
46
46. Foot control 49. ...
Instruction Manual - Page 5

ACCESSORIES
FOR SEWING MACHINE
1. Auxiliary spool pin
4. Screwdriver (small)
12.
When purchasing additional bobbins, be sure they are accessed via your computer by installing the FUTURA software. Buttonhole opener/Brush
9. Vinyl bag 20. Bobbins 21. Button sewing foot
1
16. Thread spool net (long)
18.
Scissors 22. The FUTURA embroidery designs are Class I5 J....
Instruction Manual - Page 6

... the spool pin. Place a thread spool on .
Always disconnect the machine from power supply by removing the plug from needle plate area before using sewing machine only.
The same switch controls both the power and the light.
Place felt disc over it. Power line cord/FOOT CONTROL
Connect the plug of thread. VERTICAL SPOOL PIN for normal thread spool...
Instruction Manual - Page 11

5
HELPFUL SUGGESTIONS: Put a drop of the hook using a small screw
6
driver.
If the threading hook cannot catch thread, adjust the vertical position by bending the twin thread guide.
9 Felt disc
If the threading hook is deviated from needle hole,
adjust the position of sewing machine oil onto the felt disc,
if the machine is used after a long interval.
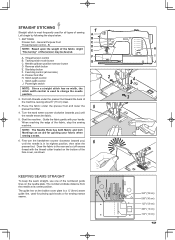
Instruction Manual - Page 14

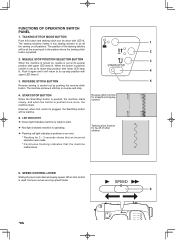
... PANEL FUNCTIONS
Pattern selection buttons
Turn on the length and width controls are for reference only and do not represent actual sewing parameters of the row that ...sew Straight Stitch.
LED indicator
Pattern selection buttons
LED indicator
Stitch length control
Twin needle mode button
Stitch width/needle position control
*NOTE: The provided scales and numbers on the power switch...
Instruction Manual - Page 15
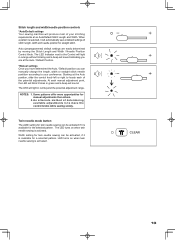
.../needle position controls
*Auto/Default settings Your sewing machine will produce most of your preference. Starting at an Auto/Default Stitch Length and Width. The LED Indicator next to the Control will light in red beyond the potential adjustment range.
The LED turns on when twin needle sewing is available for a selected pattern. NOTES: 1.
Width...
Instruction Manual - Page 16
... the reverse stitch button. NEEDLE STOP POSITION SELECTOR BUTTON
When the machine is pushed.
2
2. LED INDICATOR
Green light indicates machine is ready to start.
Red light indicates machine is operating.
Flashing red light indicates a problem or an error. * Flashing for tie-off
1
the sewing on , needle is used, the lever serves as a top speed limiter...
Instruction Manual - Page 19
...or for guiding your hands. Let's begin by following the steps below.
1. Guide the fabric gently ...Turn the hand wheel counter clockwise (towards you ) until the needle enters the fabric.
5.
Draw the fabric to change the needle
position. 2. SETTINGS Presser foot - Thread tension control B. Power/light switch
F G
2
H I . Tacking stitch mode button C. Start/stop the sewing machine...
Instruction Manual - Page 38

...; To remove, press the release lever and slide the hoop towards you ) until the needle comes to embroidering standby position. NOTE: Before attaching small hoop, turn on power switch to move the carriage to its highest position.
PREPARING THE MACHINE BEFORE
INSTALLING THE HOOP
1
1. Turn hand wheel counter clockwise (toward you .
Instruction Manual - Page 40
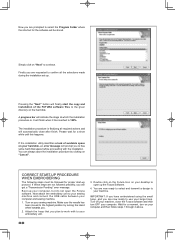
... of available space on your machine. Pressing the "Next" button will be followed for the software will finally start -up . Next attach the embroidery unit to your sewing machine and connect the USB cable between your embroidery unit.
3. You are now ready to select and transmit a design to your hard disk, an error message will prompt you are requested...
Instruction Manual - Page 43
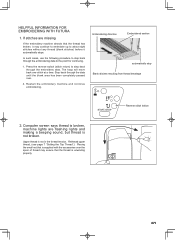
HELPFUL INFORMATION FOR EMBROIDERING WITH FUTURA
1.
Computer screen says thread is broken, machine lights are missing
If the embroidery machine detects that the thread has broken, it automatically stops. Press the reverse switch (stitch return) to step back through the embroidering data to the point for continuing.
1. Embroidering direction
Embroidered section
1357
2468
automatically ...
Instruction Manual - Page 49
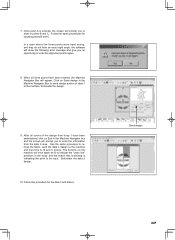
... indicate the "cross line" positions in the Machine Navigator box and the screen will show the following error message and give you an opportunity to the machine and input the A, B and C points.... button that is blinking is entered, the screen will appear. Click on Send design in the Machine Navigator Box to send design portion of the design from the data 2 area. Follow the same procedures ...
Instruction Manual - Page 50

....
48 USB cable is disconnected while being suspended (Embroidery is being transferred.
USB cable is connected, but USB cable is not connected. All LED lamps are turned off . HELPFUL MESSAGES WHEN EMBROIDERING... are turned off . All LEDlamps are shown.
This sample means 16 blocks are transferred and 3 blocks are lit as "P"and "C" alternately for about 2 seconds, and back to sew the ...
Instruction Manual - Page 52
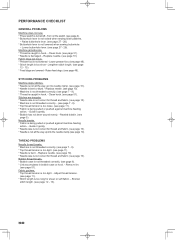
PERFORMANCE CHECKLIST
GENERAL PROBLEMS Machine does not sew. * Power switch is too tight. - Replace needle. (see page 49). * Stitch length is too short - ... been wound evenly. -
Fabric puckers. * Top thread tension is turned off.- Fabric does not move. * Presser foot is caught in hook. - Replace needle. (see page 10). * Machine is not all the way up into needle clamp. (see page 10...
Instruction Manual - Page 53
... spring (4).
(2)
(A) (B)
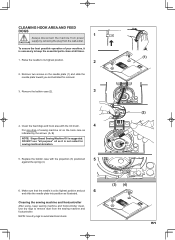
6. DO NOT use "all purpose" oil as indicated by removing the plug from the sewing machine and footcontroller. CLEANING HOOK AREA AND FEED DOGS
1
Always disconnect the machine from power CAUTION supply by the arrows. (A, B)
NOTE: Singer Brand Sewing Machine Oil is at all times.
(1)
1. Replace the bobbin case with the lint brush.
4
Put one...
Instruction Manual - Page 54
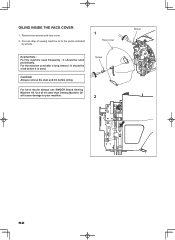
... after a long interval : It should be oiled before oiling.
For best results always use SINGER Brand Sewing Machine Oil.
Screw
2
Screw
52 Use of sewing machine oil to your machine. OILING INSIDE THE FACE COVER
1. CAUTION: Always remove the dust and lint before it is used frequently : It should be oiled periodically. Put one drop...
Instruction Manual - Page 59

... a guide for the next row. A cord can be flattened after being sewn. For threading, follow the machine's thread path with a twin needle to create small "tucks" in the underside, which allows the tucks not to be used to sew 5/8 of the foot. To attach the guide, simply insert it , so the first pintuck...
Instruction Manual - Page 61

... on machine socket for foot control.
Remove foreign particle. When a message is locked up due to thread entangled around spindle or
○ ○ rotation interrupted forcibly. Turn off power switch and eliminate the problem that caused the
02
bobbin winder to start /
stop . Bobbin winder is locked up due to stop.
is connected.
...
Similar Questions

I Get E7 Error Message On My Singer Model 7258 Sewing Machine. There Is No Refe
Error message E7 is up on my Singer Stylist model 7258 sewing machine. It is not working at all. I t...
Error message E7 is up on my Singer Stylist model 7258 sewing machine. It is not working at all. I t...
(Posted by ebellamybellamy9 5 years ago)

Thread Guide Has Come Off My Singer Seqs 6000 Embroidery/sewing Machine.
I cannot figure out how to get the thread guide back on. It came off when the part that holds the ne...
I cannot figure out how to get the thread guide back on. It came off when the part that holds the ne...
(Posted by sharonrn 9 years ago)

Beeping From Singer Sewing Machine Stylist Ii 5625
My sewing machine will beep and stop sewing after three inches of sewing. I have taken it to be repa...
My sewing machine will beep and stop sewing after three inches of sewing. I have taken it to be repa...
(Posted by arusheria 9 years ago)
Feed Dog Lever Will Not Slide Back On Seqs 6000. Feed Dog Stuck In Down Position
Brand-spanking new Singer Futura SEQS 6000, never even been plugged in. While reading directions, I ...
Brand-spanking new Singer Futura SEQS 6000, never even been plugged in. While reading directions, I ...
(Posted by sabeha 10 years ago)
Can You Also Wind A Bobbin On The Singer Seqs 6000 While Your Are Embroidering
I have the Futura 4 in 1 Quartet SEQS 6000. I saw on HSN where the Singer Quarete has this feature. ...
I have the Futura 4 in 1 Quartet SEQS 6000. I saw on HSN where the Singer Quarete has this feature. ...
(Posted by meiafarrell 10 years ago)