Singer Futura Quartet Support Question
Singer Futura Quartet Support Question
Find answers below for this question about Singer Futura Quartet.Need a Singer Futura Quartet manual? We have 1 online manual for this item!
Question posted by Brince22 on July 12th, 2014
Singer Curvy Bobbin Won't Wind.
The bobbin starts to wind, goes for a second or two, and then stops, beeping. Any suggestions?
Current Answers
Related Singer Futura Quartet Manual Pages
Instruction Manual - Page 1
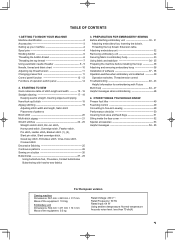
STARTING TO SEW Quick reference table of ...Sewing on a button 26 Buttonholes 27 - 29
Using buttonhole foot, Procedure, Corded buttonholes Buttonholing with Futura Multi hoop 44 - 47 Helpful messages when embroidering 48
4. TABLE OF CONTENTS
1.GETTING TO KNOW YOUR MACHINE Machine identification 2 Accessories 3 Setting up your machine 4 Spool pins 4 Winding bobbin 5 Threading the bobbin...
Instruction Manual - Page 2
...
24
37
38 39
28 29 30 31
43. Instruction manual
42
42 43
43
NOTE: B e s u r e t h e U S B c a b l e i s
44
attached to your machine when
doing embroidery.
45
44 45
47
48
49
50
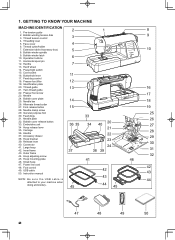
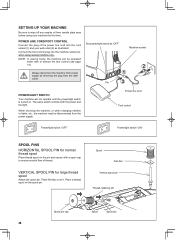
2 Bobbin winding tension disk 3. Thread cutter/holder
7. Alternate thread cutter
27. Accessory drawer 38. Hoop bracket 39. Hoop adjusting screw
32
45...
Instruction Manual - Page 3
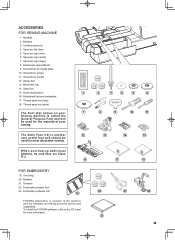
Buttonhole opener/Brush
9. Screwdriver (small)
12. Blind hem foot
14. Vinyl bag 20. Bobbins 21. Embroidery software CD
19
FUTURA embroidery is "system" of your
7
Sewing machine is another
12
very useful foot and should be
used for more information.
2
3
4
5
6
8
9
10
11
13
14
15
17
18
20
21
22
23 3
Spool ...
Instruction Manual - Page 4
... a spool cap to wipe off any surplus oil from needle plate area before using sewing machine only. NOTE: In sewing mode, the machine can be disconnected from the walloutlet.
Connect the foot control plug into the cord socket (1) and your machine the first time. The same switch controls both the power and the light. Place...
Instruction Manual - Page 5
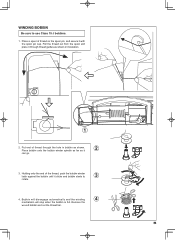
... spool pin, and secure it
2
can go.
3. Bobbin will disengage automatically and the winding
4
mechanism will stop when the bobbin is full. WINDING BOBBIN
Be sure to
3
rotate.
4. Place a spool of the thread, push the bobbin winder latch against the bobbin until it through the hole in illustration.
1
2. Place bobbin onto the bobbin winder spindle as far as shown. Remove...
Instruction Manual - Page 9
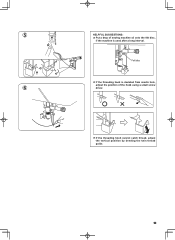
Felt disc
If the threading hook is used after a long interval. 5
HELPFUL SUGGESTIONS: Put a drop of sewing machine oil onto the felt disc,
if the machine is deviated from needle hole,
adjust the position of the hook using a small screw
6
driver.
If the threading hook cannot catch thread, adjust the vertical position by bending the twin thread guide.
9
Instruction Manual - Page 10
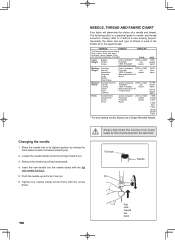
...the plug from power supply by pulling it before a new sewing project. Always disconnect the machine from the wall-outlet. Generally, the same size and type...blue band 16/100 purple band
* For best sewing results, always use a Singer Branded Needle. Tighten the needle clamp screw firmly ...Medium- Push the needle up as far as in the bobbin as it toward the back.
5. Loosen the needle ...
Instruction Manual - Page 11
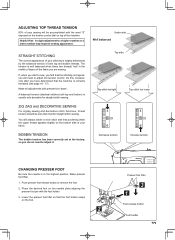
... may improve sewing appearance. You will need to adjust the tension control. The tension is correctly threaded (see page 16 - 17). Do this, however, only after you do not need to adjust it.
BOBBIN TENSION
The bobbin tension has been correctly set at the factory, so you have determined that the machine is well...
Instruction Manual - Page 13
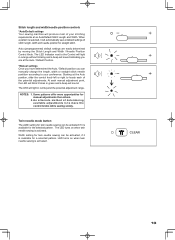
...sewing is activated.
13
When a pattern is selected, it is to locate each manual adjustment point, the LED will blink 3 times in green and a beep will sound. At each of the potential adjustments. The LED will light in orange without blinking and a beep... controls
*Auto/Default settings Your sewing machine will produce most of your preference. Starting at the Auto / Default Position...
Instruction Manual - Page 14
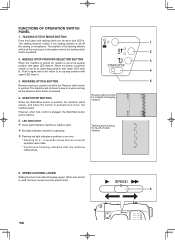
... MODE BUTTON
Push this button and tacking stitch can be done with
4
upper LED lamp lit.
3. The sewing machine makes 4 tiny tacking stitches to start.
Red light indicates machine is plugged, the Start/Stop button will return to sew in the pattern where the tacking stitch button is pushed.
2
2. Reverse stitch function for 2 - 3 seconds shows that...
Instruction Manual - Page 17
...distance from the needle at rear side) G. General Purpose Foot Thread tension control - Start/stop the sewing machine. Stitch width control J. Power/light switch
F G
2
H I . Turn the hand wheel counter ...excess
thread with your fabric when sewing a seam.
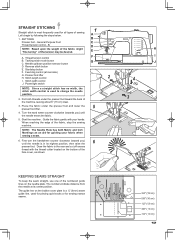
6. KEEPING SEAMS STRAIGHT
To keep the seam straight, use one of the numbered guide lines on the bobbin cover plate is a ¼"...
Instruction Manual - Page 28

Pull out the bobbin thread
underneath the fabric to a length of the bartack threads.
...
Fabric marking
9. Fabric marking
mark
* Sewing will be completed automatically in the center of buttonhole on the buttonhole foot, and then lower the buttonhole foot.
8. Place the fabric under the foot. While holding the top thread, start the machine. Carefully mark the position of the buttonhole...
Instruction Manual - Page 30
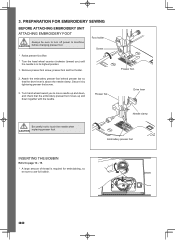
... above the needle clamp. Turn hand wheel toward you to machine CAUTION before changing presser foot. Needle clamp Embroidery presser foot
INSERTING THE BOBBIN
Refer to page 14 - 15.
* A large amount...it by tightening presser foot screw.
3. PREPARATION FOR EMBROIDERY SEWING
BEFORE ATTACHING EMBROIDERY UNIT ATTACHING EMBROIDERY FOOT
Always be sure to touch the needle when CAUTION replacing...
Instruction Manual - Page 38

...has been moved to the highest position by clicking on "Cancel". Double click on the Futura Icon on your hard disk, an error message will prompt you to free some hard ...precisely, you will finally start -up your computer and sewing machine.
1.
A progress bar will be followed for a short while until this happens. Next attach the embroidery unit to your sewing machine and connect the USB ...
Instruction Manual - Page 39
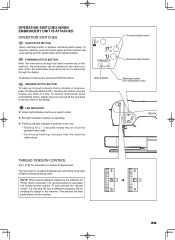
... the way back to loosen thread tension.
Design may wish to re-adjust thread tension according to start /stop the machine, push the button again and the machine will move as it at a time. LED indicator
Forward stitch button Reverse stitch button Start/stop sewing and the needle stops at a time. This ensures the best
performance of the...
Instruction Manual - Page 50
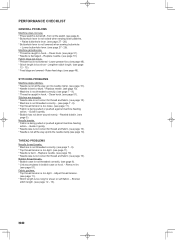
... into needle clamp. (see page 11). * Stitch length is turned off.- Replace needle. (see page 10). * Machine is not threaded correctly. (see page 10). * Needle is not raised when sewing stitch patterns.
- Guide it gently. * Bobbin has not been wound evenly. -
Fabric puckers. * Top thread tension is not correct for thread and fabric...
Instruction Manual - Page 51
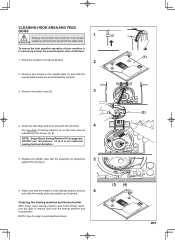
...by removing the plug from the sewing machine and footcontroller. Replace the bobbin case with the lint brush.
4
Put one drop of your machine, it is not suited for removal...CLEANING HOOK AREA AND FEED DOGS
1
Always disconnect the machine from power CAUTION supply by the arrows. (A, B)
NOTE: Singer Brand Sewing Machine Oil is suggested. Make sure that the needle is necessary to its ...
Instruction Manual - Page 52
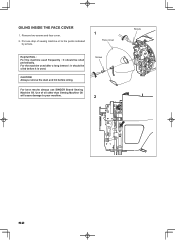
... a long interval : It should be oiled periodically. Put one drop of oil other than Sewing Machine Oil will cause damage to the points indicated
by arrows.
1
Face cover
Helpful Hints : For the machine used frequently : It should be oiled before oiling.
For best results always use SINGER Brand Sewing Machine Oil. OILING INSIDE THE FACE COVER
1.
Instruction Manual - Page 53
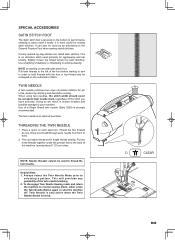
...of a Singer Brand twin ...before starting to sew in broken needles and possible damage to hold threads with the foot or top thread may be set above twin needle mark, regardless of the machine,...sewing. Use a backing of parallel stitches for satin stitching. This will result in order to your machine. Place a spool on each needle from front to thread the twin needle.
Pick up bobbin...
Instruction Manual - Page 60
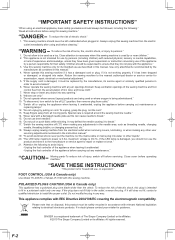
... carrying out any other user
servicing adjustments mentioned in the instruction manual." 19. To reduce the risk of lint, dust, and loose cloth." 7.
SINGER is required around the sewing machine needle." 14. "Use this product must be replaced by or near children." 2. "Never drop or insert any object into any air openings blocked...
Similar Questions

Where Can I Get Replacement Parts For My Futura Quartet 6000 Machine?
(Posted by treasuredjewels2321 7 months ago)

I Was Sewing And All Of The Sudden My Machine Turned Off
(Posted by mari0624 3 years ago)

I Get E7 Error Message On My Singer Model 7258 Sewing Machine. There Is No Refe
Error message E7 is up on my Singer Stylist model 7258 sewing machine. It is not working at all. I t...
Error message E7 is up on my Singer Stylist model 7258 sewing machine. It is not working at all. I t...
(Posted by ebellamybellamy9 5 years ago)
Beeping From Singer Sewing Machine Stylist Ii 5625
My sewing machine will beep and stop sewing after three inches of sewing. I have taken it to be repa...
My sewing machine will beep and stop sewing after three inches of sewing. I have taken it to be repa...
(Posted by arusheria 9 years ago)
Singer Futura Troubleshooting
I have a singer futura quartet 6000 bobbin bunches up n now machine flashes when u turn it on
I have a singer futura quartet 6000 bobbin bunches up n now machine flashes when u turn it on
(Posted by loriann22262 10 years ago)