Singer Futura Quartet Support Question
Singer Futura Quartet Support Question
Find answers below for this question about Singer Futura Quartet.Need a Singer Futura Quartet manual? We have 1 online manual for this item!
Question posted by carolyngore77 on June 15th, 2016
Stop/start Button
how to turn off the start/stop button to use my foot pedal?
Current Answers
Answer #1: Posted by waelsaidani1 on June 15th, 2016 10:35 AM
waelsaidani1

Member since:
May 12th, 2013 Points: 19,501,777

Member since:
May 12th, 2013 Points: 19,501,777
Related Singer Futura Quartet Manual Pages
Instruction Manual - Page 1
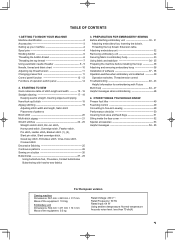
...53 Helpful messages 54 - 55
For European version
Sewing machine Dimensions: 567 mm × 240 mm &#...Rated input: 64 W Using ambient temperature: Normal temperature Acoustic noise level: less than 70 db(A)
1 STARTING TO SEW Quick reference table of ...Sewing on a button 26 Buttonholes 27 - 29
Using buttonhole foot, Procedure, Corded buttonholes Buttonholing with Futura Multi hoop 44 -...
Instruction Manual - Page 3
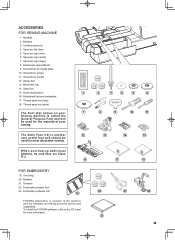
...To install the FUTURA software, refer to the CD insert for needle plate
10. Spool pin cap (mini)
6. Thread spool net (short)
The Foot that comes on your
7
Sewing machine is "system" of your
sewing. Spool pin cap (small)
7. Button sewing foot
1
16. Embroidery presser foot 23. Bobbins
3. Screwdriver (small)
12. When purchasing additional bobbins, be
used for most decorative...
Instruction Manual - Page 4
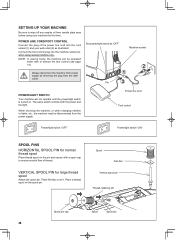
... surplus oil from needle plate area before using sewing machine only.
Set power/light switch at "OFF"
machine socket
2 1
Pin
3
POWER/LIGHT SWITCH
Your machine will not operate until the power/light switch is turned on the spool pin.
Connect the foot control plug into the cord socket (1) and your machine the first time.
Spool
Felt disc
Vertical...
Instruction Manual - Page 6
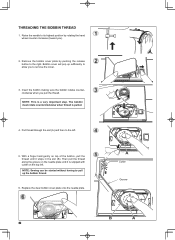
...thread until it stops in the slot (B). Insert the bobbin making sure the bobbin rotates counterclockwise when you to pull up the bobbin thread.
6. NOTE: Sewing can be started without having to...step. A
Cutter
Groove
B
A
6 Raise the needle to its highest position by pushing the release button to the left . Bobbin cover will pop up sufficiently to allow you pull the thread. Pull ...
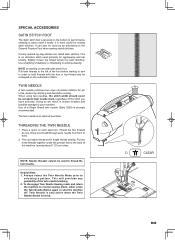
Instruction Manual - Page 9
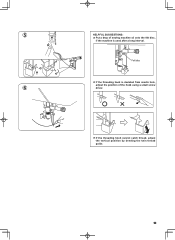
5
HELPFUL SUGGESTIONS: Put a drop of the hook using a small screw
6
driver.
If the threading hook cannot catch thread, adjust the vertical position by bending the twin thread guide.
9 Felt disc
If the threading hook is deviated from needle hole,
adjust the position of sewing machine oil onto the felt disc,
if the machine is used after a long interval.
Instruction Manual - Page 11
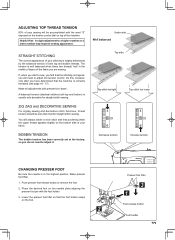
... you have determined that the machine is irregular, you do not need to adjust it.
A balanced tension (identical stitches both top and bobbin threads. Make all adjustments with the foot holder.
3.
Place the desired foot on the foot.
2
Presser foot lifter
3 1
Foot release button
Foot holder
11 Lower the presser foot lifter so that the foot holder snaps on the...
Instruction Manual - Page 12
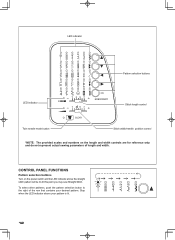
... will be lit. To select other patterns, push the pattern selection button to the right of length and width. CONTROL PANEL FUNCTIONS
Pattern selection buttons
Turn on the length and width controls are for reference only and do not represent actual sewing parameters of the row that contains your pattern is lit.
12
At...
Instruction Manual - Page 13
... is available for the selected pattern.
Twin needle mode button
The width setting for twin needle sewing can be activated, if it is selected, it is...turns on when twin needle sewing is activated.
13 At each of the potential adjustments. The LED will light in green and a beep will sound. Stitch length and width/needle position controls
*Auto/Default settings Your sewing machine...
Instruction Manual - Page 14
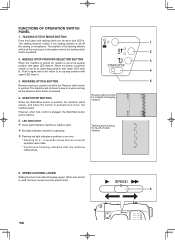
... LED lamp lit.
START/STOP BUTTON
When the Start/Stop button is pushed, the machine starts slowly, and when the button is pressed.
4. LED INDICATOR
Green light indicates machine is ready to sew in the pattern where the tacking stitch button is plugged, the Start/Stop button will continue to start.
Red light indicates machine is turned on all patterns. TACKING...
Instruction Manual - Page 17
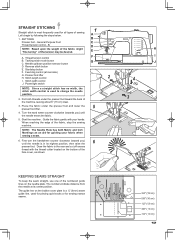
... selector button D. Start/stop the sewing machine. Start the machine. When reaching the edge of
3
the machine, leaving about 6" (15 cm) clear.
3.
The guide line on the bobbin cover plate is a ¼" (6mm) seam guide line, used for piecing quilt blocks or for all types of the
face cover, as an aid for guiding your hands. SETTINGS Presser foot - Tacking...
Instruction Manual - Page 38

... during the installation set-up the Futura Software.
4. Turn off your computer and then follow steps 1 through 4 above.
38 Make sure the needle has been moved to 100%. If these steps are not followed precisely, you are now ready to select and transmit a design to your sewing machine and connect the USB cable between...
Instruction Manual - Page 39
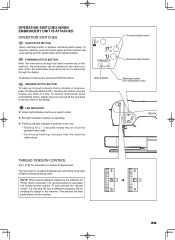
... is ready to loosen thread tension. To stop the machine, push the button again and the machine will stop sewing and the needle stops at "E" for
Photo Stitch (optional) it is recommended to decrease
the thread tension toward "0" and activate the "Speed
limiter", by the software for embroidery to start /stop button (For embroidery only)
THREAD TENSION CONTROL
Set...
Instruction Manual - Page 41
...1357
2468
automatically stop
Blank stitches resulting from thread breakage
Reverse stitch button
2.
Upper thread is not broken. Restart the embroidery machine and continue embroidering.
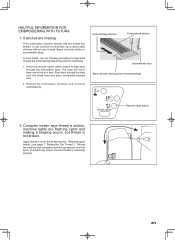
In such cases, use the following procedure ...embroidery data. HELPFUL INFORMATION FOR EMBROIDERING WITH FUTURA
1. If stitches are flashing lights and making a beeping sound, but thread is not ...
Instruction Manual - Page 44
... compensate for the hoop or a combination of hoops that will be used to set the fabric into the hoop and will therefore sew the design to the alignment of the embroidery. When these points are...Hooping is a special feature in the Futura QuartetTM software that will allow embroidery data which is larger than a single embroidery hoop to be sent to the machine to stitch out, while making it easy...
Instruction Manual - Page 48

.... This sample means 16 blocks are transferred and 3 blocks are turned off. All LED lamps are turned off . USB cable is connected, but USB cable is not connected. All LEDlamps are turned off . Just after the embroidery data was completely transferred (before starting to sew the first block). All LED lamps are completed. (Now block...
Instruction Manual - Page 51
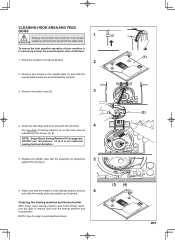
... the hook race as it is at all purpose" oil as indicated by removing the plug from the wall-outlet. DO NOT use "all times.
(1)
1. Cleaning the sewing machine and footcontroller
After using, keep the essential parts clean at its highest position.
2
2. Make sure that the needle is necessary to its highest position and...
Instruction Manual - Page 52
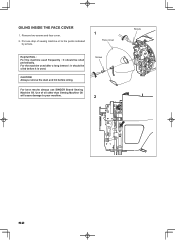
... screws and face cover. 2.
For the machine used frequently : It should be oiled periodically. Use of sewing machine oil to your machine. OILING INSIDE THE FACE COVER
1. Put one drop of oil other than Sewing Machine Oil will cause damage to the points indicated
by arrows.
1
Face cover
Helpful Hints : For the machine used after a long interval : It should be...
Instruction Manual - Page 53
...foot: Pull both threads to the left of stabilizer or interfacing to your machine.
NOTE on starting to sew in broken needles and possible damage to avoid puckering. Use of parallel stitches for sewing... needle sewing. When using twin-needles, the stitch width should never be used as an alternative to normal sewing mode, either press the Twin Needle Button again or shut the machine off...
Instruction Manual - Page 54
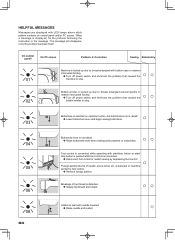
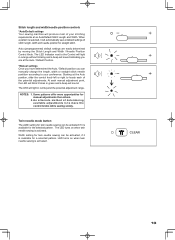
... forcibly. Turn off power switch and eliminate the problem that caused the
02
bobbin winder to stop .
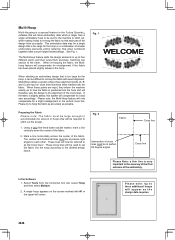
The message will disappear, once the problem has been fixed. HELPFUL MESSAGES
Messages are displayed with start/stop button or start/
stop button is pushed while foot control is connected.
Disconnect foot control or restart sewing by depressing foot control.
○...
Instruction Manual - Page 60
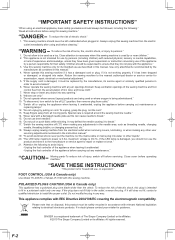
... or its affiliates. ©2010 The Singer Company Limited or its intended use , or equivalent." "IMPORTANT SAFETY INSTRUCTIONS"
"When using this sewing machine." "This sewing machine should always be used or where oxygen is intended to persons: " 1. "Attention the following ." Unplug the foot controller of the appliance before
servicing.
If it unattended: - "Do not...
Similar Questions

I Was Sewing And All Of The Sudden My Machine Turned Off
(Posted by mari0624 3 years ago)

I Get E7 Error Message On My Singer Model 7258 Sewing Machine. There Is No Refe
Error message E7 is up on my Singer Stylist model 7258 sewing machine. It is not working at all. I t...
Error message E7 is up on my Singer Stylist model 7258 sewing machine. It is not working at all. I t...
(Posted by ebellamybellamy9 5 years ago)

Singer Futura Quartet
Will my Singer Futura Quartet sew a patch on leather, if so, what size needle n foot do I use Ty
Will my Singer Futura Quartet sew a patch on leather, if so, what size needle n foot do I use Ty
(Posted by Lthomas85 9 years ago)


Beeping From Singer Sewing Machine Stylist Ii 5625
My sewing machine will beep and stop sewing after three inches of sewing. I have taken it to be repa...
My sewing machine will beep and stop sewing after three inches of sewing. I have taken it to be repa...
(Posted by arusheria 9 years ago)