Singer Futura Quartet Support Question
Singer Futura Quartet Support Question
Find answers below for this question about Singer Futura Quartet.Need a Singer Futura Quartet manual? We have 1 online manual for this item!
Question posted by Hggmoor on July 25th, 2014
Futura Quartet Xl-400 Will Not Start In Center
The person who posted this question about this Singer product did not include a detailed explanation. Please use the "Request More Information" button to the right if more details would help you to answer this question.
Current Answers
Related Singer Futura Quartet Manual Pages
Instruction Manual - Page 1
... the face cover 52 Special accessories 53 Helpful messages 54 - 55
For European version
Sewing machine Dimensions: 567 mm × 240 mm × 317 mm Mass of the equipment... 26 Sewing on a button 26 Buttonholes 27 - 29
Using buttonhole foot, Procedure, Corded buttonholes Buttonholing with Futura Multi hoop 44 - 47 Helpful messages when embroidering 48
4. STARTING TO SEW Quick reference...
Instruction Manual - Page 3
... foot and underplate
17. To install the FUTURA software, refer to the CD insert for needle plate
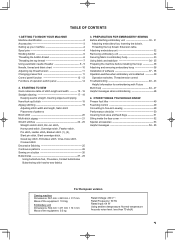
10. Spool pin cap (large)
8. Zipper foot
13. Thread spool net (long)
18. Thread spool net (short)
The Foot that comes on your
7
Sewing machine is "system" of your
sewing.
Auxiliary spool pin
4. Screwdriver for more information...
Instruction Manual - Page 4
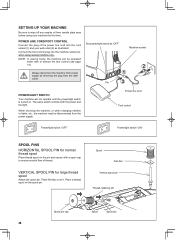
... is turned on the spool pin. The same switch controls both the power and the light. NOTE: In sewing mode, the machine can be disconnected from the power supply. Power line cord Foot control
XL-550-P04-1.eps
Power/light switch "OFF"
Power/light switch "ON"
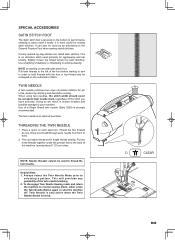
SPOOL PINS HORIZONTAL SPOOL PIN for large...
Instruction Manual - Page 9
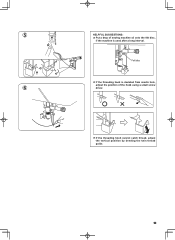
Felt disc
If the threading hook is used after a long interval.
5
HELPFUL SUGGESTIONS: Put a drop of sewing machine oil onto the felt disc,
if the machine is deviated from needle hole,
adjust the position of the hook using a small screw
6
driver.
If the threading hook cannot catch thread, adjust the vertical position by bending the twin thread guide.
9
Instruction Manual - Page 11
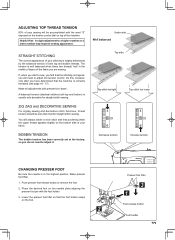
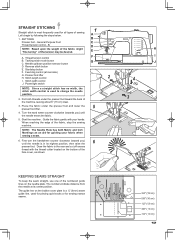
If, when you start to sew, you find that the stitching is irregular, you have determined that the machine is correctly threaded (see page 16 - 17).
Under side
Well balanced
Top side
Top stitch too tight
Top stitch too loose
Decrease tension
Increase tension
...
Instruction Manual - Page 13
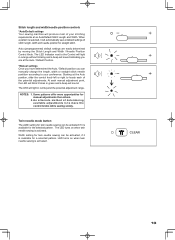
...Auto position, slide the control knob left or right to move the control knobs while sewing slowly. Starting at an Auto/Default Stitch Length and Width. The LED will light in green and...others.
2. Stitch length and width/needle position controls
*Auto/Default settings Your sewing machine will produce most of your preference. Auto (preprogrammed) default settings are at default settings of the ...
Instruction Manual - Page 14
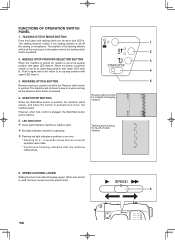
... with upper LED lamp lit. NEEDLE STOP POSITION SELECTOR BUTTON
When the machine is pressed.
4. START/STOP BUTTON
When the Start/Stop button is pushed, the machine starts slowly, and when the button is operating. FUNCTIONS OF OPERATION SWITCH PANEL
1. The sewing machine makes 4 tiny tacking stitches to start.
Red light indicates machine is pushed once more, the...
Instruction Manual - Page 15

... Toward left
Toward right
Toward left
Toward right
Width control
15 2. RIGHT
- STARTING TO SEW
QUICK REFERENCE TABLE OF STITCH LENGTH AND WIDTH
STITCH
STRAIGHT STRAIGHT STRETCH HAND-LOOK ...~ 3.0
2.5
2.0 ~ 4.0
LENGTH
AUTO
MANUAL
2.0
1.0 ~ 3.0
2.0
1.0 ~ 3.0
0.5
0.5 ~ 1.5
2.0
0.5 ~ 3.0
2.5
1.5 ~ 3.0
1.5
0.3 ~ 2.5
2.0
1.5 ~ 3.0
NEEDLE POSITION
AUTO
MANUAL
CENTER
LEFT -
Instruction Manual - Page 17
... up/down position selector button D. Start/stop the sewing machine. When reaching the edge of
3
the machine, leaving about 6" (15 cm)...sewing. Power/light switch
F G
2
H I .
Thread tension control B.
Draw the fabric to change the needle
position. 2. Stitch width control J. Let's begin by following the steps below.
1. STRAIGHT STITCHING
Straight stitch is in its center...
Instruction Manual - Page 18

... higher until you achieve the desired appearance.
4.
Start to a cord. Baste the seam allowances together, enclosing the filler cord, forming seam tape for topstitching and quilting.
1. Thread the needle with either invisible thread or with thread that is designed to look like hand sewing for the piping.
Helpful Hint: Slight adjusting of...
Instruction Manual - Page 25
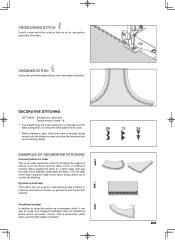
...can be used for embellishing bias binding or creating decorative borders on a fabric edge, first sew the stitch with a stabilizer underneath the fabric.
This is enough thread wound onto the bobbin ... of the stitch, being sewn, to check the stitch pattern to be used .
* Before starting to sew, check that there is particularly useful when securing both edges of pockets.
25 Pyramid on a ...
Instruction Manual - Page 28

... your garment. 6. While holding the top thread, start the machine. Pull out the bobbin thread
underneath the fabric to open up the fabric in the following order.
1
2
3
4
5
6
7
Fabric marking
9. Place the fabric under the foot. Fabric marking
mark
* Sewing will be completed automatically in the center of the bartack threads.
28
Buttonhole foot alignment...
Instruction Manual - Page 38

... plan to work with the installation. Pressing the "Next" button will be followed for proper start the copy and installation of available space on your embroidery unit.
3. Boot up the Futura Software.
4.
Turn off your computer and sewing machine.
1. IMPORTANT: If you have embroidered using the small hoop, and you are now ready to...
Instruction Manual - Page 39
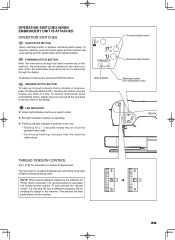
... the Reverse Stitch button.
LED indicator
Forward stitch button Reverse stitch button Start/stop sewing and the needle stops at a time.
This ensures the best
performance ...- 3 seconds shows that an incorrect operation was made. * Continuous flashing indicates that is pushed, machines starts slowly. You may be advanced one stitch at "E" for embroidery to the type of fabric and ...
Instruction Manual - Page 44
... for it and sew accordingly. Multi-Hoop utilizes a system where three alignment points (A, B, and C) are input, they inform the machine exactly as the...lined water soluble marker, mark a line vertically down the center of the design lines up to the divided design layout....Multi-Hoop
Multi-Hooping is a special feature in the Futura QuartetTM software that will allow embroidery data which is too...
Instruction Manual - Page 48

... USB cable is being suspended (Embroidery is not transferred yet.
Embroidery data is not connected.
HELPFUL MESSAGES WHEN EMBROIDERING
Display on according to sew the first block). Just after the embroidery data was completely transferred (before starting to transferred block numbers. (16 blocks in this example). All LED lamps are turned off .
Instruction Manual - Page 51
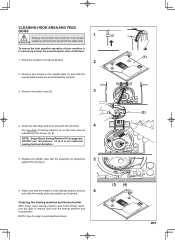
... spring (4).
(2)
(A) (B)
6. Replace the bobbin case with the lint brush.
4
Put one drop of your machine, it is suggested. Use dry rags to keep sewing machine and footcontroller clean. Remove two screws on the hook race as illustrated for sewing machine lubrication.
5. Make sure that the needle is at all purpose" oil as illustrated. Remove the...
Instruction Manual - Page 52
... before it is used frequently : It should be oiled before oiling.
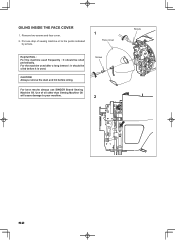
For best results always use SINGER Brand Sewing Machine Oil. OILING INSIDE THE FACE COVER
1. Screw
2
Screw
52 Use of sewing machine oil to your machine. For the machine used after a long interval : It should be oiled periodically. Put one drop of oil other than...
Instruction Manual - Page 53
...Foot when sewing stretch stitches. NOTE on starting to sew in ...broken needles and possible damage to avoid puckering.
Use of fabric. Pull the three threads together under it easily. This will result in order to the back of the twin needle breaking. 2. This is an attractive stitch used to back.
2. Doing so will preclude any possibility of the machine...
Instruction Manual - Page 60
... an electrical appliance, basic safety precautions should always be replaced by pulling on disposal, this plug is being administered." 10. Return the sewing machine to the nearest authorized dealer or service center for guidance. "Indoors use bent needles." 16. "Do not unplug by the manufacturer, its affiliates. "Keep fingers away from the accumulation...
Similar Questions

Where Can I Get Replacement Parts For My Futura Quartet 6000 Machine?
(Posted by treasuredjewels2321 7 months ago)

Replacement Part For Singer Futura Xl 400
I am looking for the embroidery arm unit for a Singer Futura Xl 400. Can you assist me in locating t...
I am looking for the embroidery arm unit for a Singer Futura Xl 400. Can you assist me in locating t...
(Posted by sjh4ba 3 years ago)

Singer Futura Xl-400
I am in need of a Singer Futura XL-400 Startup disc. Any idea where I can get one
I am in need of a Singer Futura XL-400 Startup disc. Any idea where I can get one
(Posted by fayevb 4 years ago)
Connection Error--futura Quartet
when I try to open the program I get the error message that my cables aren't connected or machine is...
when I try to open the program I get the error message that my cables aren't connected or machine is...
(Posted by MelissaAllison 6 years ago)
Singer Futura Quartet
Will my Singer Futura Quartet sew a patch on leather, if so, what size needle n foot do I use Ty
Will my Singer Futura Quartet sew a patch on leather, if so, what size needle n foot do I use Ty
(Posted by Lthomas85 9 years ago)