Singer Futura Quartet Support Question
Singer Futura Quartet Support Question
Find answers below for this question about Singer Futura Quartet.Need a Singer Futura Quartet manual? We have 1 online manual for this item!
Question posted by allertgroups on January 2nd, 2022
I Just Received A Singer Fq-4 Instead Of A Seqs6000. The Seller Says They Are T
I just received a Singer FQ-4 instead of a SEQS6000. The seller says they are the same model even though they advertised a SEQS600. I noticed that the hand wheel wobbles as it turns and makes a crunching sound?? Has this supposedly Brand NEW machine been damaged?? Are a SEQS6000 the same model as a FQ-4, or have I been "Baited and Switched"??Thank you
Current Answers
Answer #1: Posted by cashregisterguy on January 2nd, 2022 6:01 PM
cashregisterguy

Member since:
August 28th, 2010 Points: 891,420

Member since:
August 28th, 2010 Points: 891,420
Hi. From what I can find, the FQ series includes the SEQS6000 so the seller is probably correct in that it is from that series of machines. However, that model seems to have started in 2010 and I can see no further software support after Windows 8, so be aware that it could be an outdated model and perhaps not brand new. Regardless, if it wobbles and is not smooth running, then you have a warranty claim anyway. It should run smooth.
If you found my answer useful, please click 'accept'. Thank you.
Answer #2: Posted by SonuKumar on January 3rd, 2022 8:59 AM
SonuKumar

Member since:
May 9th, 2021 Points: 16,621,300
Member since:
May 9th, 2021 Points: 16,621,300
Please respond to my effort to provide you with the best possible solution by using the "Acceptable Solution" and/or the "Helpful" buttons when the answer has proven to be helpful.
Regards,
Sonu
Your search handyman for all e-support needs!!
Related Singer Futura Quartet Manual Pages
Instruction Manual - Page 4
...sewing machine only.
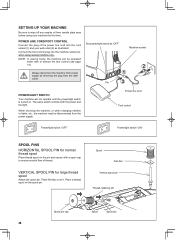
SETTING UP YOUR MACHINE
Be sure to ensure smooth flow of the power line cord into the machine socket (3), when using your wall outlet (2) as illustrated.
When servicing the machine, or when changing needles or lights, etc., the machine..."OFF"
machine socket
2 1
Pin
3
POWER/LIGHT SWITCH
Your machine will not operate until the power/light switch is turned on. ...
Instruction Manual - Page 6
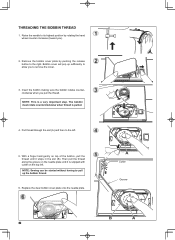
Insert the bobbin making sure the bobbin rotates counterclockwise when you ).
2. Pull thread through the ...Cutter
Groove
B
A
6 THREADING THE BOBBIN THREAD
1. Remove the bobbin cover plate by rotating the hand wheel counter clockwise (toward you pull the thread. NOTE: Sewing can be started without having to the right. The bobbin must rotate counterclockwise when thread is a ...
Instruction Manual - Page 7
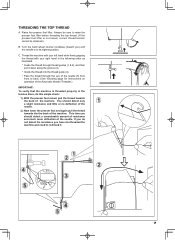
...presser foot lifter. Always be obtained.)
B. Thread the machine with your left hand while firmly gripping the thread with your right hand in the following order as illustrated. * Guide the ...
2.) Now lower the presser foot and again pull the thread towards the back of the machine. Turn the hand wheel counter clockwise (toward you) until the needle is not raised, correct thread tension cannot be...
Instruction Manual - Page 10
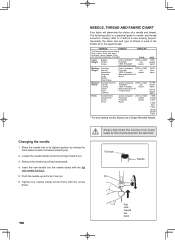
... the upper thread. They are listed as it before a new sewing project.
Remove the needle by turning it downward.
4.
TYPE
LightWeight
Batiste Chiffon Crepe
Cotton-wrapped 2000 ...16/100 purple band
* For best sewing results, always use a Singer Branded Needle. Always disconnect the machine from power supply by turning the hand wheel counter clockwise (toward you ).
2.
...
Instruction Manual - Page 13
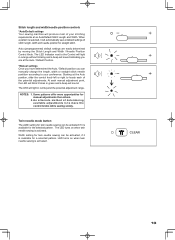
... for manual adjustments than others.
2. Stitch length and width/needle position controls
*Auto/Default settings Your sewing machine will sound. Auto (preprogrammed) default settings are at the Auto / Default Position. *Manual settings Once... Needle Position Control Knob. LED turns on when twin needle sewing is to your stitching requirements at an Auto/Default Stitch Length and Width.
Instruction Manual - Page 14
... the machine malfunctions.
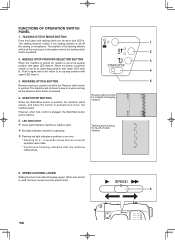
6. Tacking stitch function for tie-off
1
the sewing on , needle is pushed once more, the machine stops. NEEDLE STOP POSITION SELECTOR BUTTON
When the machine is turned on ...limiter.
6
14 The sewing machine makes 4 tiny tacking stitches to start.
Red light indicates machine is operating. LED INDICATOR
Green light indicates machine is ready to tie ...
Instruction Manual - Page 17
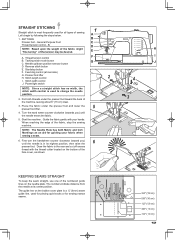
... a ¼" (6mm) seam guide line, used to the rear and cut off excess
thread with your fabric when sewing a seam.
6. Turn the hand wheel counter clockwise (towards you ) until the needle enters the fabric.
5. Start the machine.
Draw the fabric to change the needle
position. 2.
KEEPING SEAMS STRAIGHT
To keep the seam straight, use one...
Instruction Manual - Page 20

... almost invisible on the Blind hem Foot (A) so that
the needle just pierces the fabric fold and the guide just rests
against the fold. It should just pierce the fold of the guide.
4.
Then adjust the guide on medium to heavyweight fabrics. Always make a sewing test first.
4
Top side
20 BLIND STITCH
SETTINGS :Presser foot...
Instruction Manual - Page 24

... is most often sewn with an elegant touch.
GREEK KEY STITCH
A traditional pattern suited for use in heirloom sewing. Sew along the raw edge of fabric and trim close to swimwear, sportswear, T-shirts, babywear in stretch nylon, ... the stitching. SLANT PIN STITCH
Excellent for hemstitching table and bed covers with a Wing Needle (SINGER Style 2040) to create holes in the stitch pattern.
24
Instruction Manual - Page 26
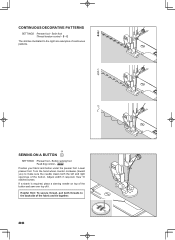
... :Feed dog control - If a shank is required, place a darning needle on top of the button and sew over top of the button. Turn the hand wheel counter clockwise (toward you) to make sure the needle clears both threads to the right are examples of the fabric and tie together.
26 CONTINUOUS DECORATIVE PATTERNS
SETTINGS :Presser...
Instruction Manual - Page 30
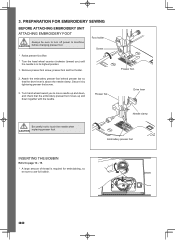
...SEWING
BEFORE ATTACHING EMBROIDERY UNIT ATTACHING EMBROIDERY FOOT
Always be sure to move needle up and down , and check that the drive lever is required for embroidering, so be sure to turn....
1.
Presser bar
Presser foot Drive lever
Be careful not to machine CAUTION before changing presser foot. Turn hand wheel toward you to use full bobbin.
30 Attach the embroidery presser ...
Instruction Manual - Page 32
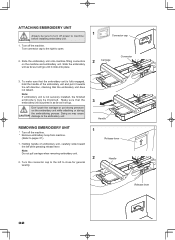
... place.
1
Connector cap
2
Carriage
Connector
3. Turn the connector cap to pages 37.)
1. Make sure that the embroidery unit does not detach. Turn off the machine. * Remove embroidery hoop from machine.
(Refer to the left while pressing release lever. Doing so may be sure to turn off power to close for general sewing.
3
Handle
1
Release lever
2
Handle
Release...
Instruction Manual - Page 36
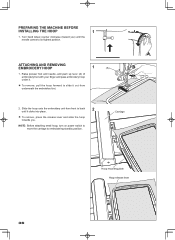
Turn hand wheel counter clockwise (toward you .
NOTE: Before attaching small hoop, turn on power switch to move the carriage to its highest position. Raise presser foot and needle, and push up lever... AND REMOVING EMBROIDERY HOOP
1
(A)
1. Slide the hoop onto the embroidery unit from underneath the embroidery foot.
2.
PREPARING THE MACHINE BEFORE
INSTALLING THE HOOP
1
1.
Instruction Manual - Page 37
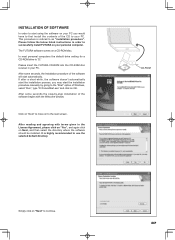
...After some seconds, the Installation procedure of the CD to your PC you would have to successfully install FUTURA on a CD-ROM disc. INSTALLATION OF SOFTWARE
In order to start using the software on OK....the default drive setting for a CD-ROM drive is "D:"
Please insert the FUTURA CD-ROM into the CD-ROM disc receiver in order to first install the contents of the software will start the ...
Instruction Manual - Page 38

... a moment, turn OFF your sewing machine. Turn on the hard disk.
It will be followed for the software will finish when it has reached to 100%.
You can always abort the installation procedure by turning the Hand wheel towards you plan to work with to free some hard disk space before proceeding with the installation. Make sure the...
Instruction Manual - Page 48

...). USB cable is connected, but USB cable is not transferred yet.
All LED lamps are turned off . This sample means 16 blocks are transferred and 3 blocks are lit as "P"and "C" alternately for about 2 seconds, and back to sew the first block).
LED lamps are completed. (Now block 4 is in progress.)
When last...
Instruction Manual - Page 51
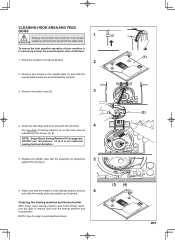
.... Remove the bobbin case (2).
3
4.
CLEANING HOOK AREA AND FEED DOGS
1
Always disconnect the machine from power CAUTION supply by the arrows. (A, B)
NOTE: Singer Brand Sewing Machine Oil is necessary to keep sewing machine and footcontroller clean. Cleaning the sewing machine and footcontroller
After using, keep the essential parts clean at its highest position.
2
2. Remove...
Instruction Manual - Page 52
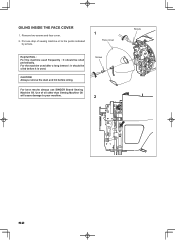
... two screws and face cover. 2. OILING INSIDE THE FACE COVER
1.
Put one drop of oil other than Sewing Machine Oil will cause damage to the points indicated
by arrows.
1
Face cover
Helpful Hints : For the machine used after a long interval : It should be oiled before oiling.
For best results always use SINGER Brand Sewing Machine Oil.
Instruction Manual - Page 53
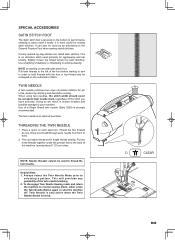
... Twin Needle Button again or shut the machine off. It is strongly recommended.
TWIN NEEDLE
A twin-needle produces two rows of stabilizer or interfacing to the back of fabric. Doing so will preclude any possibility of a Singer Brand twin needle (Style 2025) is most useful for sewing satin stitches. THREADING THE TWIN NEEDLE...
Instruction Manual - Page 60
... from the electrical outlet when removing covers, lubricating, or when making any other ).
If it unattended, unplug the appliance before cleaning."
Please note that they have been given supervision or instruction concerning use , or equivalent." SINGER is for guidance.
Return the sewing machine to persons: " 1. Keep ventilation openings of the appliance when...
Similar Questions

I Was Sewing And All Of The Sudden My Machine Turned Off
(Posted by mari0624 3 years ago)

Singer Futura Quartet Seqs 6700 Sewing Machine
how to set my singer futura quartet seqs 6700 sewing machine to sew. A distance more than one inch a...
how to set my singer futura quartet seqs 6700 sewing machine to sew. A distance more than one inch a...
(Posted by johour2194 3 years ago)

How To Correct Flashing Lights When Just Turned It On
Havent used it for a year. Turned on and the lights all are flashing? What is the fix?
Havent used it for a year. Turned on and the lights all are flashing? What is the fix?
(Posted by sjsgot49 4 years ago)

We've Had This Machine For A Little Over A Year,first Time Trying To Use It. E
error code 01 comes up. Bobbin appears right, but the mentions rotation interupted forcefully. How d...
error code 01 comes up. Bobbin appears right, but the mentions rotation interupted forcefully. How d...
(Posted by dmislanders 4 years ago)

Beeping From Singer Sewing Machine Stylist Ii 5625
My sewing machine will beep and stop sewing after three inches of sewing. I have taken it to be repa...
My sewing machine will beep and stop sewing after three inches of sewing. I have taken it to be repa...
(Posted by arusheria 9 years ago)