Singer 9960 Quantum Stylist Support Question
Singer 9960 Quantum Stylist Support Question
Find answers below for this question about Singer 9960 Quantum Stylist.Need a Singer 9960 Quantum Stylist manual? We have 2 online manuals for this item!
Question posted by Anonymous-140764 on July 27th, 2014
Why Doe It Stop Sewing After A While
The person who posted this question about this Singer product did not include a detailed explanation. Please use the "Request More Information" button to the right if more details would help you to answer this question.
Current Answers
Related Singer 9960 Quantum Stylist Manual Pages
Instruction Manual - Page 2
...symbol "O") when making any other user servicing adjustments mentioned in . INSTRUCTION MANUAL
This sewing machine is intended for household use bent needles. 13. Read all moving parts. To disconnect...14. Do not pull or push fabric while stitching.
Keep ventilation openings of the sewing machine and foot controller free from all instructions before cleaning. To unplug, grasp the ...
Instruction Manual - Page 3

...EDITING OF EACH PATTERN 46 G. TO RECALL THE SELECTED PATTERNS 47 H. SEWING THE SELECTED PATTERNS 48 I . START/STOP BUTTON 10 B. PATTERN CHART 12 D. SETTING SPOOL OF THREAD ON SPOOL ...12 G. SCROLL BUTTONS 13 K. WINDING THE BOBBIN 14 D. INSERTING THE BOBBIN 15
THREADING THE MACHINE 16
A. AUTO TACK STITCH 19 D. USING THE GENERAL PURPOSE FOOT 29 C. REVERSE STITCH ...
Instruction Manual - Page 4
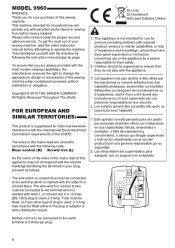
... in accordance with the International Electrotechnical Commission requirements of the CISPR. To get the most modern sewing capabilities, the manufacturer reserves the right to heavy material. MODEL 9960
PREFACE Thank you for your purchase of this sewing machine when considered necessary without notification or obligation.
Copyright © 2010 THE SINGER COMPANY All Rights Reserved...
Instruction Manual - Page 10
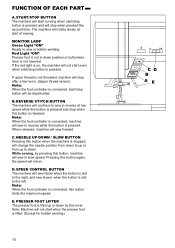
... is pressed. If upper thread is not threaded, machine will stop after a few turns. (Upper thread sensor) Note: When the foot controller is connected, start /stop button is pressed and will start running when start /stop button is released. FUNCTION OF EACH PART
A. START/STOP BUTTON The machine will stop when this button, machine will sew in slow speed.
Instruction Manual - Page 18

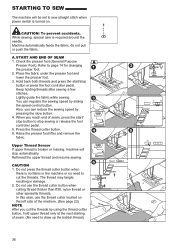
..., hold upper thread only at the next starting of seam, press the start /stop sewing or release the foot controller pedal. 5. A. Place the fabric under the presser foot and lower the presser foot. 3. The thread may tangle, resulting in the machine or no fabric in damage. 2. In this case, use the thread cutter...
Instruction Manual - Page 19
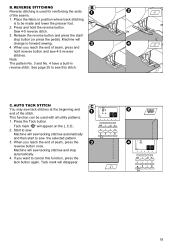
... the end of the seams. 1. When you reach the end of the stitch. C. Machine will change to sew this function, press the tack button again. Machine will sew tacking stitches and stop button (or press the pedal). AUTO TACK STITCH You may sew tack stitches at the beginning and end of seam, press and hold the...
Instruction Manual - Page 25
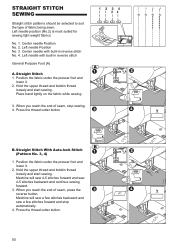
... button. Center needle Position No. 2. When you reach the end of seam, stop automatically.
4. Machine will sew 4-5 stitches forward and sew 4-5 stitches backward and continue sewing forward.
3. Press the thread cutter button.
25 Machine will sew a few stitches backward and sew a few stitches forward and stop sewing. 4. Left needle Position No. 3. When you reach the end of fabric...
Instruction Manual - Page 26

...is fitted into the presser bar.
5. Be sure the needle does not hit the dress pin, while sewing.
26 Remove the presser foot and holder. (See page 7)
3. Slide the plastic attaching head from...crosswise to the basting position. Place the fabric under the presser foot and
lower it on. B. Machine will be reduced automatically. 1. BASTING
You can baste a garment before trying it . 2. The ...
Instruction Manual - Page 39

... the second hole. Adjust the stitch width so that the needle does not hit the button during sewing. Note: To sew a 4-hole button, follow the procedure above for the first two holes. Then lift presser foot ...
7. Tie them stand away from the front.
Insert a straight pin or sewing machine needle under the center slit of button and wind around stitches to hold the button securely.
3.
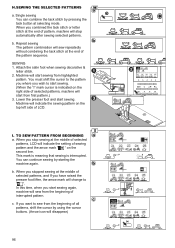
Instruction Manual - Page 48
... the tack stitch at the end of pattern, machine will disappear)
48 SEWING 1.
If you want to " ", In this time, when you start sewing again, machine will sew from the beginning of the pattern sequence.
You can combine the tack stitch by starting the machine again. When you stopped sewing at the middle of selected patterns, and If...
Instruction Manual 2 - Page 2
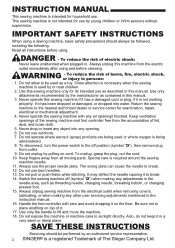
... the handle to break. 12. To reduce the risk of lint, dust, and loose cloth. 5. Never drop or insert any object into water. Switch the sewing machine off position (symbol "O"), then remove plug from the electric outlet immediately after using . SAVE THESE INSTRUCTIONS
Servicing should always be performed by young children or...
Instruction Manual 2 - Page 3

... 14 B. START/STOP BUTTON 20 B. L.C.D. PATTERN CHART 24 D. SEWING THE SELECTED PATTERNS ...9960 8 FOR EUROPEAN AND SIMILAR TERRITORIES: ...... 8 MAIN PARTS 10 ACCESSORIES 12 DUST COVER 12 EXTENSION TABLE 14
a. REMOVING THE EXTENSION TABLE 14 b. SCROLL BUTTONS 26 K. PREPARING TO THREAD MACHINE 32 B. START AND END OF SEAM 36 B. ELONGATION 46 E. BASTING 52
ELASTIC STITCH SEWING...
Instruction Manual 2 - Page 8
... une personne responsable de leur sécurité.
2. fuse must be connected to the earth terminal of a three-pin plug.
8 MODEL 9960
PREFACE Thank you for your purchase of this sewing machine when considered necessary without notification or obligation. Then familiarize yourself with excellent performance in your plug, proceed as follows:
EU only...
Instruction Manual 2 - Page 20

... is not in reverse at start /stop when pressed the second time. While sewing, by this button, machine will continue to sew in down position or buttonhole lever is pressed.
Note: Machine will sew forward. Red Light "ON" Presser foot is connected, machine will be deactivated. B. When released, machine will not start /stop when this button is connected, this...
Instruction Manual 2 - Page 36
... care is no fabric in damage. 2. Upper Thread Sensor If upper thread is broken or missing, machine will be set to stop sewing or release the foot controller pedal. 5.
In this case, use the thread cutter button when cutting thread thicker than #30, nylon thread or other speciality ...
Instruction Manual 2 - Page 38

... beginning and end of seam, press and hold the reverse button. Machine will disappear.
38 Tack mark " " will sew tacking stitches automatically and then start /
stop automatically. 4. When you reach the end of the stitch. See page 50 to sew. Machine will appear on the L.C.D.. 2. Sew 4-5 reverse stitch. 3. This function can be made and lower the...
Instruction Manual 2 - Page 50
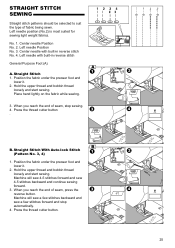
... weight fabrics. Position the fabric under the presser foot and lower it . 2. No. 1. Center needle Position No. 2. Machine will sew a few stitches backward and sew a few stitches forward and stop sewing. 4.
Place hand lightly on the fabric while sewing.
3. Straight Stitch With Auto-lock Stitch (Pattern No. 3, 4)
1. When you reach the end of fabric being sewn...
Instruction Manual 2 - Page 52

... Note: To prevent the fabric layers from your left to the left.
2. CAUTION: To prevent accidents.
Machine will be reduced automatically. 1.
Remove the presser foot and holder. (See page 14)
3. Place the...presser bar.
5. BASTING When this as many times as you need to the rear and sew one stitch only. 3. Pull the fabric required amount to finish the seam. 5. The ...
Instruction Manual 2 - Page 78
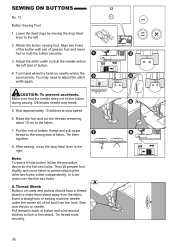
... Adjust the stitch width so that the needle does not hit the button during sewing. Insert a straight pin or sewing machine needle under the center slit of button.
4. Tie thread ends securely.
78 ... two holes, either independently, or crisscross over the pin or needle. You may break.
5. After sewing, move fabric to the right. Pull thread to back of button and wind around stitches to the...
Instruction Manual 2 - Page 96
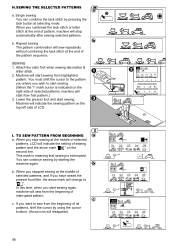
..., shift the cursor by using the cursor buttons. (Arrow icon will start sewing. (When the "I .
You can combine the tack stitch by starting the machine again.
I " mark cursor is interrupted. When you stopped sewing at selecting mode. When you stop automatically after sewing selected patterns.
You must shift the cursor to the pattern you where you...
Similar Questions

Why Is My Singer Quantum Stylist 9960 Stuck In Reverse Sewing
(Posted by kelsydan1 1 year ago)

Quantum 9960, Thread Balls Up
thread balls up under plate. Have to tear fabric to get it out. Also the bar that goes across the bo...
thread balls up under plate. Have to tear fabric to get it out. Also the bar that goes across the bo...
(Posted by Sisbankssb 4 years ago)

Bobbin Case On Singer 9960 Quantum Stylist Noisey
when I sew I hear a clicking sound and some rattling of the bobbin occurs. more so when I sew on the...
when I sew I hear a clicking sound and some rattling of the bobbin occurs. more so when I sew on the...
(Posted by sdshowen 9 years ago)

Beeping From Singer Sewing Machine Stylist Ii 5625
My sewing machine will beep and stop sewing after three inches of sewing. I have taken it to be repa...
My sewing machine will beep and stop sewing after three inches of sewing. I have taken it to be repa...
(Posted by arusheria 9 years ago)

I Need An Extnesion Table For My Sewing Machine Singer 7258 Stylist
(Posted by loucksd 10 years ago)