Singer 9960 Quantum Stylist Support Question
Singer 9960 Quantum Stylist Support Question
Find answers below for this question about Singer 9960 Quantum Stylist.Need a Singer 9960 Quantum Stylist manual? We have 2 online manuals for this item!
Question posted by trickettfamily on March 12th, 2013
Start.button.red.all.the.time
We have just purchased the machine and have power, but the start button remains red all the time and the foot up pedal shows on the scrren therefore the machine will not work.
Current Answers
Related Singer 9960 Quantum Stylist Manual Pages
Instruction Manual - Page 3

...UTILITY STITCH BUTTON 12 F. CLEAR BUTTON 13 J. TACK BUTTON 13 M. WINDING THE BOBBIN 14 D. PREPARING TO THREAD MACHINE 16 B. REVERSE STITCHING 19 C. USING THE OVERCASTING FOOT 29 B. NOTE 29
BLIND HEM STITCHING 30 PATCH WORK 31 APPLIQUE 31 INSERTING ZIPPERS CENTERED INSERTION 32 LAPPED INSERTION 33
To stitch around the zipper tab: (Diagram A 33
BUTTONHOLE SEWING 34...
Instruction Manual - Page 4
... connected to the terminal which is marked with letter L or colored red. This machine intended for radio and television interference with the International Electrotechnical Commission requirements ...for your purchase of this sewing machine.
This appliance is used , a 3 Amp.
fuse must be fitted either in sewing from light to heavy material. To get the most modern sewing capabilities,...
Instruction Manual - Page 9
... the power line cord to persons. 1. Turn on
machine. 3. The harder you press the foot controller, the
faster the machine will stop when foot controller is turned on cord. To reduce the risk of start /stop and speed with this machine from outlet. A lamp will permit control of electric shock, this plug is connected, start , stop button will light...
Instruction Manual - Page 14
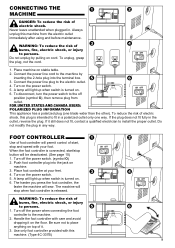
... spool cap direction according to the size of the thread and start the machine by pressing the start/stop button or pressing the foot controller pedal. 6.After the bobbin winds a few turns, stop the machine by pressing the start/stop automatically when bobbin is full. (Release the pedal.) 9.Push the bobbin and spindle to the left to right. 3.Bring...
Instruction Manual - Page 18

... to sew straight stitch when power switch is turned on the left side of the machine. (See page 11) NOTE After you can regulate the sewing speed by pressing the slow button. 4. You can reduce the sewing speed by sliding the speed control button. Press the thread cutter button. 6. START AND END OF SEAM 1. Raise the presser foot lifter and...
Instruction Manual - Page 19
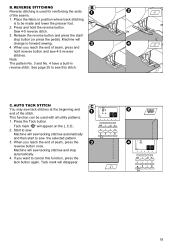
...press and hold the reverse button.
Start to sew this function, press the tack button again. REVERSE STITCHING Reverse stitching is to forward sewing. 4. Sew 4-5 reverse stitch. 3. C. B.
Machine will change to be used for reinforcing the ends of the stitch. Press the Tack button. Machine will sew tacking stitches and stop button (or press the pedal). AUTO TACK STITCH You may...
Instruction Manual - Page 25
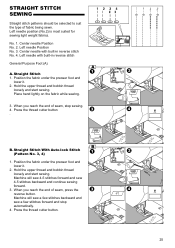
...thread and bobbin thread
loosely and start sewing. No. 1.
Machine will sew a few stitches backward and sew a few stitches forward and stop sewing. 4. Left needle Position No. 3. Position the fabric under the presser foot and lower it . 2. Hold the upper thread and bobbin thread loosely and start sewing. Press the thread cutter button.
25 Center needle with built...
Instruction Manual - Page 26

... many times as you need to the basting position. Note: To prevent the fabric layers from your left .
2. B. ATTACHING THE DARNING/ EMBROIDERY FOOT
1. Repeat...sew. Hold the upper thread and bobbin thread
loosely and start to the rear and sew one stitch only. 3. Remove the presser foot and holder. (See page 7)
3. CAUTION: To prevent accidents. No. 5 Basting Stitch
Darning/Embroidery Foot...
Instruction Manual - Page 39

... a thread shank to the wrong side of the foot from the fabric. Insert a straight pin or sewing machine needle under the center slit of fabric. Align two holes of the button with slot of button.
4. Make sure that the needle enters the left .
2. Note: To sew a 4-hole button, follow the procedure above for the first two holes...
Instruction Manual - Page 48
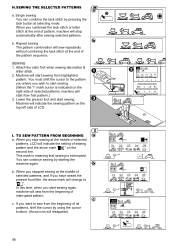
..., LCD will sew from highlighted
pattern. Single sewing You can continue sewing by using the cursor buttons. (Arrow icon will start from the beginning of interrupted pattern. Attach the satin foot when sewing decorative &
letter stitch. 2. This mark is meaning that sewing is indicated on the right side of selected patterns, machine will disappear)
48
Repeat sewing The pattern...
Instruction Manual - Page 52

... the needle up-down / slow button.
12
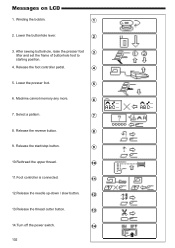
13.Release the thread cutter button.
13
14.Turn off the power switch.
14
52 Winding the bobbin.
1
2. Lower the presser foot.
5
6. Machine cannot memory any more.
6
7. Release the reverse button.
8
9. After sewing buttonhole, raise the presser foot
3
lifter and set the frame of buttonhole foot to
starting position.
4. Messages on LCD...
Instruction Manual 2 - Page 3

...-HAND EMBROIDERY 84 D. SELECTING DECORATIVE & LETTER STITCH (selecting mode 88
B. OPENING THE ACCESSORY CASE 14
CHANGING THE PRESSER FOOT 14
A. PATTERN CHART 24 D. UTILITY STITCH BUTTON 24 F. DRAWING UP THE BOBBIN THREAD 34
STARTING TO SEW 36
A. WIDTH OF SEAM ALLOWANCE 40
THREAD TENSION 42 SELECTING UTILITY STITCH PATTERN ....... 44
A. USING THE GENERAL PURPOSE...
Instruction Manual 2 - Page 8
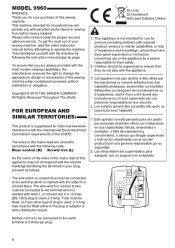
...marked with letter L or colored red. Fuse must be supervised to ...9960
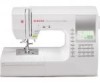
PREFACE Thank you with excellent performance in sewing from light to heavy material.
If a 13 Amp. (BS 1363) plug is not intended for your purchase of a three-pin plug.
8 Neither cord is to be fitted, or if any other type of plug is colored brown must be connected to this sewing machine.
This machine...
Instruction Manual 2 - Page 18
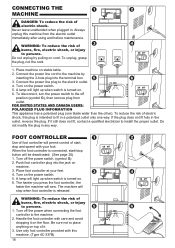
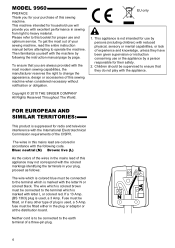
...permit control of foot controller will light up when switch is connected, start , stop button will sew. Do not unplug by
inserting the 2-hole plug into the jack on the power switch. 5. Turn... If it . 3. FOOT CONTROLLER
Use of start /stop and speed with this machine from outlet. When the foot controller is turned on the power switch. 5. Turn off the power switch. (symbol O) ...
Instruction Manual 2 - Page 36
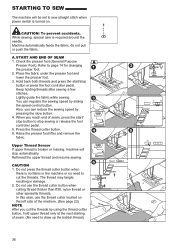
... and remove the fabric. Do not press the thread cutter button when
there is turned on the left side of seam, press the start /stop button or press the foot controller pedal. Machine automatically feeds the fabric, do not pull or push the fabric. START AND END OF SEAM 1.
STARTING TO SEW
The machine will stop sewing or release the foot controller pedal. 5.
Instruction Manual 2 - Page 38

... function can be made and lower the presser foot. 2. Machine will sew tacking stitches automatically and then start /
stop automatically. 4. When you reach the end of the stitch. AUTO TACK STITCH You may sew tack stitches at the beginning and end of seam, press the reverse button once. Start to be used for reinforcing the ends of...
Instruction Manual 2 - Page 50
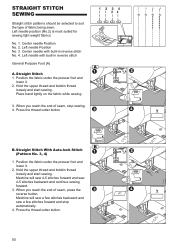
... upper thread and bobbin thread
loosely and start sewing.
When you reach the end of seam, stop automatically.
4. Press the thread cutter button.
50 Center needle Position No. 2. Position the fabric under the presser foot and lower it . 2. B. Machine will sew a few stitches backward and sew a few stitches forward and stop sewing. 4. Place hand lightly on the fabric...
Instruction Manual 2 - Page 52

... can baste a garment before trying it . 2. BASTING When this as many times as you need to finish the seam. 5. Place the fabric under the presser foot and
lower it on. Raise the fabric feed dogs for next regular sewing. Tighten the presser foot thumb screw. Be sure the needle does not hit the dress...
Instruction Manual 2 - Page 96
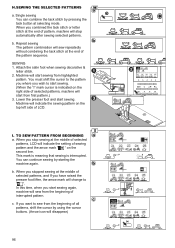
... the cursor by using the cursor buttons. (Arrow icon will indicate the sewing pattern on the right side of selected patterns, and If you have raised the presser foot lifter, the arrow mark will change to sew from the beginning of LCD. Lower the presser foot and start sewing from first pattern.) 3. b. Machine will disappear)
96 If you...
Instruction Manual 2 - Page 102
... foot controller pedal.
4
5. Select a pattern.
7
8. Machine cannot memory any more.
6
7. Messages on LCD
1. After sewing buttonhole, raise the presser foot
3
lifter and set the frame of buttonhole foot to
starting position.
4. Lower the presser foot.
5
6. Lower the buttonhole lever.
2
3. Release the start/stop button.
9
10.Rethread the upper thread.
10
11.Foot...
Similar Questions

Why Is My Singer Quantum Stylist 9960 Stuck In Reverse Sewing
(Posted by kelsydan1 1 year ago)

Quantum 9960, Thread Balls Up
thread balls up under plate. Have to tear fabric to get it out. Also the bar that goes across the bo...
thread balls up under plate. Have to tear fabric to get it out. Also the bar that goes across the bo...
(Posted by Sisbankssb 4 years ago)

Bobbin Case On Singer 9960 Quantum Stylist Noisey
when I sew I hear a clicking sound and some rattling of the bobbin occurs. more so when I sew on the...
when I sew I hear a clicking sound and some rattling of the bobbin occurs. more so when I sew on the...
(Posted by sdshowen 8 years ago)

My Futura Xl550 Will Sew With Foot Pedal But Won't Work With Automatic Button Th
Singer futura xl550 looks as though everything is fine but I can't use the back stitch thread cutter...
Singer futura xl550 looks as though everything is fine but I can't use the back stitch thread cutter...
(Posted by lnmboutique 10 years ago)

Does This Sewing Machine Work In Australia As We Have 220 V Here Please
(Posted by jennymonte 11 years ago)