Singer 9100 Professional Support Question
Singer 9100 Professional Support Question
Find answers below for this question about Singer 9100 Professional.Need a Singer 9100 Professional manual? We have 2 online manuals for this item!
Question posted by pam2056 on January 17th, 2021
Automatic Buttonholes
Hi. Im trying to do buttonholes with the buttonhole foot. It does the left side correct then the right side it does very small stitches back to the start. It then continues sewing in the same spot. Pam Singer Stylist 9100
Current Answers
Related Singer 9100 Professional Manual Pages
Instruction Manual - Page 4
...
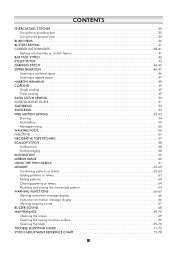
OVERCASTING STITCHES 35 Using the overcasting foot 35 Using the all purpose foot 35
BLIND HEMS 36 BUTTON SEWING 37 CORDED BUTTONHOLES 38-41
Making a buttonhole on stretch fabrics 41 BAR TACK STITCH 42 EYELET STITCH 43 DARNING STITCH 44-45...the screen 69 Cleaning the sewing machine surface 69 Cleaning the hook 69-70 TROUBLE SHOOTING GUIDE 71-72 STITCH ADJUSTMENT REFERENCE CHART 73-78
Instruction Manual - Page 5
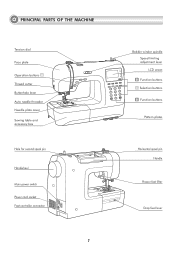
PRINCIPAL PARTS OF THE MACHINE
Tension dial Face plate Operation buttons A Thread cutter Buttonhole lever Auto needle threader Needle plate cover Sewing table and accessory box
Hole for second spool pin
Handwheel Main power switch Power cord socket Foot controller connector
1
Bobbin winder spindle Speed limiting adjustment lever LCD screen
B Function buttons C Selection buttons B Function...
Instruction Manual - Page 6
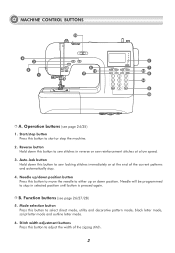
... letter mode and outline letter mode.
6. B. Mode selection button Press this button to start or stop in reverse or sew reinforcement stitches at the end of the zigzag stitch.
2 Function buttons (see page 24/25)
1. Start/stop button Press this button to stop the machine.
2. MACHINE CONTROL BUTTONS
15
4 3
2 1
6
START STOP
12
11
1
2
3
4
5
6
7
8
9
0
5 7 13 8 14
9 10...
Instruction Manual - Page 9

... SCREEN
Pattern
Reverse Auto-lock Needle up
position
Twin needle
Suggested presser foot and identification letter
Bobbin winding
Buttonhole lever Sound on
Pattern
Needle position
Tension
Stitch length
Auto-stop Mirror
Needle down position
Pattern number
Sound off
Alphabet
Stitch width Stitch length
Suggested presser foot and identification letter
Pattern number
Stitch width
Tension
4
Instruction Manual - Page 13
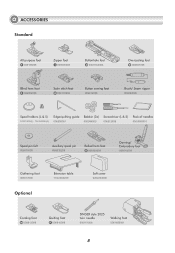
ACCESSORIES Standard
All purpose foot
T 006186008
Zipper foot
I 006905008
Buttonhole foot
D 006H1A0004
Overcasting foot
E 006907008
Blind hem foot
F 006904008
Satin stitch foot
A 006172008
Button sewing foot
006914008
Brush/ Seam ripper
006099008
Spool holders (L & S) Edge/quilting guide Bobbin (3x) Screwdriver (L & S) Pack of needles
R12373209(L) TA10943209(S) 006008001
006084009
...
Instruction Manual - Page 16
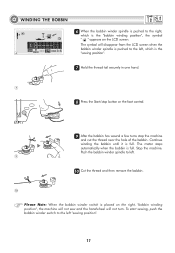
... symbol " " appears on the right, "bobbin winding position", the machine will not sew and the handwheel will disappear from the LCD screen when the
bobbin winder spindle is pushed to the left, which is the
6
"sewing position".
7 Hold the thread tail securely in one hand.
7
8 Press the Start/stop button or the foot control.
8
9 After the bobbin...
Instruction Manual - Page 26
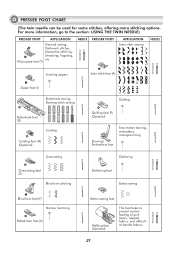
... fabrics.
21 For more stitching options. All purpose foot (T)
NEEDLE
PRESSER FOOT
APPLICATION Satin stitch sewing
NEEDLE
Inserting zippers
Satin stitch foot (A)
Zipper foot (I)
Buttonhole sewing, Darning-stitch sewing
Buttonhole foot (D)
Cording
Cording foot (M) (Optional)
Overcasting
Quilting
Quilting foot (P) (Optional)
Darning/ Embroidery foot
Free-motion darning, embroidery...
Instruction Manual - Page 29
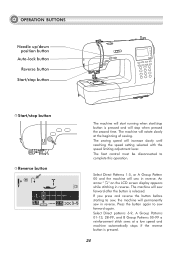
... while stitching in reverse. If you press and reverse the button before starting to sew, the machine will increase slowly until reaching the speed setting selected with the speed limiting adjustment lever. The machine will stop button is pressed and will rotate slowly at a low speed and machine automatically stops if the reverse button is released. The foot...
Instruction Manual - Page 30
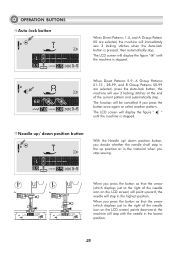
... Direct Patterns 1-4, and A Group Pattern 00 are selected, press the Auto-lock button, the machine will sew 3 locking stitches at the end of the current pattern and automatically stop.
When you press the button so that the arrow (which displays just to the right of the needle icon on the LCD screen) points downward, the...
Instruction Manual - Page 37
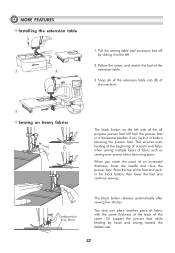
... push in before lowering the presser foot. Pull the sewing table and accessory box off by hand and sewing toward the folded side.
32 A
B
3
Sewing on heavy fabrics
The black button on the left .
2. Press the toe of the seam. Cardboard or thick fabric
The black button releases automatically after sewing few stitches. You also can place another...
Instruction Manual - Page 42
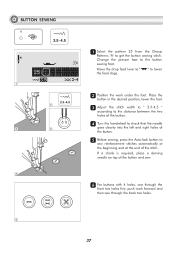
... the button sewing foot. Place the
button in the desired position, lower the foot.
3 Adjust the stitch width to " 2.5-4.5 "
according to the distance between the two holes of the button.
4 Turn the handwheel to check that the needle
goes cleanly into the left and right holes of the button and sew.
6 For buttons with 4 holes, sew through the...
Instruction Manual - Page 43
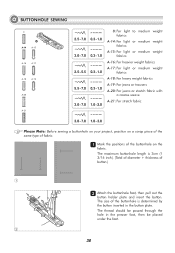
... on a scrap piece of the same type of fabric.
1 Mark the positions of button.)
1
2 Attach the buttonhole foot, then pull out the
button holder plate and insert the button. BUTTONHOLE SEWING
0
A-14
D A-15
A-16
A-17
A-18
A-19
A-20
A-21
2.5~7.0 0.3~1.0 3.0~7.0 0.3~1.0 2.5~5.5 0.3~1.0 5.5~7.0 0.3~1.0 3.0~7.0 1.0~2.0
0: For light to medium weight fabrics
A-14: For light or medium...
Instruction Manual - Page 44
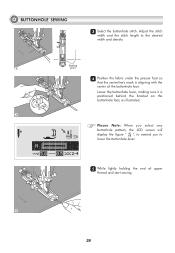
BUTTONHOLE SEWING
3 Select the buttonhole stitch. Lower the buttonhole lever, making sure it is aligning with the center of upper
thread and start sewing.
5
39
Adjust the stitch
width and the stitch length to lower the buttonhole lever.
5 While lightly holding the end of the buttonhole foot. Starting
3
point
4 Position the fabric under the presser foot so
that the centerline's ...
Instruction Manual - Page 46
... on the backside of the fabric.
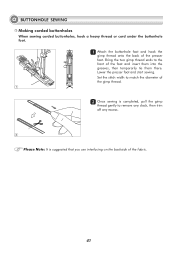
41 BUTTONHOLE SEWING Making corded buttonholes
When sewing corded buttonholes, hook a heavy thread or cord under the buttonhole foot.
1 Attach the buttonhole foot and hook the
gimp thread onto the back of the foot and insert them into the grooves, then temporarily tie them there. Set the stitch width to match the diameter of the...
Instruction Manual - Page 47
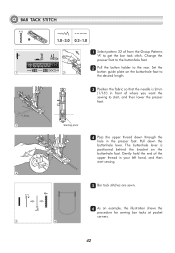
... for sewing bar tacks at pocket corners.
5
6
42 The buttonhole lever is 2mm
(1/16") in the presser foot. Change the presser foot to the buttonhole foot.
22 Pull the button holder to get the bar tack stitch. Gently hold the end of the upper thread in your left hand, and then start , and then lower the presser foot.
2mm 3
4
Starting point...
Instruction Manual - Page 48

Small: 5.0mm (3/16 inch).
2
33 Lower the needle into the fabric at the center using an eyelet
punch.
* Eyelet punch is completed, the machine automatically sews reinforcement stitches, then stops.
3
44 Make a hole at the
beginning of eyelet.
EYELET STITCH
A-23
A-24
A
5.0 6.0 7.0
A-23: Select for sewing eyelets on belts , etc A-24: Select for sewing eyelets on belts , etc...
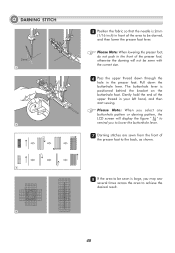
Instruction Manual - Page 49
... the desired length.
3
Stop
Stop
a
a
Start b
4
Start b
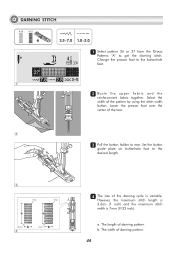
44. Change the presser foot to get the darning stitch. Lower the presser foot over the center of darning pattern.
44
b. DARNING STITCH
A-26
A-27
D
3.5~7.0 1.0~2.0
11 Select pattern 26 or 27 from the Group
Patterns "A" to the buttonhole foot.
1
22 B a s t e t h e u p p e r f a b r i c a n d t h e
reinforcement fabric...
Instruction Manual - Page 50
... the buttonhole foot. Please Note: When you select any buttonhole pattern or darning pattern, the LCD screen will not be sewn with the correct size.
66 Pass the upper thread down the buttonhole lever. Please Note: When lowering the presser foot, do not push in the front of the upper thread in your left hand, and then start sewing.
Instruction Manual - Page 52
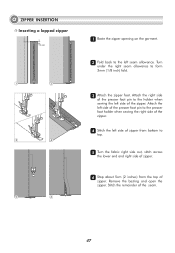
... of
zipper. Attach the left side of the presser foot pin to the presser foot holder when sewing the right side of the zipper.
44 Stitch the left side of zipper from the top of the seam.
47 Remove the basting and open the zipper. Attach the right side
of the presser foot pin to form 3mm (1/8 inch) fold...
Instruction Manual - Page 61

... screw.
- Your
sewing machine offers excellent stitch quality
1
on your machine. WALKING FOOT
1
* The Walking foot is fitted onto the presser
foot bar.
- a b
22 Remove the presser foot holder by
unscrewing (...foot attachment.
56 It is easier to
right, so that it is an optional accessory. Lower the presser foot bar.
- It also helps to prevent uneven feeding of fabrics from left...
Similar Questions

I Can't Get The Buttonhole Foot To Work Properly
I cannot get the foot to make a proper buttonhole. It makes the stitches correctly, but does not sha...
I cannot get the foot to make a proper buttonhole. It makes the stitches correctly, but does not sha...
(Posted by aagray2 8 years ago)

Singer 9100 Sewing Machine
Brand new machine, on switch on, loud noise, needle area seems to vibrate, unable to sew, help.
Brand new machine, on switch on, loud noise, needle area seems to vibrate, unable to sew, help.
(Posted by jimluisanelson 8 years ago)

9100 Need Bobbins
I need to buy more bobbins for a 9100 sewing machine. how do I know which ones to buy?
I need to buy more bobbins for a 9100 sewing machine. how do I know which ones to buy?
(Posted by luvbabyfeet40 10 years ago)

Singer Professional 9100...bobbin Trouble
I constantly have to thead then re thread machine....careful to follow instructions. Still a mess. T...
I constantly have to thead then re thread machine....careful to follow instructions. Still a mess. T...
(Posted by Motherofmen 10 years ago)