Singer 8768 HERITAGE Support Question
Singer 8768 HERITAGE Support Question
Find answers below for this question about Singer 8768 HERITAGE.Need a Singer 8768 HERITAGE manual? We have 1 online manual for this item!
Question posted by jkbp on September 30th, 2014
12 Of The Stitch Buttons Won't Work. 2nd And 4th Rows. Machine Is New.
The person who posted this question about this Singer product did not include a detailed explanation. Please use the "Request More Information" button to the right if more details would help you to answer this question.
Current Answers
Answer #1: Posted by TechSupport101 on September 30th, 2014 5:14 PM
TechSupport101

Member since:
May 24th, 2013 Points: 12,171,305

Member since:
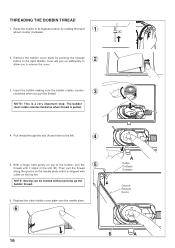
May 24th, 2013 Points: 12,171,305
Related Singer 8768 HERITAGE Manual Pages
Instruction Manual - Page 2

...sewing machine is not working properly, if it must be supervised to ensure that on cord. "T his appliance is damaged, it has been dropped or damaged, or dropped into water. "Never operate this manual. "Never operate the sewing machine... only." 9. "Do not pull or push fabric while stitching. "Always unplug sewing machine from outlet." 11. "Caution - to the nearest authorized...
Instruction Manual - Page 5

... button 28 - 29
2. KNOWING YOUR SEWING MACHINE Machine identification 6 - 7 Accessories 8 - 9 Setting up your machine 10 - 11 Spool pins 12 - 13 Presser foot lifter, Feed dog control 12 - 13 Converting to -sew fabrics
3. CARING FOR YOUR MACHINE Cleaning hook area and feed dogs 50 - 51
Cleaning the sewing machine and foot controller
4. STARTING TO SEW Quick reference table of stitch...
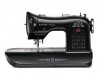
Instruction Manual - Page 8

...Cord socket
16. Reverse stitch button
11. Identification plate
17. Thread guide
22. Hand wheel
7
14. Twin thread guide
13
21. Bobbin winder stop
6
10. Horizontal spool pin
12. Bobbin cover plate
25. Thread cutter/holder
7. Foot release button
28. KNOWING YOUR SEWING MACHINE
MACHINE IDENTIFICATION
1. 1. Extension table release button
18. Needle
24.
Instruction Manual - Page 10

... (large) 8.
Needles 2. Auxiliary spool pin 4. Zipper foot 11. Satin stitch foot 12. especially honeycomb , star a etc. Spool pin cap (small) 6. Blindhem stitch foot 13. Buttonhole opener/seam ripper and brush 9. ACCESSORIES
1. Spool pin cap (medium) 7. Buttonhole foot
The foot that comes on your sewing machine is another very useful foot and should be sure they...
Instruction Manual - Page 14
... table removed the machine converts into place until it provides a large working surface as a ...12 They should be used .
To remove the extension table, hold it firmly with left while pushing the release button (A) with a beep sound to lower the presser foot to the right. NOTE: If you start the machine...CONVERTING TO FREE-ARM SEWING
Your machine can be placed to sew.
If the thread ...
Instruction Manual - Page 18
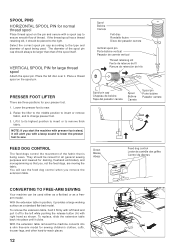
...in the slot (B). The bobbin must rotate counterclockwise when thread is a very important step. NOTE: Sewing can be started without picking up sufficiently to
2
allow you pull the thread.
3
NOTE: This... and then to the left . Raise the needle to its highest position by pushing the release button to remove the cover.
3. Remove the bobbin cover plate by rotating the hand
1
wheel counter ...
Instruction Manual - Page 26

... foot holder. 3.
Place the desired foot on top of the machine. Lower the presser foot lifter so that the machine is usually only desireable for straight stitch sewing.
Raise presser foot lifter. 1. Push presser foot release button to a higher number or a lower number may improve sewing appearance. ADJUSTING TOP THREAD TENSION
90% of your fabric. BOBBIN...
Instruction Manual - Page 28

... position Control.
The LED indicator above the stitch length or stitch width control buttons indicating the selected function.
Number display shows either stitch length or width depending on the stitch you may sew straight stitch.
At this point you choose. Note: Instructions for manual adjustments than others.
26
Stitch length control
Boutons d'ajustement manuel de la...
Instruction Manual - Page 30
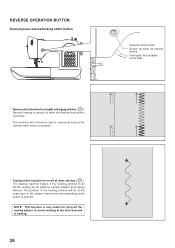
... arrière Interruptor de puntadas hacia atrás
* Reverse stitch function for straight and zigzag stitches ( ) Reverse sewing is carried out while the reverse stitch button is pressed.
* Tacking stitch function for tying off the sewing pattern to tie off of other stitches ( ) The sewing machine makes 4 tiny tacking stitches to avoid raveling at the exact spot in reverse as...
Instruction Manual - Page 34

... the weight of the fabric, slight "fine tuning" of the fabric, stop the sewing machine.
B
D
1.
Stitch length control E. Turn the hand wheel counter clockwise until the needle is at its... the needle enters the fabric.
5. NOTE: To secure the stitching and avoid raveling, press the reverse stitch button and sew a few stitches at its highest position, then raise the presser foot, draw...
Instruction Manual - Page 36

...until
you acheive the desired appearance. 4. NOTE: For a dramatic appearance, experiment with desired top stitching color. Attach the right side of the foot. PIPING Create a piping by covering a filler cord...seam tape for the piping.
Thread machine with a bias strip of the zipper foot. When
sewing, the machine will pull this thread to sew.
Helpful hint: Slight adjusting of the zipper...
Instruction Manual - Page 38

... en el centro
36 AUTO
The top thread may appear on the bottom depending on the thread, fabric, type of stitch and sewing speed, but the bobbin thread must never appear on the sewing machine.
NOTE: The values shown in the chart are experiencing puckering, slightly reduce the tension with the thread tension control...
Instruction Manual - Page 40
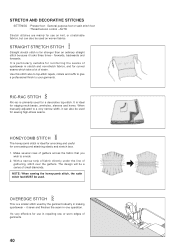
... heavyweight fabrics overcast the fabric's raw edge.
Turn the handwheel counter clockwise by hand until the needle swings fully to sew blind hems. Always make a sewing test first.
4
Top side Endroit Cara
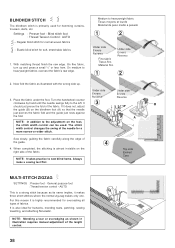
MULTI-STITCH ZIGZAG
SETTINGS :Presser foot - NOTE: It takes practice to the left. It is also ideal for hemming curtains, trousers...
Instruction Manual - Page 42
... and attaching elastic and stretch lace. 1. Make several rows of gathers across the fabric that you
wish to your garments. With a narrow strip of fabric directly under the line of garments.
40
OVEREDGE STITCH
This is far stronger than an ordinary straight stitch because it sews and finishes the seam in stretch and non...
Instruction Manual - Page 44
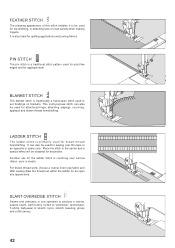
... thin tape in stretch nylon, stretch toweling, jersey and cotton jersey.
42 This multi-purpose stitch can also be obtained for the ladder stitch is also ideal for appliqué work , choose a coarse linen type fabric and after sewing draw the thread out within the ladder for attaching fringe, attaching edgings, couching, appliqué...
Instruction Manual - Page 46

...control -
Adjust width if required. DECORATIVE PATTERNS
SETTINGS :Presser foot -
Sew 10 stitches. AUTO
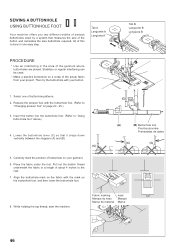
* Always practice on borders and for use in the stitch pattern. Be careful not to create holes in heirloom sewing. SEWING ON A BUTTON
SETTINGS :Presser foot - ENTREDEUX STITCH
Useful for decorative stitching on a scrap of the actual fabric from your project.
* Before starting...
Instruction Manual - Page 48
...tissu Marca de material
mark Marque Marca
46 While holding the top thread, start the machine. All of this is done in the area of the garment where buttonholes are ... buttonhole foot. (Refer to
"Changing presser foot" on the fabric with your button.
1. SEWING A BUTTONHOLE
USING BUTTONHOLE FOOT
Your machine offers you two different widths of bartack buttonholes sewn by a system that it ...
Instruction Manual - Page 50
... illustration.
Spur Saliente Tige
48
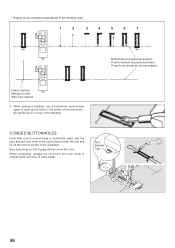
Be careful not to release slack and snip off the cord as shown in the center of the buttonhole. Sew buttonhole so that zigzag stitches cover the cord.
CORDED BUTTONHOLES
Hook filler cord (crochet thread or buttonhole twist) over the spur and pull both ends of the...
Instruction Manual - Page 54

... to the twin needle
mark prior to the back of the machine, leaving about 6" (15 cm) of the needle when sewing straight stitch may be used primarily for satin stitching. STRAIGHT STITCH NEEDLE POSITION
The position of thread. Closely spaced zig-zag stitches are available in broken needles and possible damage to 13 different positions with...
Instruction Manual - Page 58
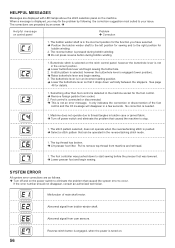
... follows. Turn off power switch and eliminate the problem that can be operated in the machine socket for sewing and to start sewing before the presser foot was lowered. Lower presser foot and begin sewing. 3.
Reverse stitch button is engaged, when the power is selected; The corrections are preceded by following the correction suggestion...
Similar Questions

Back Stitch Button Locks
When I use my reverse stitch it locks and will not stiforward. I turn it off and then it is OK. But ...
When I use my reverse stitch it locks and will not stiforward. I turn it off and then it is OK. But ...
(Posted by Sdlepal 1 year ago)

C2 Problem
I have a singer heritage sewing machine with 8768 number, I was sewing with no problems and suddenly...
I have a singer heritage sewing machine with 8768 number, I was sewing with no problems and suddenly...
(Posted by Karenglassbrenner 8 years ago)

The Only Stitch That My New Machine Will Do Is A Straight Stitch
(Posted by justshea 9 years ago)

Reverse Stitch Function Does Not Work
The reverse stitch function does not work. It just continues forward.
The reverse stitch function does not work. It just continues forward.
(Posted by wynakay 10 years ago)