Singer 8763 Curvy Support Question
Singer 8763 Curvy Support Question
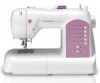
Find answers below for this question about Singer 8763 Curvy.Need a Singer 8763 Curvy manual? We have 1 online manual for this item!
Question posted by melodyhall on August 11th, 2014
I Put On The Zipper Foot And Now It Will Not Sew.
I put he zipper foot on the machine and now it hums and won't sew? what am I doing wrong?
Current Answers
Answer #1: Posted by sabrie on August 11th, 2014 9:22 PM
sabrie
Member since:
May 23rd, 2013 Points: 3,306,778

Member since:
May 23rd, 2013 Points: 3,306,778
How to use the zipper foot, check out the video on the link below.
http://m.youtube.com/watch?v=QiU-QI0koG4
http://m.youtube.com/watch?v=QiU-QI0koG4
www.techboss.co.za
Related Singer 8763 Curvy Manual Pages
Instruction Manual - Page 3
STARTING TO SEW Quick reference table of stitch length and width 30 - 31 Straight stitching 32 - 35
Keeping seams straight, Inserting zippers and piping Hand-...OF CONTENTS
1. KNOWING YOUR SEWING MACHINE Machine identification 6 - 7 Accessories 8 - 9 Setting up your machine 10 - 11 Spool pins 12 - 13 Presser foot lifter, Darning plate 12 - 13 Converting to free-arm sewing 12 - 13 Winding the...
Instruction Manual - Page 6
... 26 27 28 29 30
31
32
33
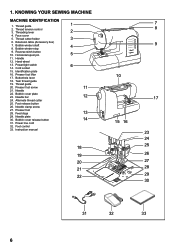
6 Bobbin winder shaft 8. Presser foot screw
11
21. Alternate thread cutter
25. Foot control
33. Buttonhole lever
18. Needle
22. Power line cord
32. Feed dogs
13
29. KNOWING YOUR SEWING MACHINE
MACHINE IDENTIFICATION
1. Presser foot lifter
17. Twin thread guide
19. Thread guide
1
2. Horizontal spool pin
5
11...
Instruction Manual - Page 8
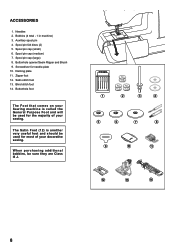
Spool pin cap (small) 6. Spool pin cap (medium) 7. Darning plate 11. Zipper foot 12. The Satin Foot (12) is called the General Purpose Foot and will be used for most of your Sewing machine is another very useful foot and should be sure they are Class I5 J.
1
2
3
4
5
6
7
8
9
10
11
12
13
14
8 ACCESSORIES
1.
Spool pin cap (large) 8.
Satin...
Instruction Manual - Page 12
... to its highest position to change the presser foot or to
remove thick fabric.
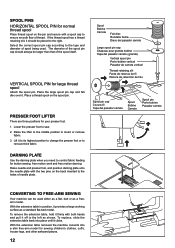
PRESSER FOOT LIFTER
There are three positions for button sewing, free motion work and free motion darning. Lift... to the middle position to sew. 2. VERTICAL SPOOL PIN for sewing children's clothes, cuffs, trouser legs, and other awkward places.
12 CONVERTING TO FREE-ARM SEWING
Your machine can be placed to the ...
Instruction Manual - Page 20
... hole,
adjust the position of sewing machine oil onto the felt disc,
if the machine is
in place. NOTE: Make sure that the machine be broken. 3.
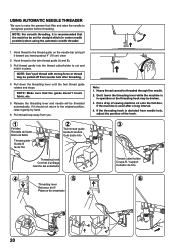
Pull down ...the threading lever until the twin thread guide rotates and stops.
USING AUTOMATIC NEEDLE THREADER
*Be sure to raise the presser foot...
Instruction Manual - Page 22
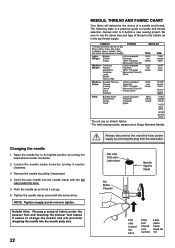
...fabrics. * For best sewing results, always use the same size and type of weight. Insert the new needle into the needle plate slot.
22
Always disconnect the machine from power supply by ... the top thread supply. Helpful Hint: Placing a scrap of fabric under the presser foot and lowering the presser foot makes it easier to its highest position by turning the hand wheel counter clockwise.
...
Instruction Manual - Page 24
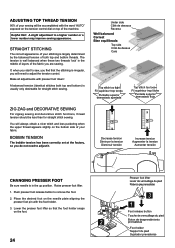
..." exposed on the tension control dial on top of the machine.
If, when you start to sew, you are sewing.
Raise presser foot lifter. 1. Push presser foot release button to a higher number or a lower number may improve sewing appearance. ADJUSTING TOP THREAD TENSION
90% of your sewing will always obtain a nicer stitch and less puckering when the...
Instruction Manual - Page 26
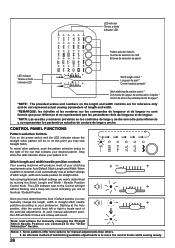
...lit. Some patterns offer more options for reference only and do not represent actual sewing parameters of determining available adjustments is selected, it will sound indicating you are easily ...stitch pattern will sound. Stitch length and width/needle position controls
Your sewing machine will produce most of the potential adjustments. The LED Indicator next to the Control will ...
Instruction Manual - Page 28
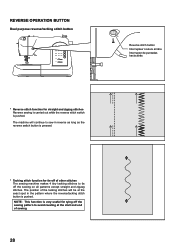
...: This function is very useful for tie-off of other stitches The sewing machine makes 4 tiny tacking stitches to tie off the sewing pattern to sew in the pattern where the reverse/tacking stitch button is pushed. The position of sewing.
28
The machine will continue to avoid raveling at the start and end of the...
Instruction Manual - Page 32
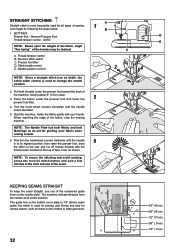
... 3/8" ( 9 mm) 1/4" ( 6 mm) NOTE: The Needle Plate has both threads under the presser foot and lower the
5
presser foot lifter.
4. Let's begin by following the steps below.
1
B
1.
Stitch length control E. First turn ...the start and end of sewing. AUTO
E
NOTE: Based upon the weight of the fabric, slight
"fine tuning" of the fabric, stop the sewing machine. KEEPING SEAMS STRAIGHT
To...
Instruction Manual - Page 34
... until
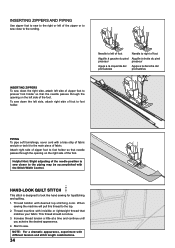
you acheive the desired appearance. 4. Attach right side of zipper foot to foot holder so that
matches your fabric. Start to the top. 2. INSERTING ZIPPERS AND PIPING
Use zipper foot to sew to the right or left of foot to foot holder.
When
sewing the machine will pull this thread to sew. This thread should not show. 3. HAND-LOOK QUILT STITCH...
Instruction Manual - Page 36
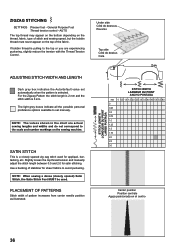
...default value set manualy. NOTE: The values shown in the chart are actual sewing lengths and widths and do not correspond to the top or you are ...sewing a dense (closely spaced) Satin Stitch, the Satin Stitch Foot MUST be used for appliqué, bartacking, etc. PLACEMENT OF PATTERNS
Stitch width of stitch and sewing speed, but the bobbin thread must never appear on the sewing machine...
Instruction Manual - Page 38
...fabric, turn up .
1
2
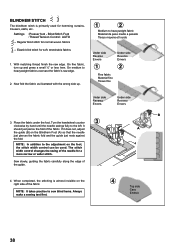
Medium to sew blind hems. Always make a sewing test first.
4
Top side Cara Endroit
38 It
should just pierce the fold of the guide.
Blind Stitch Foot : Thread Tension Control: AUTO
- On ...the Blindhem Foot (A) so that the needle
just pierces the fabric fold and the guide just rests against
the fold. Now fold the fabric as illustrated with the wrong side up...
Instruction Manual - Page 40
... of the length control.
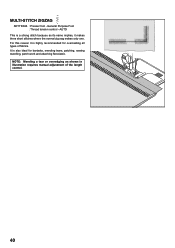
40 MULTI-STITCH ZIGZAG
SETTINGS :Presser foot -
General Purpose Foot :Thread tension control - For this reason it makes three short stitches where the normal zig-zag makes only one. AUTO
This is highly recommended for bartacks, mending tears, patching, sewing towelling, patch-work and attaching flat elastic. NOTE: Mending...
Instruction Manual - Page 50
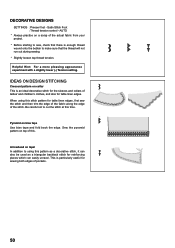
... then trim the edge of the fabric along the edge of pockets.
50 Satin Stitch Foot :Thread tension control - Arrowhead on lapel In addition to sew, check that there is particularly useful for table linen edges. Sew the pyramid pattern on collar This is an ideal decorative stitch for the sleeves and collars...
Instruction Manual - Page 54

... the size buttonhole required. Insert the button into the buttonhole foot. (Refer to "Changing presser foot" on a scrap of the actual fabric from your button.
1. Then try the buttonhole with the buttonhole foot. (Refer to "Using buttonhole foot" above.)
4. SEWING A BUTTONHOLE USING BUTTONHOLE FOOT
Your machine offers you two different widths of bartack buttonholes sewn by a system...
Instruction Manual - Page 56
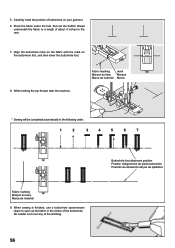
...length of about 4 inches to cut any of the stitching.
56
Buttonhole foot alignment position Position d'alignement du pied boutonnière Posición de ... start the machine. Fabric marking Marque du tissu Marca de material
mark Marque Marca
* Sewing will be completed automatically in the center of buttonhole on the buttonhole foot, and then lower the buttonhole foot.
8.
5. ...
Instruction Manual - Page 62
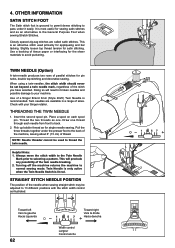
... an attractive stitch used to the General Purpose Foot when sewing Stretch Stitches. NOTE: Needle threader cannot be set beyond a twin needle mark, regardless of tissue paper or interfacing for pin tucks, double top stitching and decorative sewing. This is recommended. Turning off the machine returns the machine to selecting a pattern. Use a backing of the...
Instruction Manual - Page 64
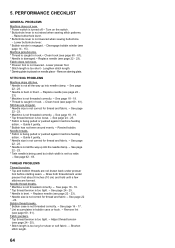
Disengage bobbin winder (see page 60 - 61). Fabric does not move. * Presser foot is too tight. - Lengthen stitch length. * Darning plate is placed on the switch. * Buttonhole lever is not raised when sewing stitch patterns.
- STITCHING PROBLEMS
Machine skips stitches. * Needle is too long for thread and fabric. - Guide it gently. * Bobbin has not...
Instruction Manual - Page 68
... risk of electric shock:"
1. "Do not use as a toy. reduce
risk
of
injury,
switch
off ("0") position, then remove plug from the accumulation of the sewing machine and foot control free from outlet." 9. Do not modify the plug in the outlet, reverse the plug. Keep ventilation openings of lint, dust, and loose cloth." 5.
"Read...
Similar Questions

Singer Sewing Machine 8763 Bobbin Thread Does Not Sew After Material Jam
(Posted by Anonymous-151081 9 years ago)

Is A Special Foot Required To Free Form Stitch On Singer Sewing Machine Model 55
(Posted by kopitkin 9 years ago)

Question For Future Singer Sewing Machine
My sewing machine keeps beeping and displays a "E1" I have re threaded a couple times??
My sewing machine keeps beeping and displays a "E1" I have re threaded a couple times??
(Posted by Nanalora13 9 years ago)

Something Is Wrong With The Straight Stitch.
My straight stitch seems to have problems even though I did everything I know to fix it. The upper t...
My straight stitch seems to have problems even though I did everything I know to fix it. The upper t...
(Posted by nafangr 10 years ago)

My Curvy 8763 Wont Sew. Reverse Button Seems To Be Stuck In On Position.
lights flashing wont sew reverse button stuck in on position
lights flashing wont sew reverse button stuck in on position
(Posted by sandygregson 11 years ago)