Singer 2250 Tradition Support Question
Singer 2250 Tradition Support Question
Find answers below for this question about Singer 2250 Tradition.Need a Singer 2250 Tradition manual? We have 1 online manual for this item!
Question posted by nafangr on November 27th, 2013
Something Is Wrong With The Straight Stitch.
My straight stitch seems to have problems even though I did everything I know to fix it. The upper thread appears totally tight and the down thread does big loops... Every stitch and a loop for the down thread, while the upper thread continues to be almost a perfect line, as if it was never stiched, as if we just put the thread in a very straight line ontop of the fabric. I did move the numbers to bigger ones, even to number 7, nothing changed. I did change the needle, still nothing. I id clean very thoroughly the whole machine, still... nothing... What might be wrong? Is it the time for Lady M (my sewing machine) to be taken for service? I have her since February 2012 and she never had a service, but there was no need. I take a very good care of her. Please, any ideas?
Current Answers
Related Singer 2250 Tradition Manual Pages
Instruction Manual - Page 2

...threading needle, changing needle, threading bobbin, or changing presser foot, and the like.
10. The wrong plate can cause the needle to persons: 1. Switch the sewing machine off the machine or unplug when the machine is fixed...SAVE THESE INSTRUCTIONS
This sewing machine is
75dB(A). 17. Never operate this manual. 3.
Do not pull or push fabric while stitching. Do not unplug...
Instruction Manual - Page 6
... 20 Inserting and changing needles 22 Threading the upper thread 24 Thread tension 26 Raising the bobbin thread 28 Reverse sewing/ Removing the work/ Cutting the thread...30 Matching needle/ fabric/ thread 32 How to choose your pattern 36 Straight stitch and needle position 38
Zig-zag stitching 40 Blind hem/ Lingerie stitch 42 Sewing on buttons 44 Sew 4-step buttonholes 46 Zippers and...
Instruction Manual - Page 9

GB Principal parts of the machine
1. Thread tension dial
7
2. Presser foot
5. Reverse sewing lever
10
8. Thread cutter
2
9
4. Bobbin stopper
4
9. Stitch length dial
10. Pattern selector dial 5
6
2 Thread take-up lever
1
8
3. Removable extension table/ accessory storage
3
7. Needle plate
6.
Instruction Manual - Page 11

Bobbin winder
12
13. Presser foot lever
15
22. Foot speed control
23. Power and light switch
14
20
16. Bobbin thread guide 21
18. Handwheel
13
19
15. Main plug socket
17. Face plate
20. Upper thread guide
19. GB Principal parts of the machine
11. Handle
21. Hole for second spool pin
18
14. Power cord 16
22
23
4 Horizontal spool pin
11
17
12.
Instruction Manual - Page 13

Button sewing foot e. Satin stitch foot r. Zipper foot c. L-screwdriver f. Bobbin (3x) j. Hemmer foot p. Second spool pin t. Buttonhole foot d. Oil bottle h. Pack of needles I. Edge/ quilting guide k. they are not supplied with this machine; Seam ripper/ brush g. Darning plate l. Spool pin felt
6 All purpose foot b. Spool holder
Optional accessories (2) (These 8 ...
Instruction Manual - Page 31
6
43
2
8
7
5
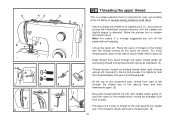
GB Threading the upper thread
This is a simple operation but it is strongly suggested you turn off the spool as illustrated. (4)
- Note: For safety, it is helpful to back.
5
6
7
8
- Place the spool of thread to carry out correctly as by not doing so several sewing problems could result.
1
- Thread tension module by raising the needle to its...
Instruction Manual - Page 33

... the tension is important to good sewing. -
Proper setting of your fabric.
26 B. Jerk it does not unwind at all decorative sewing you will unwind by the thread. Thread tension too tight for straight stitch sewing. - If the tension is correct, the thread will always obtain a nicer stitch and less fabric puckering when the upper thread appears on the bottom side of the...
Instruction Manual - Page 37
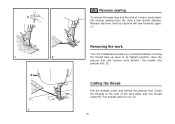
Pull threads down the reverse sewing lever (A). Sew a few reverse stitches. Release the lever and the machine will sew forwards again. (1)
Removing the work
Turn the handwheel toward you (counterclockwise) to bring the thread take up lever to cut. (3)
30 Guide the threads to the side of a seam, press down to its highest position, raise the presser foot and...
Instruction Manual - Page 45

For a fine stitch set stitch length to the straight stitch position. For gathering, set length at "1" or "2". You can select center or right needle position. Generally speaking, the thicker the fabric and needle, the longer the stitch should be. For thick fabrics, set to "4". GB Straight stitching and needle position
Turn the pattern selector dial so that the...
Instruction Manual - Page 53

...sew over the heavy thread or cord. (A)
46 Measure diameter and thickness of the buttonhole foot. Place fabric under the foot, so that the buttonhole center line marked on fabric. Adjust the stitch length dial in steps 2 and 4. Take care not to sew too many stitches in the " " to set stitch density. GB Sew... the fabric. Slightly reducing upper thread tension will produce better
results. -
Instruction Manual - Page 55

... and continue to zipper foot. It is also possible to form a "welt" or piping. (2)
1
2
48 Set stitch length control between "2.5" -
The zipper foot can be attached right or left, depending on " ". Change to sew. GB Zippers and piping
Set the machine as illustrated. "4" (according to thickness of the foot you are going to...
Instruction Manual - Page 57

..., as well as pocket openings. GB Multi-stitch zig-zag
For sewing on both sides. For mending:
Place patch in position. Set the stitch length dial to " " or " ".
This seam should be varied by adjusting the stitch length. First sew over the straight stitch.
Set stitch to secure ends.
1
2
50 The stitch length can be approximately 1/4 to 1/2 of backing...
Instruction Manual - Page 59

... and batting together.
52 A darning hoop is accomplished without the sewing machine internal feed system. Stippling: Sew a straight stitch. Using the optional darning foot will help guide you sew, in a meandering fashion to create small curving lines to hold layers of the hole (to secure the threads). (5) First row: Always work by the operator. Note: Free motion...
Instruction Manual - Page 65

GB Quilting functions
* The Quilting foot is used to produce perfect 1/4" seams.
Use it to seam squares or patches and for channel quilting. This foot is an optional accessory not included with your machine. The quilting guide supplied with your machine will help you sew straight, perfectly parallel lines.
58
Instruction Manual - Page 67
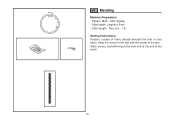
Stitch across, backstitching at the start and at the end of the tear. GB Mending
Machine Preparation: - Align the center of the foot with the center of the seam.
60 Stitch width: Largest 4.5mm - Stitch length: Fine (0.5 - 1.0) Sewing Instructions: Position a piece of fabric directly beneath the tear in your fabric. Pattern: Multi - stitch Zigzag -
Instruction Manual - Page 69

Pattern: Straight Stitch - Stay stitch along the edge of the area 1/4 of an inch from the edge of the seam.
62 Stitch length: 1.5mm (fine) Sewing Instructions: Stay-stitching is used to reinforce curves such as armholes, seams in stretch fabrics, and other areas to prevent stretching. GB Stay-stitching
Machine Preparation: -
Instruction Manual - Page 71

... Stitch Length: 2 - 3 Sewing Instructions: To mark pintucks in the same direction for each tuck. Fold and press wrong sides together on pulled thread line or marked lines. Repeat, sewing in your fabric, either pull a thread to mark the fold or mark with chalk or marking pencil. Stitch 1/8 of an inch from fold line. GB Traditional pintucks
Machine Preparation: - Pattern: Straight...
Instruction Manual - Page 73

... it's highest, raise the presser foot and pull the upper and lower threads to sew the length required. Cut your fabric the required amount by backstitching and then continue to the back of stitching. Pattern: Straight Stitch - Sewing Instructons: Use this procedure once again at 1/4 of thread. GB Gathering
Machine Preparation: - Once the two rows are completed, draw in...
Instruction Manual - Page 77
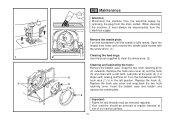
...
(5) and clean with sewing machine oil. Lubricate at
one of our service centers.
70 Turn the handwheel until the needle is in the left position. Your machine should be serviced at regular... lint and threads must always be removed regularly. When cleaning the machine, it must be disconnected from the main socket. GB Maintenance
Attention: Disconnect the machine from the electrical...
Instruction Manual - Page 79
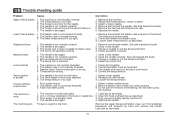
... 2. The machine is too tight.
1. Choose a needle to suit the thread and fabric. 4. Correct the thread tension.
1. Poor quality thread. 2. Remove and reinsert the needle. (flat side towards the back) 5. The wrong size or type of needle has been used .
3. Thread the bobbin case as described.
2. Readjust the stitch length. 3. Do not pull on the fabric while sewing, let...
Similar Questions

I Get E7 Error Message On My Singer Model 7258 Sewing Machine. There Is No Refe
Error message E7 is up on my Singer Stylist model 7258 sewing machine. It is not working at all. I t...
Error message E7 is up on my Singer Stylist model 7258 sewing machine. It is not working at all. I t...
(Posted by ebellamybellamy9 5 years ago)

Thread Questions
The thread is gathering at the bobbin on my singer tradition 2273 what am i doing wrong please.I hav...
The thread is gathering at the bobbin on my singer tradition 2273 what am i doing wrong please.I hav...
(Posted by ianrcox56 7 years ago)

Beeping From Singer Sewing Machine Stylist Ii 5625
My sewing machine will beep and stop sewing after three inches of sewing. I have taken it to be repa...
My sewing machine will beep and stop sewing after three inches of sewing. I have taken it to be repa...
(Posted by arusheria 9 years ago)

Sewing Elastics Into Lycra
When sewing the elastic int the leotard the zig zag stitch is gather at the back making the stitch l...
When sewing the elastic int the leotard the zig zag stitch is gather at the back making the stitch l...
(Posted by sampennisi 10 years ago)

Please Help
What stitch and tension should i use if I'm trying to sew oilcloth with a singer tradition 2250 sewi...
What stitch and tension should i use if I'm trying to sew oilcloth with a singer tradition 2250 sewi...
(Posted by Anonymous-93802 11 years ago)