Singer 8763 Curvy Support Question
Singer 8763 Curvy Support Question
Find answers below for this question about Singer 8763 Curvy.Need a Singer 8763 Curvy manual? We have 1 online manual for this item!
Question posted by sandygregson on April 9th, 2013
My Curvy 8763 Wont Sew. Reverse Button Seems To Be Stuck In On Position.
lights flashing wont sew reverse button stuck in on position
Current Answers
Related Singer 8763 Curvy Manual Pages
Instruction Manual - Page 3
...than 70db(A)
3 OTHER INFORMATION Satin stitch foot, Twin needle, Straight stitch needle position 62 - 63
5. PERFORMANCE CHECKLIST 64 - 65
For European version
Dimensions: 449...Sewing on a button 52 - 53 Sewing a buttonhole 54 - 59
Using buttonhole foot, Procedure, Corded buttonholes
3. KNOWING YOUR SEWING MACHINE Machine identification 6 - 7 Accessories 8 - 9 Setting up your machine...
Instruction Manual - Page 6
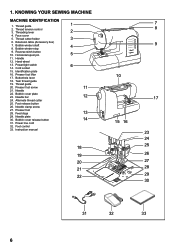
.... Needle plate 30. KNOWING YOUR SEWING MACHINE
MACHINE IDENTIFICATION
1. Thread guide
1
2. Threading lever
2
4. Extension table (Accessory box)
7. Power/light switch 14. Identification plate
16. Presser...28 29 30
31
32
33
6 Reverse stitch button 10. Handle
12. Hand wheel
13. Thread guide
20. Bobbin cover plate 23. Foot release button
26. Foot control
33. Cord ...
Instruction Manual - Page 8
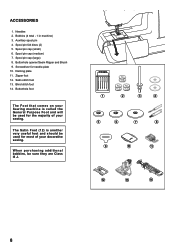
... Ripper and Brush 9.
Zipper foot 12. Satin stitch foot 13. When purchasing additional bobbins, be used for the majority of your sewing. Buttonhole foot
The Foot that comes on your Sewing machine is another very useful foot and should be sure they are Class I5 J.
1
2
3
4
5
6
7
8
9
10
11
12
13
14
8 Spool pin cap...
Instruction Manual - Page 12
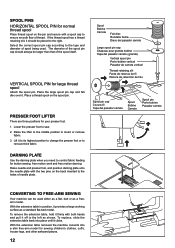
... thread spool has a thread retaining slit, it to its highest position to change the presser foot or to control fabric feeding for button sewing, free motion work and free motion darning.
Place a thread spool...to the holes of the spool pin cap should be placed to sew. 2.
bed or as shown. With the extension table removed the machine converts into place until it off to the left as a ...
Instruction Manual - Page 14

... spool pin cap. Pull the thread out from top of bobbin. Push bobbin winder shaft to far left to the left position, if it through the hole in illustration.
1
2. Start machine. Push shaft to remove
bobbin and cut
4
the thread tail. Hold onto end of thread on the foot control again to...
Instruction Manual - Page 16

Bobbin cover will pop up the bobbin thread.
6. NOTE: Sewing can be started without picking up sufficiently to
2
allow you ... the hand
1
wheel counter clockwise.
2. THREADING THE BOBBIN THREAD
1. Raise the needle to its highest position by pushing the release button to the left .
Replace the clear bobbin cover plate onto the needle plate.
6
A
Cutter Coupeur Cortador
Groove...
Instruction Manual - Page 20
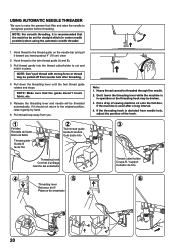
.... 3. Release the threading lever and needle will be threaded through fine needle. 2. Pull thread loop away from needle hole,
adjust the position of sewing machine oil onto the felt disc,
if the machine is
in operation or the threading hook may be pulled off from needle hole after a long interval. 4. Heavy thread cannot be...
Instruction Manual - Page 22
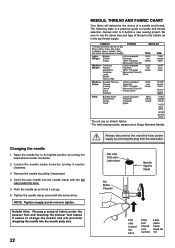
...a needle and thread. Insert the new needle into the needle plate slot.
22
Always disconnect the machine from the wall-outlet. The following table is a practical guide to it downward. 4.
NOTE: Tighten... linen, silk, wool, synthetic, rayon, blends. Be sure to its highest position by pulling it before a new sewing project. Push the needle up as far as in the top thread supply. ...
Instruction Manual - Page 24
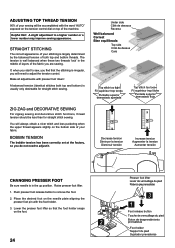
...position. The tension is usually only desireable for straight stitch sewing.
Raise presser foot lifter. 1.
Push presser foot release button to a higher number or a lower number may improve sewing...Foot release button Touche de verrouillage du pied Boton de desprendimiento prensatelas
Foot holder Support du pied Sujetador prensatelas Place the desired foot on top of the machine. ADJUSTING ...
Instruction Manual - Page 26
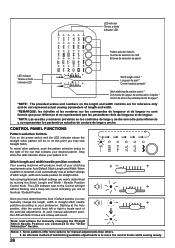
...: Instructions for manual adjustments than others. 2.
CONTROL PANEL FUNCTIONS
Pattern selection buttons
Turn on the length and width controls are contained in the "Other Information" Section.
Stitch length and width/needle position controls
Your sewing machine will automatically sew at the Auto / Default Position. Starting at an Auto/Default Stitch Length and Width. Notes: 1.
Auto...
Instruction Manual - Page 28
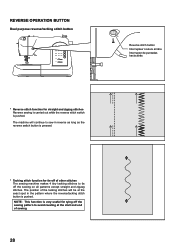
... be at the start and end of other stitches The sewing machine makes 4 tiny tacking stitches to tie off of sewing.
28
NOTE: This function is very useful for tying off the sewing pattern to sew in the pattern where the reverse/tacking stitch button is pushed. The position of the tacking stitches will continue to avoid raveling...
Instruction Manual - Page 32
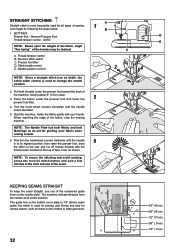
... of the fabric, stop the sewing machine. The numbers indicate distance from the needle at its highest position, then raise the presser foot, draw
6
the fabric to change the needle position.
3
2. General Purpose Foot...: To secure the stitching and avoid raveling, press the reverse stitch button and sew a few stitches at its center position. The guide line on the top of face cover as an...
Instruction Manual - Page 34
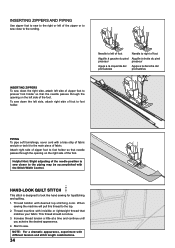
... side of foot to the cording. Helpful Hint: Slight adjusting of the needle position to sew closer to presser foot holder so that the needle passes through the opening on ...thread should not show. 3.
Attach right side of zipper foot to look like hand sewing for topstitching and quilting. 1.
When
sewing the machine will pull this thread to the main piece of fabric. PIPING To pipe soft ...
Instruction Manual - Page 36
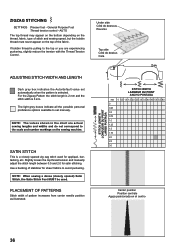
...light grey boxes indicate all the possible personal preference options available to the scale and number markings on the top of stitch and sewing speed, but the bobbin thread must never appear on the sewing machine...5.5 6.0 0 0.25 0.5 0.75 1.0 1.25 1.5 1.75 2.0 2.5 3.0
Center position Position centrale Aguja posicionada en el centro
36 ZIGZAG STITCHING
SETTINGS :Presser foot -
PLACEMENT OF ...
Instruction Manual - Page 52
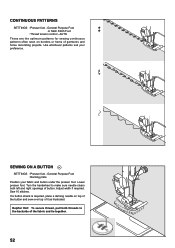
... the backside of it as illustrated. Sew 10 stitches. Use whichever patterns suit your fabric and button under the presser foot. If a button shank is required, place a darning needle on borders or hems of button. CONTINUOUS PATTERNS
SETTINGS :Presser foot - General Purpose Foot :Darning plate
Position your preference. SEWING ON A BUTTON
SETTINGS :Presser foot -
Helpful Hint: To...
Instruction Manual - Page 54

...of buttonhole patterns.
2. Lower the buttonhole lever (C) so that measures the size of the button and calculates the size buttonhole required. Then try the buttonhole with the buttonhole foot. (...fabric from your button.
1.
Stabilizer or regular interfacing can be used.
* Make a practice buttonhole on page 24 - 25.)
3. SEWING A BUTTONHOLE USING BUTTONHOLE FOOT
Your machine offers you two...
Instruction Manual - Page 56
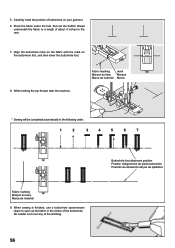
... While holding the top thread, start the machine. Fabric marking Marque du tissu Marca de material
mark Marque Marca
* Sewing will be completed automatically in the center of....
7.
When sewing is finished, use a buttonhole opener/seam ripper to a length of the buttonhole. Carefully mark the position of the stitching.
56
Buttonhole foot alignment position Position d'alignement du...
Instruction Manual - Page 60
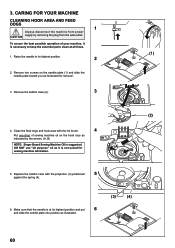
... two screws on the hook race as it is necessary to its highest position and put
6
and slide the needle plate into position as illustrated for sewing machine lubrication.
(2)
(A) (B)
5. Raise the needle to keep the essential parts clean at its highest position.
2
2.
3. Replace the bobbin case with the lint brush.
4
Put one drop of your...
Instruction Manual - Page 62
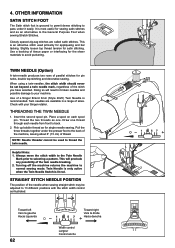
...to 13 different positions with your machine.
4. Use... a backing of thread. Use of parallel stitches for satin stitching. Insert the second spool pin. Draw one . NOTE: Needle threader cannot be set beyond a twin needle mark, regardless of the needle when sewing straight stitch may be adjusted to thread the twin needle. STRAIGHT STITCH NEEDLE POSITION
The position...
Instruction Manual - Page 68
... as contained in this sewing machine only for all. (European Union only)
SINGER® is a registered trademark of
injury,
switch
off ("0") position, then remove plug from...reverse the plug.
Always unplug this can cause a needle to the off
before replacing light bulb. "WARNING-
"To disconnect, turn switch to break." 12. Keep ventilation openings of the sewing machine...
Similar Questions

My Plate Has Frozen In The Up Position And Wont Sew
(Posted by elaineharris 2 years ago)

Free Motion Quilting Curvy 8763
can I lower the feed dogs to do free motion quilting with my curvy 8763?
can I lower the feed dogs to do free motion quilting with my curvy 8763?
(Posted by jlynnbutler1 3 years ago)

Reverse Button
Hi I started using my new machine today and although I love it already, the reverse button doesn't s...
Hi I started using my new machine today and although I love it already, the reverse button doesn't s...
(Posted by Sallieferguson 6 years ago)

How And Where Exactly Do I Oil The Upper Section Of My Singer Curvy 8763?
Re: Singer Curvy 8763. I've already removed, cleaned and oiled the bobbin case, but I'd like to know...
Re: Singer Curvy 8763. I've already removed, cleaned and oiled the bobbin case, but I'd like to know...
(Posted by nancy3262 8 years ago)

Singer Curvy 8763 Beeps Will Not Start The Button Hole Task. Please Help
(Posted by Anonymous-113995 10 years ago)