Singer 8763 Curvy Support Question
Singer 8763 Curvy Support Question
Find answers below for this question about Singer 8763 Curvy.Need a Singer 8763 Curvy manual? We have 1 online manual for this item!
Question posted by jlynnbutler1 on February 12th, 2021
Free Motion Quilting Curvy 8763
can I lower the feed dogs to do free motion quilting with my curvy 8763?
Current Answers
Answer #1: Posted by techyagent on February 17th, 2021 3:49 AM
techyagent

Member since:
June 17th, 2014 Points: 4,799,790

Member since:
June 17th, 2014 Points: 4,799,790
Techygirl
Related Singer 8763 Curvy Manual Pages
Instruction Manual - Page 3
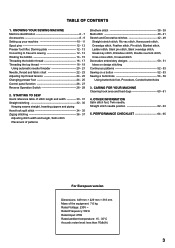
...°C Acoustic noise level: less than 70db(A)
3 CARING FOR YOUR MACHINE Cleaning hook area and feed dogs 60 - 61
4. KNOWING YOUR SEWING MACHINE Machine identification 6 - 7 Accessories 8 - 9 Setting up your machine 10 - 11 Spool pins 12 - 13 Presser foot lifter, Darning plate 12 - 13 Converting to free-arm sewing 12 - 13 Winding the bobbin 14 - 15 Threading the bobbin thread...
Instruction Manual - Page 6
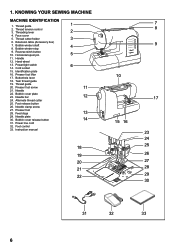
... shaft 8. Reverse stitch button 10. Buttonhole lever
18. Foot release button
26. Feed dogs
13
29. Power line cord
32. Extension table (Accessory box)
7. Twin thread guide
19. Needle plate 30. Hand wheel
13. Needle
22. Presser foot 28. KNOWING YOUR SEWING MACHINE
MACHINE IDENTIFICATION
1. Foot control
33. Horizontal spool pin
5
11. Cord socket
6
15...
Instruction Manual - Page 8
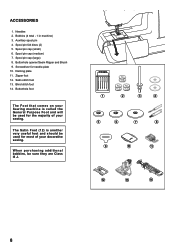
... discs (2) 5. Spool pin cap (large) 8. Buttonhole opener/Seam Ripper and Brush 9.
Blind stitch foot 14. Bobbins (4 total - 1 in machine) 3. Screwdriver for most of your decorative sewing. Buttonhole foot
The Foot that comes on your Sewing machine is another very useful foot and should be sure they are Class I5 J.
1
2
3
4
5
6
7
8
9
10
11
12
13
14...
Instruction Manual - Page 10
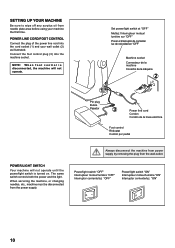
...line cord/FOOT CONTROL
Connect the plug of the power line cord into the machine socket.
Always disconnect the machine from power supply by removing the plug from the power supply. Set power...232;re sur "OFF"
Poner el Interruptor de corriente/ luz de velocidad en "OFF"
machine socket Connecteur de la machine Conector de la máquina
2
1
Pin plug
Butée
Pasador
3
Power line cord...
Instruction Manual - Page 12
...
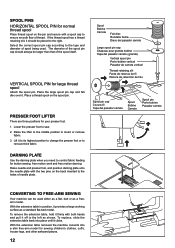
PRESSER FOOT LIFTER
There are three positions for button sewing, free motion work and free motion darning. Lift it off to the left as a ...the presser foot or to control fabric feeding for your presser foot. 1. Lower the presser foot to insert or remove
...extension table in position, it clicks.
CONVERTING TO FREE-ARM SEWING
Your machine can be larger than that of thread. The ...
Instruction Manual - Page 20
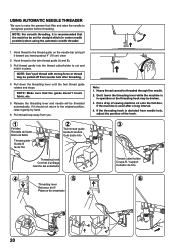
... for straight stitch (in center needle position) when using the automatic needle threader.
1. Don't lower the threading lever while the machine is deviated from needle hole,
adjust the position of sewing machine oil onto the felt disc,
if the machine is recommended that the guide doesn't touch fabric, etc.
5.
Hook thread to its highest position...
Instruction Manual - Page 22
... band
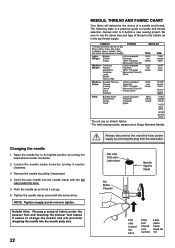
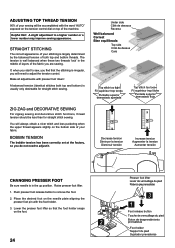
* Do not use on stretch fabrics. * For best sewing results, always use the same size and type of thread in the...as it can be of fabric under the presser foot and lowering the presser foot makes it downward. 4.
Flat side Côt&#...Insert the new needle into the needle plate slot.
22
Always disconnect the machine from power supply by removing the plug from the wall-outlet. They are...
Instruction Manual - Page 24
...your fabric.
BOBBIN TENSION
The bobbin tension has been correctly set at the factory, so you are sewing. Lower the presser foot lifter so that the stitching is irregular, you will need to adjust it.
4... less puckering when the upper thread appears slightly on top of the machine.
Helpful Hint: A slight adjustment to remove the foot. 2.
Raise presser foot lifter. 1.
ADJUSTING TOP ...
Instruction Manual - Page 26
... point you can manually change the length, width or straight stitch needle postition according to move the control knobs while sewing slowly.
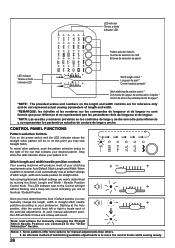
26 Stitch length and width/needle position controls
Your sewing machine will sound indicating you are at an Auto/Default Stitch Length and Width.
Some patterns offer more options for manually...
Instruction Manual - Page 28
...
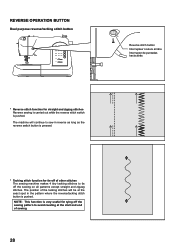
Reverse stitch button Interrupteur couture arrière interruptor de puntadas hacia atrás
* Reverse stitch function for tying off the sewing pattern to tie off of other stitches The sewing machine makes 4 tiny tacking stitches to avoid raveling at the exact spot in reverse as long as the reverse switch button is...
Instruction Manual - Page 32
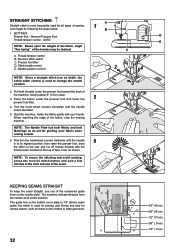
... is used for piecing quilt blocks and also for guiding your hands. The numbers indicate distance from the needle at the start and end of sewing. C
A. Start the machine.
Stitch length control ...E. NOTE: The Needle Plate has both threads under the presser foot and lower the
5
presser foot lifter.
4....
Instruction Manual - Page 34
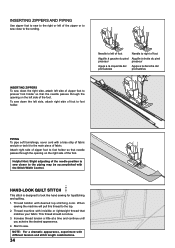
... foot Aiguille à droite du pied presseur Aguja a la derecha del prensatelas
INSERTING ZIPPERS To sew down the left side, attach right side of the zipper or to sew close to look like hand sewing for topstitching and quilting. 1.
Thread machine with the Stitch Width Control. This thread should not show. 3. Increase thread tension a little...
Instruction Manual - Page 36
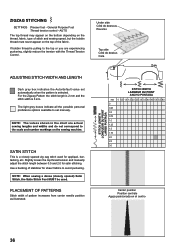
...between 0.5 and 2.0 for sheer fabrics to set automatically when the pattern is 5 mm. NOTE: When sewing a dense (closely spaced) Satin Stitch, the Satin Stitch Foot MUST be used for appliqué, ... bottom depending on the thread, fabric, type of stitch and sewing speed, but the bobbin thread must never appear on the sewing machine. Under side Côté de dessous Reverso
Top side C&#...
Instruction Manual - Page 44

... appearance.
44 It can also be used for quilting applications and Joining fabrics. This multi-purpose stitch can also be used for sewing over narrow ribbon, yarn or elastic. LADDER STITCH...thread work . Another use for applique work , choose a coarse linen type fabric and after sewing draw the thread out within the ladder for drawn thread hemstitching.
PIN STITCH
The Pin stitch...
Instruction Manual - Page 54

... button into the buttonhole foot. (Refer to "Changing presser foot" on a scrap of buttonhole patterns.
2. Lower the buttonhole lever (C) so that measures the size of the garment where buttonholes are placed.
SEWING A BUTTONHOLE USING BUTTONHOLE FOOT
Your machine offers you two different widths of bartack buttonholes sewn by a system that it drops down...
Instruction Manual - Page 56
...Marca de material
9. Fabric marking Marque du tissu Marca de material
mark Marque Marca
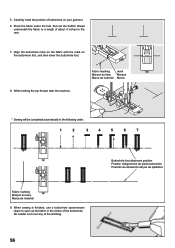
* Sewing will be completed automatically in the center of buttonhole on the buttonhole foot, and then lower the buttonhole foot.
8. Be careful not to cut any of about 4 inches to a... out the bobbin thread underneath the fabric to the rear.
7. While holding the top thread, start the machine.
Instruction Manual - Page 60
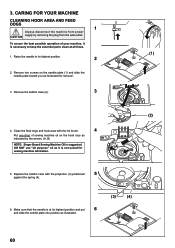
... the needle plate toward you as indicated by removing the plug from power CAUTION supply by the arrows. (A, B)
NOTE: Singer Brand Sewing Machine Oil is necessary to its highest position.
2
2. Clean the feed dogs and hook area with the projection (3) positioned
5
against the spring (4).
6. Make sure that the needle is not suited for removal...
Instruction Manual - Page 62
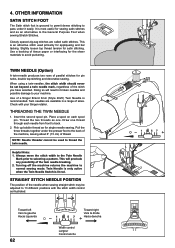
... Needle is most useful for satin stitching. Turning off the machine returns the machine to your Singer retailer. STRAIGHT STITCH NEEDLE POSITION
The position of tissue paper or interfacing for pin tucks, double top stitching and decorative sewing. Use a backing of the needle when sewing straight stitch may be used primarily for single needle...
Instruction Manual - Page 64
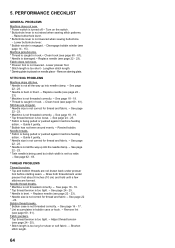
...being pulled or pushed against machine feeding
action. - Remove darning plate.
See page
22 - 23. * Twin needle is being pulled or pushed against machine feeding
action. - Draw both ... Adjust thread tension (see page 60 - 61). PERFORMANCE CHECKLIST
GENERAL PROBLEMS
Machine does not sew. * Power switch is engaged. - Lower buttonhole lever. * Bobbin winder is turned off.- See page 18 - ...
Instruction Manual - Page 68
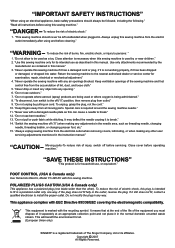
... an appropriate collection point and not place it still does not fit, contact a qualified electrician to break." 14. Keep ventilation openings of the sewing machine and foot control free from the accumulation of it separately at the end of the life of the equipment you must dispose of lint, dust, and loose cloth...
Similar Questions

I Get E7 Error Message On My Singer Model 7258 Sewing Machine. There Is No Refe
Error message E7 is up on my Singer Stylist model 7258 sewing machine. It is not working at all. I t...
Error message E7 is up on my Singer Stylist model 7258 sewing machine. It is not working at all. I t...
(Posted by ebellamybellamy9 5 years ago)

My Sewing Machine Is Not Sewing The Correct Stitch.
When I push the automated button to sew a special stitch it will not sew it. What can I do?
When I push the automated button to sew a special stitch it will not sew it. What can I do?
(Posted by tammywood16 7 years ago)

Singer Sewing Machine 8763 Bobbin Thread Does Not Sew After Material Jam
(Posted by Anonymous-151081 9 years ago)

Question For Future Singer Sewing Machine
My sewing machine keeps beeping and displays a "E1" I have re threaded a couple times??
My sewing machine keeps beeping and displays a "E1" I have re threaded a couple times??
(Posted by Nanalora13 9 years ago)

258 Singer Sewing Machine
How do you lower feed dogs to be able to free-motion quilt?
How do you lower feed dogs to be able to free-motion quilt?
(Posted by vll 10 years ago)