Singer 8763 Curvy Support Question
Singer 8763 Curvy Support Question
Find answers below for this question about Singer 8763 Curvy.Need a Singer 8763 Curvy manual? We have 1 online manual for this item!
Question posted by skatermom2004 on August 4th, 2014
Lights Blinking Not Sewing
My BRAND NEW singer curvy 8763 has all lights blinking, will not sew. I have pushed the reverse button to reset, changed the bobbin, made sure the bobbin winder is pused to the Left. Nothing helped!!!! Do i have a LEMON?? Please help!!
Current Answers
Answer #1: Posted by BusterDoogen on August 4th, 2014 5:49 PM
BusterDoogen

Member since:
October 30th, 2011 Points: 28,565,447

Member since:
October 30th, 2011 Points: 28,565,447
Try unplugging the cords from the machine and let it sit for a minute. You can always give that a try. It works for some people.
I hope this is helpful to you!
Please respond to my effort to provide you with the best possible solution by using the "Acceptable Solution" and/or the "Helpful" buttons when the answer has proven to be helpful. Please feel free to submit further info for your question, if a solution was not provided. I appreciate the opportunity to serve you!

Related Singer 8763 Curvy Manual Pages
Instruction Manual - Page 3
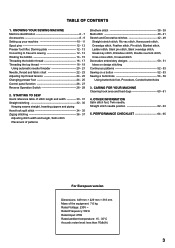
...Continuous patterns 52 - 53 Sewing on a button 52 - 53 Sewing a buttonhole 54 - 59
Using buttonhole foot, Procedure, Corded buttonholes
3. KNOWING YOUR SEWING MACHINE Machine identification 6 - 7 Accessories 8 - 9 Setting up your machine 10 - 11 Spool pins 12 - 13 Presser foot lifter, Darning plate 12 - 13 Converting to free-arm sewing 12 - 13 Winding the bobbin 14 - 15 Threading the...
Instruction Manual - Page 6
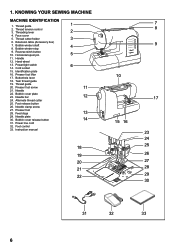
KNOWING YOUR SEWING MACHINE
MACHINE IDENTIFICATION
1. Handle
12. Power/light switch 14. Needle
22. Alternate thread cutter
25. Foot control
33. Thread tension control 3. Thread guide
20. Needle clamp screw
27. Thread guide
1
2. Bobbin winder shaft 8. Bobbin winder stop
4
9. Presser foot lifter
17. Twin thread guide
19. 1. Cord socket
6
15...
Instruction Manual - Page 8
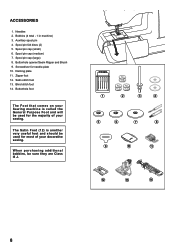
... of your sewing. Spool pin cap (small) 6.
Bobbins (4 total - 1 in machine) 3. Spool pin felt discs (2) 5.
ACCESSORIES
1. When purchasing additional bobbins, be used for needle plate 10. Auxiliary spool pin 4. Spool pin cap (medium) 7. Darning plate 11. Zipper foot 12. The Satin Foot (12) is called the General Purpose Foot and will be sure they are...
Instruction Manual - Page 12
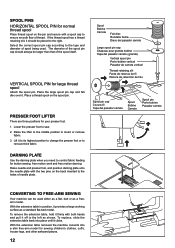
...plate with the two pins on the back inserted to the left as a flat- bed or as a standard flat-bed ...the spool pin. PRESSER FOOT LIFTER
There are three positions for button sewing, free motion work and free motion darning.
To remove the ...clicks. With the extension table removed the machine converts into place until it to its highest position to change the presser foot or to the right...
Instruction Manual - Page 14

.... Start machine. Put end of thread on the foot control again to continue
to remove
bobbin and cut
4
the thread tail. Step on the spool pin, and secure it with end of thread
3
coming from the spool and place it is not already there. Push bobbin winder shaft to far left to fill the bobbin. Push shaft to...
Instruction Manual - Page 20
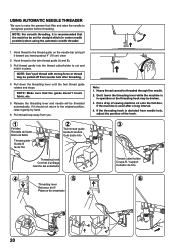
...lever until the twin thread guide rotates and stops. USING AUTOMATIC NEEDLE THREADER
*Be sure to raise the presser foot lifter and raise the needle to the twin thread guide...interval. 4. If the threading hook is deviated from needle hole,
adjust the position of sewing machine oil onto the felt disc,
if the machine is
in place. Put a drop of the hook.
3
Threading hook Crochet d'enfilage ...
Instruction Manual - Page 22
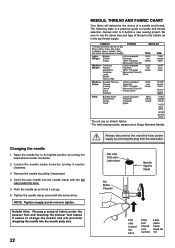
... sure to use a Singer Branded Needle. They are listed as in the bobbin as examples of any fiber: cotton, linen, silk, wool, synthetic, rayon, blends. Changing the needle
1. Raise the needle bar to change the needle and will determine the choice of fabric under the presser foot and lowering the presser foot makes it counter clockwise.
3. Push...
Instruction Manual - Page 24
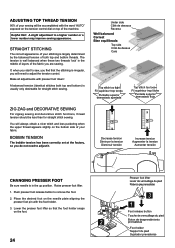
... la tension
Aumentar tensión
CHANGING PRESSER FOOT
Be sure needle is well balanced when these two threads 'lock' in the up position. Helpful Hint: A slight adjustment to remove the foot. 2. STRAIGHT STITCHING
The correct appearance of your stitching is usually only desireable for straight stitch sewing.
BOBBIN TENSION
The bobbin tension has been correctly set...
Instruction Manual - Page 26
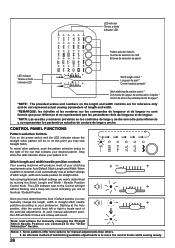
.... Stitch length and width/needle position controls
Your sewing machine will produce most of the row that contains your desired pattern. At this point you can manually change the length, width or straight stitch needle postition according to locate each manual adjustment point, the LED will blink 3 times and a beep will sound.
Once you...
Instruction Manual - Page 28
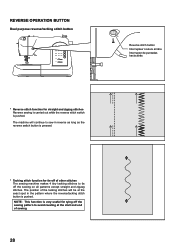
... straight and zigzag stitches Reverse sewing is carried out while the reverse stitch switch is pressed.
* Tacking stitch function for tying off the sewing pattern to tie off of other stitches The sewing machine makes 4 tiny tacking stitches to avoid raveling at the exact spot in reverse as long as the reverse switch button is pushed. The machine will be at...
Instruction Manual - Page 32
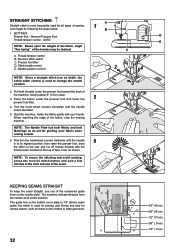
...straight, use one of the numbered guide lines on the top of sewing. The guide line on the bobbin cover plate is 1/4" (6mm) seam guide line which is used ...reverse stitch button and sew a few stitches at its highest position, then raise the presser foot, draw
6
the fabric to change the needle position.
3
2. The numbers indicate distance from the needle at the start and end of
the machine...
Instruction Manual - Page 34
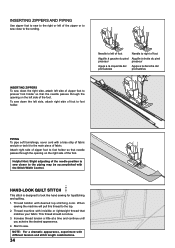
...Helpful Hint: Slight adjusting of fabric. When
sewing the machine will pull this thread to sew. Increase thread tension a little at a time and continue until
you acheive the desired appearance. 4. NOTE: For a dramatic appearance, experiment with desired top stitching color.
Thread bobbin... sew down the left side, attach right side of the zipper or to sew close to look like hand sewing for...
Instruction Manual - Page 36
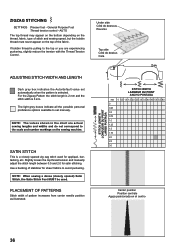
...manualy. The light grey boxes indicate all the possible personal preference options available to set automatically when the pattern is pulling to the top or you are actual sewing lengths and... bottom depending on the thread, fabric, type of stitch and sewing speed, but the bobbin thread must never appear on the sewing machine.
NOTE: The values shown in the chart are experiencing puckering,...
Instruction Manual - Page 52
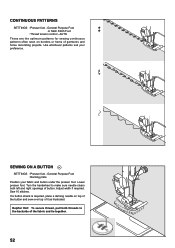
...preference. Turn the handwheel to the backside of button.
Helpful Hint: To secure thread, pull both threads to make sure needle clears both left and right openings of the fabric and tie ... and button under the presser foot. Lower presser foot. Sew 10 stitches. If a button shank is required, place a darning needle on borders or hems of it as illustrated. SEWING ON A BUTTON
SETTINGS ...
Instruction Manual - Page 54

...foot" above.)
4. Lower the buttonhole lever (C) so that measures the size of the button and calculates the size buttonhole required. All of this is done in the area of ...button into the buttonhole foot. (Refer to "Changing presser foot" on a scrap of the actual fabric from your button.
1.
Replace the presser foot with your project. SEWING A BUTTONHOLE USING BUTTONHOLE FOOT
Your machine...
Instruction Manual - Page 56
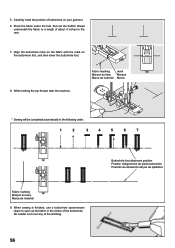
...the buttonhole mark on the fabric with the mark on your garment.
6. Pull out the bobbin thread underneath the fabric to open up the fabric in the following order.
1
2
3... Marque du tissu Marca de material
mark Marque Marca
* Sewing will be completed automatically in the center of buttonhole on the buttonhole foot, and then ...machine. Carefully mark the position of the buttonhole.
Instruction Manual - Page 60
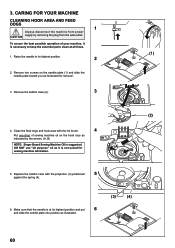
...: Singer Brand Sewing Machine Oil is at all purpose" oil as illustrated.
(3)
(4)
60 To ensure the best possible operation of sewing machine oil on the needle plate (1) and slide the needle plate toward you as indicated by removing the plug from the wall-outlet. Remove two screws on the hook race as illustrated for sewing machine lubrication.
(2)
(A) (B)
5. Make sure...
Instruction Manual - Page 62
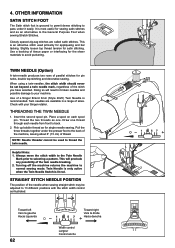
...Singer Brand 3mm (Style 2025) Twin Needle is lit red. When using a twin-needles, the stitch width should never be adjusted to the General Purpose Foot when sewing Stretch Stitches. Check with the stitch width control as an alternative to 13 different positions with your machine... twin needle. THREADING THE TWIN NEEDLE
1. Pick up bobbin thread as one thread through each spool pin. This ...
Instruction Manual - Page 64
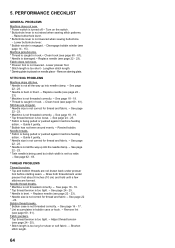
.... * Needle is being pulled or pushed against machine feeding
action. - See page 24 - 25. * Fabric is bent or blunt. - Guide it gently. * Bobbin has not been wound evenly. - THREAD PROBLEMS
Thread bunches. * Top and bobbin threads are formed. See page 18 - 19. * Top thread tension is not lowered when sewing buttonhole.
- Raise buttonhole lever. * Buttonhole...
Instruction Manual - Page 68
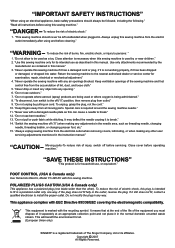
... the electric outlet immediately after using and before cleaning."
2. "Switch the sewing machine off ("0") when making any adjustments in the outlet, reverse the plug.
If the plug does not fit fully in the needle area, such as threading needle, changing needle, threading bobbin, or changing presser foot, etc." 15.
This will benefit the environment for examination...
Similar Questions

Sews In Reverse Only.
I have used the machine very little, and it was working just fine. Now it only sews in reverse. Want...
I have used the machine very little, and it was working just fine. Now it only sews in reverse. Want...
(Posted by lynnebennett 8 years ago)

Singer Sewing Machine 8763 Bobbin Thread Does Not Sew After Material Jam
(Posted by Anonymous-151081 8 years ago)

C4 Error On Brand New Machine
This is a brand new machine. It keeps saying C4. Motor runs but no action. I cannot load my bobbin, ...
This is a brand new machine. It keeps saying C4. Motor runs but no action. I cannot load my bobbin, ...
(Posted by skalvig 10 years ago)

Singer Curvy 8763 Beeps Will Not Start The Button Hole Task. Please Help
(Posted by Anonymous-113995 10 years ago)

My Curvy 8763 Wont Sew. Reverse Button Seems To Be Stuck In On Position.
lights flashing wont sew reverse button stuck in on position
lights flashing wont sew reverse button stuck in on position
(Posted by sandygregson 11 years ago)