Singer 8763 Curvy Support Question
Singer 8763 Curvy Support Question
Find answers below for this question about Singer 8763 Curvy.Need a Singer 8763 Curvy manual? We have 1 online manual for this item!
Question posted by skstrang on April 28th, 2014
My Curvy Wont Make A Button Hole Through Several Layers. .
Tryin to repair husbands dress pants..it works on thin layer Test fabric but not with the pants. ..
Current Answers
Related Singer 8763 Curvy Manual Pages
Instruction Manual - Page 3
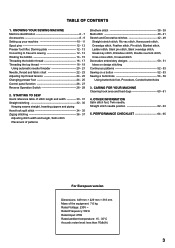
...stitch Decorative embroidery designs 50 - 51 Ideas on design stitching Continuous patterns 52 - 53 Sewing on a button 52 - 53 Sewing a buttonhole 54 - 59
Using buttonhole foot, Procedure, Corded buttonholes
3. KNOWING YOUR SEWING MACHINE Machine identification 6 - 7 Accessories 8 - 9 Setting up your machine 10 - 11 Spool pins 12 - 13 Presser foot lifter, Darning plate 12 - 13 Converting...
Instruction Manual - Page 6
...
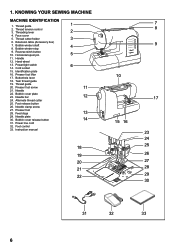
12
24. Presser foot 28. Extension table (Accessory box)
7. Reverse stitch button 10. Identification plate
16. Needle
22. Foot control
33. Bobbin winder shaft...
32
33
6 Thread tension control 3. Foot release button
26. Power line cord
32. Cord socket
6
15. KNOWING YOUR SEWING MACHINE
MACHINE IDENTIFICATION
1. Twin thread guide
19. Thread guide
1...
Instruction Manual - Page 8
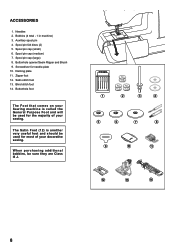
...Buttonhole opener/Seam Ripper and Brush 9. Darning plate 11. Buttonhole foot
The Foot that comes on your sewing. Bobbins (4 total - 1 in machine) 3.
Spool pin cap (small) 6. Spool pin cap (medium) 7. Satin stitch foot 13. ACCESSORIES...14. Zipper foot 12. Screwdriver for most of your Sewing machine is another very useful foot and should be sure they are Class I5 J.
1
2
3
4
5
6
...
Instruction Manual - Page 12
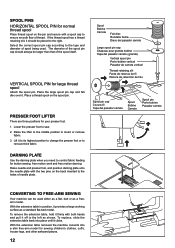
... positions for large thread spool
Attach the spool pin.
With the extension table removed the machine converts into place until it to its highest position to change the presser foot or to control fabric feeding for button sewing, free motion work and free motion darning. SPOOL PINS HORIZONTAL SPOOL PIN for normal thread spool
Place...
Instruction Manual - Page 14

... use Class 15 J bobbins.
1. After the bobbin has begun to the left position, if it through the hole in bobbin as shown in illustration.
1
2. Push shaft to fill, stop turning
when completely filled. Start machine. The bobbin will automatically stop to fill the bobbin. Pull the thread out from top of thread...
Instruction Manual - Page 16

...the needle plate.
6
A
Cutter Coupeur Cortador
Groove Cannelure Surco
B
A
16 Insert the bobbin making sure the bobbin rotates counterclockwise when you to the left .
Remove the bobbin cover plate by ... the top left .
4
5. Raise the needle to its highest position by pushing the release button to
2
allow you pull the thread.
3
NOTE: This is snipped with
cutter on the ...
Instruction Manual - Page 20
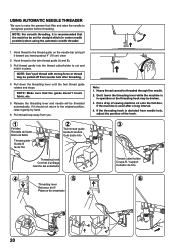
... off from you leaving about 4" (10 cm) clear.
2. If the threading hook is deviated from needle hole,
adjust the position of sewing machine oil onto the felt disc,
if the machine is recommended that the guide doesn't touch fabric, etc.
5. USING AUTOMATIC NEEDLE THREADER
*Be sure to raise the presser foot lifter and raise the...
Instruction Manual - Page 22
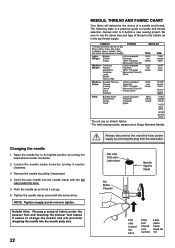
...machine from power supply by removing the plug from the wall-outlet. Tighten the needle clamp screw with the flat
side toward the back
Côté plat orienté vers l'arrière
Lado plano hacia fuera de Vd.
NEEDLE, THREAD AND FABRIC CHART
Your fabric... it can be of fabric under the presser foot and lowering the presser foot makes it before a new sewing project.
Flat side ...
Instruction Manual - Page 24
...;che
Puntada superior demasiado floja
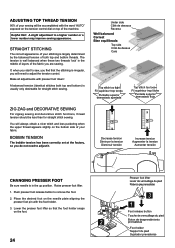
ZIG ZAG and DECORATIVE SEWING
For zigzag sewing and decorative stitch functions, thread tension should be accomplished with the word "AUTO" exposed on the tension control dial on top of the machine.
STRAIGHT STITCHING
The correct appearance of your fabric. Make all adjustments with the foot holder. 3. A balanced tension (identical...
Instruction Manual - Page 26
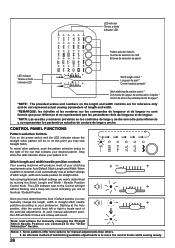
...Default Stitch Length and Width. LED indicator Témoin a diode Indicador LED
Pattern selection buttons Touches de sélection de motif Botones de selección de patrón
LED indicator... for manual adjustments than others. 2. Stitch length and width/needle position controls
Your sewing machine will sound indicating you are contained in the "Other Information" Section. The LED ...
Instruction Manual - Page 28
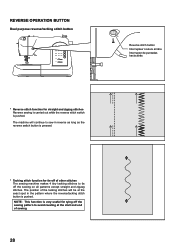
... function is very useful for tying off the sewing pattern to tie off of other stitches The sewing machine makes 4 tiny tacking stitches to avoid raveling at the start and end of the tacking stitches will continue to sew in reverse as long as the reverse switch button is pressed.
* Tacking stitch function for straight and...
Instruction Manual - Page 32
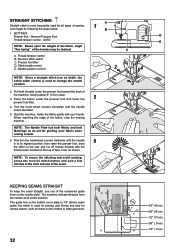
... the needle at the start and end of sewing. AUTO
E
NOTE: Based upon the weight of the fabric, slight
"fine tuning" of the fabric, stop the sewing machine. Start the machine. The guide line on the needle plate. STRAIGHT... To secure the stitching and avoid raveling, press the reverse stitch button and sew a few stitches at its highest position, then raise the presser foot, draw
6
the...
Instruction Manual - Page 34
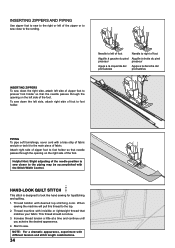
... presseur Aguja a la izquierda del prensatelas
Needle to the top. 2.
Thread bobbin with different tension and stitch length combinations.
34 Helpful Hint: Slight adjusting of fabric. When
sewing the machine will pull this thread to right of foot Aiguille à droite du pied presseur Aguja a la derecha del prensatelas
INSERTING ZIPPERS To...
Instruction Manual - Page 36
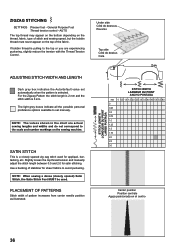
... with the Thread Tension Control.
PLACEMENT OF PATTERNS
Stitch width of the fabric. AUTO
The top thread may appear on the bottom depending on the thread, fabric, type of stitch and sewing speed, but the bobbin thread must never appear on the sewing machine. If bobbin thread is a closely spaced zig zag stitch used .
Use...
Instruction Manual - Page 38
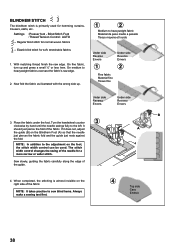
...: AUTO
- On medium to sew blind hems. Always make a sewing test first.
4
Top side Cara Endroit
38
When completed, the stitching is primarily used .
Settings : Presser foot - If it does not, adjust
the guide (B) on the right side of the needle for hemming curtains, trousers, skirts, etc. Sew slowly, guiding the fabric carefully along the edge...
Instruction Manual - Page 48
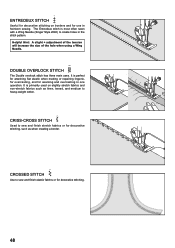
... flat elastic when making or repairing lingerie, for overcasting, and for use in the stitch pattern.
CRISS-CROSS STITCH
Used to sew and finish stretch fabrics or for decorative stitching.
48 CROSSED STITCH
Use to sew and finish elastic fabrics or for decorative stitching, such as linen, tweed, and medium to create holes in heirloom sewing. Helpful Hint...
Instruction Manual - Page 52
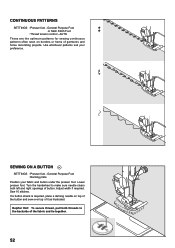
... thread, pull both left and right openings of the fabric and tie together.
52 Lower presser foot. Turn the handwheel to make sure needle clears both threads to the backside of button.
General Purpose Foot
or Satin Stitch Foot
:Thread tension control - Sew 10 stitches.
SEWING ON A BUTTON
SETTINGS :Presser foot - General Purpose Foot :Darning plate...
Instruction Manual - Page 54

... buttonhole patterns.
2. Stabilizer or regular interfacing can be used.
* Make a practice buttonhole on page 24 - 25.)
3. tab A Languette A Lengüeta A
tab B Languette B Lengüeta B
PROCEDURE
* Use an interfacing in one of the actual fabric from your button.
1. SEWING A BUTTONHOLE USING BUTTONHOLE FOOT
Your machine offers you two different widths of bartack buttonholes sewn...
Instruction Manual - Page 60
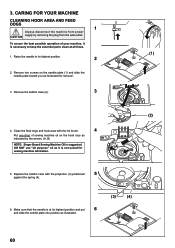
...sewing machine oil on the needle plate (1) and slide the needle plate toward you as illustrated.
(3)
(4)
60 Remove the bobbin case (2).
3
4. Clean the feed dogs and hook area with the projection (3) positioned
5
against the spring (4).
6. Make...
6
and slide the needle plate into position as illustrated for sewing machine lubrication.
(2)
(A) (B)
5. Remove two screws on the hook...
Instruction Manual - Page 68
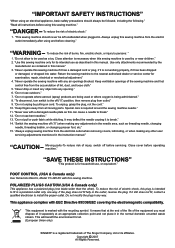
...sewing machine is being used or where oxygen is used as this sewing machine. Return the sewing machine to the nearest authorized dealer or service center for all. (European Union only)
SINGER® is not working... electrician to persons: "
1. "Switch the sewing machine off ("0") when making any way. "Always unplug sewing machine from the electric outlet immediately after using an ...
Similar Questions

Button Holes
Trying to make button holes. Using the 94 button hole choice, it is just stitching a straight stitch...
Trying to make button holes. Using the 94 button hole choice, it is just stitching a straight stitch...
(Posted by missjudypoo 8 years ago)

Singer Sewing Machine 8763 Bobbin Thread Does Not Sew After Material Jam
(Posted by Anonymous-151081 9 years ago)

Question For Future Singer Sewing Machine
My sewing machine keeps beeping and displays a "E1" I have re threaded a couple times??
My sewing machine keeps beeping and displays a "E1" I have re threaded a couple times??
(Posted by Nanalora13 9 years ago)


Singer Curvy 8763 Beeps Will Not Start The Button Hole Task. Please Help
(Posted by Anonymous-113995 10 years ago)