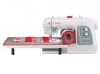
Singer 8500Q MODERN QUILTER Support Question
Singer 8500Q MODERN QUILTER Support Question
Find answers below for this question about Singer 8500Q MODERN QUILTER.Need a Singer 8500Q MODERN QUILTER manual? We have 1 online manual for this item!
Question posted by missjudypoo on December 16th, 2015
Button Holes
Trying to make button holes. Using the 94 button hole choice, it is just stitching a straight stitch and not shaping a button hole. What am I doing wrong
Current Answers
Answer #1: Posted by waelsaidani1 on December 28th, 2015 1:01 AM
waelsaidani1

Member since:
May 12th, 2013 Points: 19,501,787

Member since:
May 12th, 2013 Points: 19,501,787
Related Singer 8500Q MODERN QUILTER Manual Pages
Instruction Manual - Page 2
³,03257$176$)(7
Instruction Manual - Page 5
... V ~ Rated Frequency: 50 Hz Rated input: 64 W Using ambient temperature: Normal temperature Acoustic noise level: less than 70 db(A)
3 STARTING TO SEW Quick reference table of stitch length and width --------- 32 - 35 Straight stitching 36 - 39
Keeping seams straight, Inserting zippers and piping Hand-look quilt stitch 38 - 39 Straight stitch with auto tie-off function 38 - 39 Zigzag...
Instruction Manual - Page 8

... 16 17 18
24 25 26 27 28 29 30 31
32
33
34
6 GETTING TO KNOW YOUR MACHINE
MACHINE IDENTIFICATION
2
1
1. Horizontal spool pin 11. Hand wheel
13. Needle
23. Needle bar
13
25. ...
21. Bobbin cover release button
32. Bobbin winding tension disk
3. Buttonhole lever
10
16. Presser foot release button
14
27. Power line cord
33. Operation buttons
5
10. Thread guide
12...
Instruction Manual - Page 10
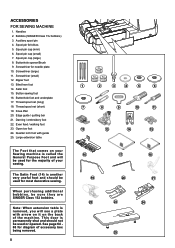
... the General Purpose Foot and will see a plate with guide 25. See page 64 65 for the majority of your Sewing machine is removed, you will be used or opened. Spool pin felt discs 5. Button sewing foot 16. Large extension table
The Foot that comes on the back of accessory box being removed.
8
1
2
3
4
5
6
7
8
9
10
11...
Instruction Manual - Page 12

... area EHIRUHXVLQJ\RXUPDFKLQHWKH¿UVWWLPH
POWER LINE CORD/FOOT CONTROL
Connect the plug of the power line cord into the machine socket (3), when using sewing machine only. Place felt disc over it. Connect the foot control plug into the cord socket (1) and your wall outlet (2) as illustrated. Always disconnect the...
Instruction Manual - Page 24
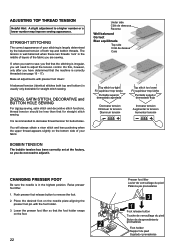
... upper thread appears slightly on the bottom side of your stitching is correctly threaded (see page 16 - 17). Make all adjustments with the foot holder. 3. ZIGZAG, SATIN STITCH, DECORATIVE and BUTTON HOLE SEWING
For zigzag sewing, satin stitch and decorative stitch functions, thread tension should be less than that the machine is largely determined by the balanced tension of your...
Instruction Manual - Page 26
....
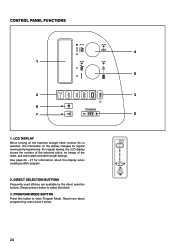
24 The information on the machine straight stitch number 00, is selected. DIRECT SELECTION BUTTONS
Frequently used stitches are available by the direct selection buttons. Read more about the display when creating a stitch program.
2. See page 26 - 27 for regular sewing and programming. Simply press a button to enter Program Mode. For regular sewing, the LCD display shows the...
Instruction Manual - Page 28
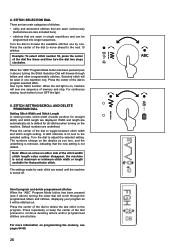
... to turn , and the underlining is not default.
For continuous sewing, touch button to browse the available stitches one by one at maximum or minimum stitch width or length available for each stitch are saved until the machine is lit next to the next 10 stitches. Press the center of the dial pressed to adjust the selected...
Instruction Manual - Page 30
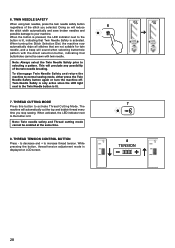
... activate Thread Cutting Mode. THREAD CUTTING MODE
Press this button to normal sewing mode, either press the Twin Needle Safety button again or turn the machine off. THREAD TENSION CONTROL BUTTON
Press - When turning the Stitch Selection Dial, the machine now automatically skips all stitches that are not suitable for twin needle, and a beep will automatically cut the...
Instruction Manual - Page 32
...operation was made.
* Continuous flashing indicates that the machine malfunctions.
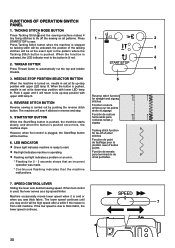
6
Reverse stitch function for straight and zigzag stitches Fonction couture arrière pour les points droits et... is plugged, the Start/Stop button will be inactive.
6. If the low speed is lit red.
4
2. TACKING STITCH MODE BUTTON
Press Tacking Stitch and the sewing machine makes 4
WLQ\ ¿[LQJ VWLWFKHV...
Instruction Manual - Page 38
... guiding your hands. SETTINGS Presser foot - Pull both Metric and Inch Markings as shown. Draw the fabric to change the needle position. Start/stop the sewing machine. Feed dog control (at its highest position, then raise the presser foot.
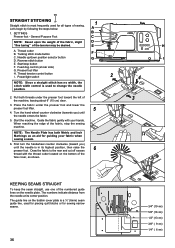
STRAIGHT STITCHING 00
Straight stitch is in its center position. Tacking stitch mode button C.
Instruction Manual - Page 40
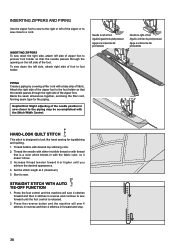
... piping may be accomplished with desired top stitching color.
2. To sew down the right side, attach left side of the foot. STRAIGHT STITCH WITH AUTO
TIE-OFF FUNCTION
16
1. Press the reverse button and the machine will sew 4 stitches forward and then 4 stitches in forward and stop.
38 Start to sew.
INSERTING ZIPPERS To sew down the left of the zipper...
Instruction Manual - Page 62

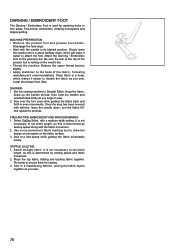
You can use and sew these stitches. DECORATIVE SEWING
Presser foot: Satin Foot
Different types of how to use other stitches in the same way.
‡ The following are examples of decorative stitches are available.
Instruction Manual - Page 70
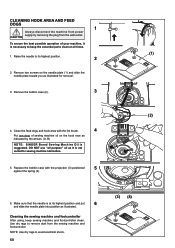
...race as indicated by removing the plug from the sewing machine and footcontroller.
Raise the needle to keep sewing machine and footcontroller clean.
Make sure that the needle is VXJJHVWHG '2 127 ...needle plate into position as illustrated for sewing machine lubrication.
5. NOTE: Use dry rags to remove dust from the wall-outlet.
Use dry rags to avoid electrical shock....
Instruction Manual - Page 72
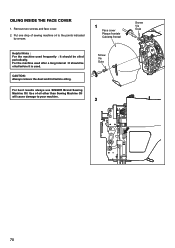
... a long interval : It should be oiled before oiling. Use of sewing machine oil to your machine.
Screw Vis Guia
2
Screw Vis Guia
70 CAUTION: Always remove the dust and lint before it is used frequently : It should be oiled periodically.
For best results always use SINGER Brand Sewing Machine Oil. Remove two screws and face cover. 2. Put one...
Instruction Manual - Page 74
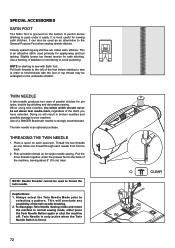
... on each needle from front to normal sewing mode, either press the Twin Needle Button again or shut the machine off. Closely spaced zig-zag stitches are called satin stitches.
Use of parallel stitches for sewing satin stitches. Thread the two threads as an alternative to the General Purpose Foot when sewing stretch stitches.
Twin Needle is only active when the...
Instruction Manual - Page 78
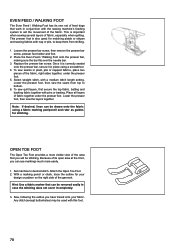
... / Embroidery Foot to Straight Stitch.
Set the sewing machine to the pressure bar. Hoop the fabric. It is not
necessary to secure them for repairing holes or torn areas, free...straight stitch. Place the top fabric, batting and backing fabric together. Place fabric in a hoop, which will make it easier to set stitch length, as you sew.
76 FREE-MOTION EMBROIDERY AND MONOGRAMMING 1. Use...
Instruction Manual - Page 80
Replace the presser bar screw. Select straight stitch, with pins or basting. Lower the presser foot, then sew the seam from shifting.
1.
Set machine to keep them from top to aid the... lines can be removed easily in case the stitching does not cover it in conjunction with nap or pile, to desired stitch. Sew, following the outline you will be used with this foot.
78 Place all layers of...
Instruction Manual - Page 82
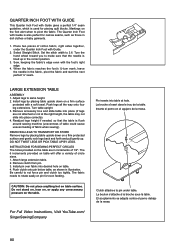
... Straight Stitch. Sew,...hole. Install pin over fabric into place (if legs are in increments of cotton fabric, right sides together, under table. The fabric needs to make sure that the table is flush around sewing machine...Guide gives a perfect 1/4" seam guideline, which is used for even feeding. Markings on table surface. Set the stitch width to not force pin and clutch too tightly...
Instruction Manual - Page 86
... can be used for this dial, you see 34 at the top of the screen. The I at the top of the screen. Programming the Memory
To access the memory, touch the ABC Program Mode button. Push in the top dial (Stitch Selection Dial) to enter this stitch into memory. The G will be displayed at...
Similar Questions

I Get E7 Error Message On My Singer Model 7258 Sewing Machine. There Is No Refe
Error message E7 is up on my Singer Stylist model 7258 sewing machine. It is not working at all. I t...
Error message E7 is up on my Singer Stylist model 7258 sewing machine. It is not working at all. I t...
(Posted by ebellamybellamy9 5 years ago)

Having A Power Problem With My Modern Quilter 8500q
I have a Singer Modern Quilter 8500Q sewing machine , it is about 10 months old and tonight it just ...
I have a Singer Modern Quilter 8500Q sewing machine , it is about 10 months old and tonight it just ...
(Posted by Rosbel1227 7 years ago)

I Am Trying To See A Button Hole And It Keeps Telling Me To Lower The Button Lev
can not see button hole
can not see button hole
(Posted by Anonymous-159085 7 years ago)

On The Singer 8500q Machine.
Does anyone know what error message Er 16 means on this Singer 8500Q sewing machine ? On the digital...
Does anyone know what error message Er 16 means on this Singer 8500Q sewing machine ? On the digital...
(Posted by donalori 8 years ago)
Beeping From Singer Sewing Machine Stylist Ii 5625
My sewing machine will beep and stop sewing after three inches of sewing. I have taken it to be repa...
My sewing machine will beep and stop sewing after three inches of sewing. I have taken it to be repa...
(Posted by arusheria 9 years ago)