Singer 8500Q MODERN QUILTER Support Question
Singer 8500Q MODERN QUILTER Support Question
Find answers below for this question about Singer 8500Q MODERN QUILTER.Need a Singer 8500Q MODERN QUILTER manual? We have 1 online manual for this item!
Question posted by Anonymous-159085 on June 16th, 2016
I Am Trying To See A Button Hole And It Keeps Telling Me To Lower The Button Lev
can not see button hole
Current Answers
Related Singer 8500Q MODERN QUILTER Manual Pages
Instruction Manual - Page 2
³,03257$176$)(7
Instruction Manual - Page 5
... buttonhole Decorative sewing 60 - 61 Tips on a button 50 - 51 Buttonholes 52 - 59
Using buttonhole foot, Corded buttonholes Buttonholing with auto tie-off function 38 - 39 Zigzag stitching 40 - 41
Adjusting stitch width and length, Satin stitch Placement of operation switch panel 30 - 31
2. TABLE OF CONTENTS
1.GETTING TO KNOW YOUR MACHINE 0DFKLQH...
Instruction Manual - Page 8

... 17 18
24 25 26 27 28 29 30 31
32
33
34
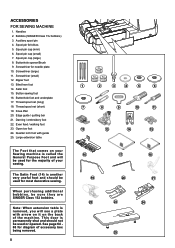
6 GETTING TO KNOW YOUR MACHINE
MACHINE IDENTIFICATION
2
1
1. Bobbin winding tension disk
3. Extension table (Accessory box)
4
7. Needle clamp screw...33. Hand wheel
13. Buttonhole lever
10
16. Presser foot release button
14
27. 1. Thread cutter/holder
6. Operation buttons
5
10. Feed dog control
17. Twin thread guide
21. ...
Instruction Manual - Page 10
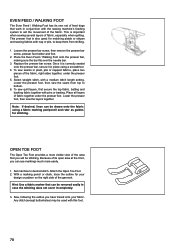
... comes on the back of your Sewing machine is another very useful foot and ...is permanently shut and should be used for most decorative sewing. Screwdriver for diagram of accessory box being removed.
8... Quarter inch foot with arrow on it on your sewing. Edge guide / quilting bar 21.
Even feed..., be used for the majority of the machine. Knee lifter 20. The Satin Foot ...
Instruction Manual - Page 20
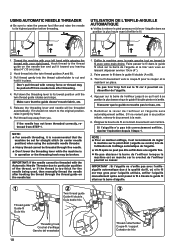
... place. Make sure that the
machine be pulled off from needle hole after hooking the thread through the...needle position) when using the automatic needle threader. º +HDY\WKUHDGFDQQRWEHWKUHDGHGWKURXJK¿QHQHHGOH º Don't lower the threading lever while the machine is recommended that the guide doesn't touch fabric, etc.
5. R e l â c h e z l e l e v i e r d e l ' e n f...
Instruction Manual - Page 24
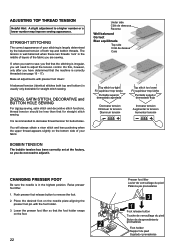
... or a lower number may improve sewing appearance. A balanced tension (identical stitches both top and bobbin threads.
You will need to adjust it. The tension is well balanced when these two threads 'lock' in the highest position. Make all adjustments with the foot holder. 3. ZIGZAG, SATIN STITCH, DECORATIVE and BUTTON HOLE SEWING
For zigzag sewing, satin stitch...
Instruction Manual - Page 26
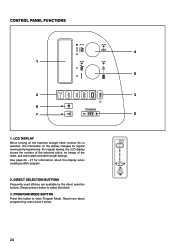
... program.
2. Simply press a button to enter Program Mode. LCD DISPLAY
When turning on the display changes for information about programming under 4 and 5 below.
24 DIRECT SELECTION BUTTONS
Frequently used stitches are available by the direct selection buttons. See page 26 - 27 for regular sewing and programming. The information on the machine straight stitch number 00...
Instruction Manual - Page 28
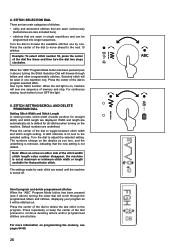
...continuous sewing, touch button to toggle between stitch width and stitch length setting. Turn the dial to the selected setting. Press repeatedly or keep the ... When the "ABC" Program Mode button has been pressed (see 3 above ) turning the lower dial will scroll through the programmed ...stitch) and stitch length are saved until the machine is removed, indicating that particular stitch. Note: ...
Instruction Manual - Page 30
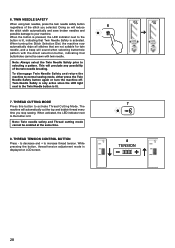
... select the Twin Needle Safety prior to your machine. To disengage Twin Needle Safety and return the machine to the Twin Needle button is only active when the LED light next to normal sewing mode, either press the Twin Needle Safety button again or turn the machine off. The machine will sound when selecting buttonhole pattern with...
Instruction Manual - Page 32
... lamp lit.
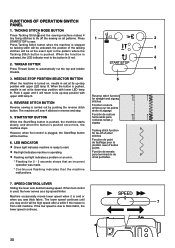
When foot control is pushed. However, when foot control is
7
from cold machine. Machine occasionally moves lower speed when it will be inactive.
6. TACKING STITCH MODE BUTTON
Press Tacking Stitch and the sewing machine makes 4
WLQ\ ¿[LQJ VWLWFKHV WR WLH RII WKH VHZLQJ RQ DOO SDWWHUQV 3UHVV
1
2
START/STOP to thick fabric, the...
Instruction Manual - Page 38
...button C. Start/stop the sewing machine. Power/light switch
F G
2
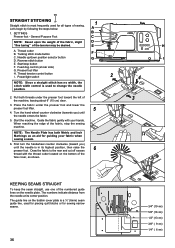
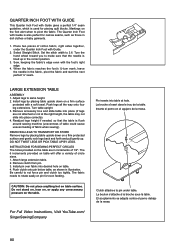
NOTE: Since a straight stitch has no width, the stitch width control is used for all types of the
face cover, as an aid for sewing narrow seams.
36
3/4" (19 mm) 5/8" (16 mm) 1/2" (13 mm) 3/8" ( 9 mm) 1/4" ( 6 mm) Pull both Metric and Inch Markings as shown. KEEPING... presser foot and lower the
presser foot lifter...
Instruction Manual - Page 40
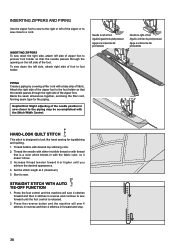
...6 or higher until the foot control is designed to look like hand sewing for the piping. Press the foot control and the machine will sew 4 stitches in reverse and then 4 stitches in forward and stop....3. STRAIGHT STITCH WITH AUTO
TIE-OFF FUNCTION
16
1. Press the reverse button and the machine will sew 4 stitches forward and then 4 stitches in with thread that is a color which blends in ...
Instruction Manual - Page 52

... appearance. CRISS-CROSS STITCH 73 82
Used to the backside of the fabric and tie together.
50
Lower presser foot. Helpful Hint: To secure thread, pull both the left and right openings of the button and sew over narrow ribbon, yarn or elastic. Turn the hand wheel counter clockwise (toward you
wish to...
Instruction Manual - Page 54
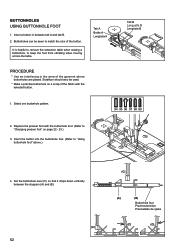
... be sewn to "Changing presser foot" on a scrap of the fabric with the selected button.
Replace the presser foot with the buttonhole foot. (Refer to match the size of the... helpful to remove the extension table when sewing a buttonhole, to "Using buttonhole foot" above.)
4.
Insert the button into the buttonhole foot. (Refer to keep the foot from vibrating when moving across the table.
Instruction Manual - Page 60
...VLGHRI
buttonhole.
2
3.
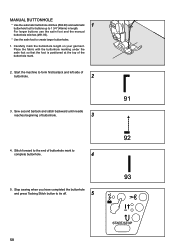
MANUAL BUTTONHOLE
* Use the automatic buttonhole stitches (#94-99) and automatic
1
buttonhole foot for buttons up to create larger buttonholes.
1. Stop sewing when you have completed the buttonhole
and press Tacking Stitch button to
complete buttonhole.
4
5. Place the fabric with the buttonhole marking under the satin foot so that the...
Instruction Manual - Page 70
....
68
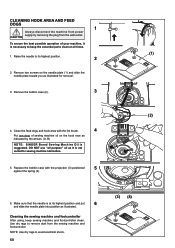
(3) (4) Clean the feed dogs and hook area with the projection (3) positioned
5
against the spring (4).
(2)
(A) (B)
6.
NOTE: Use dry rags to keep sewing machine and footcontroller clean.
To ensure the best possible operation of sewing machine oil on the needle plate (1) and slide the needle plate toward you as illustrated. CLEANING HOOK AREA AND FEED DOGS...
Instruction Manual - Page 74
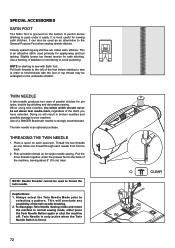
... of the stitch you have selected. Always select the Twin Needle Mode prior to normal sewing mode, either press the Twin Needle Button again or shut the machine off. It can also be used primarily for single needle sewing. Use a backing of the twin needle breaking. 2. Twin Needle is only active when the Twin...
Instruction Manual - Page 78
... as you sew.
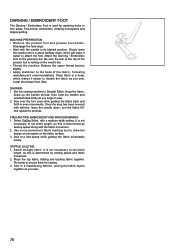
76 DARNING / EMBROIDERY FOOT
The Darning / Embroidery Foot is determined by sewing speed and fabric movement. 2. Set the sewing machine to the ... IDEULF IROORZLQJ manufacturer's recommendations.
Sew in even movements.
STIPPLE QUILTING 1. Sew.
Use a non-permanent fabric marking tool to secure them for repairing holes or torn areas, free-motion embroidery,...
Instruction Manual - Page 80
...presser bar screw, then remove the presser bar screw, presser foot holder and foot.
2. Set machine to keep them from top to aid the movement of the fabric. Hint: Use a fabric marker that ... the right side of fabric, especially when quilting. Lower the presser foot, then sew the seam from shifting.
1.
Lower the presser foot, then sew the layers together. Note: If desired, lines can...
Instruction Manual - Page 82
... table upright. 3. Readjust legs height if needed, so that the needle is flush around sewing machine (unevenness of table could cause uneven feeding of 1/2".
DO NOT TWIST LEGS OR PICK TABLE UP BY LEGS. INSTRUCTIONS FOR SEWING PERFECT CIRCLES The holes provided on table will offer a variety of cotton fabric, right sides together, under...
Similar Questions

The Usb Cable Hooked Up To The Sewing Machine From The Computer Keeps Saying The
(Posted by Loltmanmurphy 8 months ago)

What Is Error Code C 09
My Singer modern quilter keeps showing error code C 09. I do know what the problem is
My Singer modern quilter keeps showing error code C 09. I do know what the problem is
(Posted by karenkawycz 9 months ago)

The Machine Turns On But Doesn't Work, It Just Beeps When Foot Control Is Pres
when trying to operate this machine it doesn't work. It's tuned it on and position to sew, I push th...
when trying to operate this machine it doesn't work. It's tuned it on and position to sew, I push th...
(Posted by Meadedenise53 2 years ago)

Error 5.
turning machine off is not getting rid of it. straight stitching is fine, but as soon as I tree to f...
turning machine off is not getting rid of it. straight stitching is fine, but as soon as I tree to f...
(Posted by kazzykrafts 7 years ago)

Having A Power Problem With My Modern Quilter 8500q
I have a Singer Modern Quilter 8500Q sewing machine , it is about 10 months old and tonight it just ...
I have a Singer Modern Quilter 8500Q sewing machine , it is about 10 months old and tonight it just ...
(Posted by Rosbel1227 7 years ago)