Singer 7467S Confidence Stylist Support Question
Singer 7467S Confidence Stylist Support Question
Find answers below for this question about Singer 7467S Confidence Stylist.Need a Singer 7467S Confidence Stylist manual? We have 1 online manual for this item!
Question posted by jorgeivpalomino on November 16th, 2019
Error 88 Singer Brilliance 7467
Shows on display 88, what can I fix it, Help!!!
Current Answers
Answer #1: Posted by waelsaidani1 on November 17th, 2019 12:54 PM
waelsaidani1

Member since:
May 12th, 2013 Points: 19,501,787

Member since:
May 12th, 2013 Points: 19,501,787
All of the Error Messages signify that the upper tension path is not threaded correctly. Check that the transparent thread path located at the top of the machine is threaded correctly.
Hold thread in both hands and slip under transparent thread guide. While holding the thread securely, pull the thread towards you and then slip it back and forth like you were flossing. You should hear or feel two clicks as the thread slips past the thread guides.
Related Singer 7467S Confidence Stylist Manual Pages
Instruction Manual - Page 2

... power is 0.3w, maximum voltage is DC 5v, if the LED lamp is used by the manufacturer as contained in . "Attention the following ."
SINGER is necessary when this sewing machine.
"Never drop or insert any object into any way. Unplug the foot controller of electric shock:"
1. If the plug does not fit fully...
Instruction Manual - Page 5

... & embroidery foot 74 - 75 Side Cutter Attachment 76 - 77 Even feed / Walking foot, Twin needle 78 - 79 Straight stitch needle position 80 - 81
5. KNOWING YOUR SEWING MACHINE Machine identification 6 - 7 Accessories 8 - 9 Setting up your machine 10 - 11 Spool pins, Presser foot lifter 12 - 13 Feed dogs control 12 - 13 Converting to free-arm...
Instruction Manual - Page 8

... cover plate 26. Bobbin winder shaft 8. Power/light switch 15. Feed dog control 19. Alternate Thread Cutter 28. Bobbin cover release button 34. KNOWING YOUR SEWING MACHINE
MACHINE IDENTIFICATION
1. Thread tension control 4. Thread guide 23. Needle 25. Needle bar 27. Power line cord 35. Instruction manual
1 2 3 4 5
6
12 13
14 15
20 21 22...
Instruction Manual - Page 10

.... Spool pin felt discs (2) 5. Blind hem foot 13. Spool pin cap (medium) 7. Buttonhole foot 14. Soft-sided dust cover
The Foot that comes on your Sewing machine is another very useful foot and should be used for needle plate 10. ACCESSORIES
1. Spool pin cap (large) 8. Gathering foot 15.
Zipper foot 11. The...
Instruction Manual - Page 14

...(towards the right (symbol that shows the feed dogs above the line).
3) Turn the machine so that the needle is being used.
Raise the lifter to the middle position to sew.
2. The diameter of the... spool pin cap should be larger than that of the machine facing you, push the feed dog lever down and ...
Instruction Manual - Page 16

...'s clothes, cuffs, trouser legs, and other awkward places.
14 With the extension table removed the machine converts into place until it clicks. CONVERTING TO FREE-ARM SEWING
Your machine can be used either as a freearm model. With the extension table in position, it off to the left as a standard flat-bed model. To...
Instruction Manual - Page 26

...sewing project. Tighten the needle clamp screw with the flat side toward you .
2.
Flat side Côté plat Lado plano
Needle Aiguille Aguja
Stop pin Butée Pasador
Helpful... makes it can be sure to use a Singer Branded Needle. Remove the needle by turning it... selection. And be of weight.
Always disconnect the machine from power supply by turning the hand wheel toward you...
Instruction Manual - Page 28

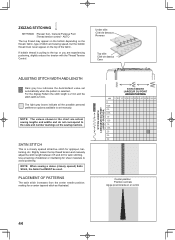
...correctly set at the factory, so you are sewing. Make all adjustments with the word "AUTO" exposed on the tension control dial on top of the machine. Raise presser foot lifter. 1.
A balanced... that the stitching is well balanced when these two threads 'lock' in the up position. Helpful Hint: A slight adjustment to remove the foot. 2. STRAIGHT STITCHING
The appearance of your stitching...
Instruction Manual - Page 32

...
30 Patterns in the "Other Information" Section. buttonholes. The LED will automatically sew at an Auto/Default Stitch Length and Width.
NOTE: Instructions for manually changing... length and width/needle position controls
*Auto/Default settings Your sewing machine will sound. Auto (preprogrammed) default settings are fixed. Starting at the Auto / Default Position. *Manual settings Once...
Instruction Manual - Page 34

... reduce the stitch width automatically and save broken needles and possible damage to normal sewing mode. While the switch is lit red. Twin needle mode switch Commutateur de mode d' aiguilles Interruptor de modo de aguja doble
32 Helpful Hints: 1.
Twin Needle is only active when the Twin Needle Switch is pushed and...
Instruction Manual - Page 36

... puntadas hacia atrás
* Reverse stitch function for tie-off of other stitches ( ) The sewing machine makes 4 tiny tacking stitches to tie off the sewing pattern to sew in the pattern where the reverse/tacking stitch button is pushed. The machine will be at the start and end of the tacking stitches will continue to...
Instruction Manual - Page 42

...) 1/4" ( 6 mm) Place the fabric under the presser foot toward you until the needle enters the fabric.
5. When reaching the edge of the material, stop the sewing machine.
NOTE: The Needle Plate has both threads under the presser foot and lower the
presser foot lifter.
4.
Instruction Manual - Page 44

...Helpful Hint: Slight adjusting of the needle position to sew closer to the piping may be accomplished with desired top stitching color. When
sewing the machine will pull this thread to look like hand sewing... 2. This thread should not show. 3. Increase thread tension a little at a time and continue until
you acheive the desired appearance. 4.
Start to sew. NOTE: For a dramatic ...
Instruction Manual - Page 46
... is a closely spaced attractive stitch for sheer materials to the scale and number markings on the top of stitch and sewing speed, but the bobbin thread must never appear on the sewing machine. making for satin stitching. General Purpose Foot :Thread tension control - NOTE: The values shown in the chart are experiencing puckering...
Instruction Manual - Page 54

... stitch is most often sewn with a Wing Needle (Singer Style 2040) to smock. 2. Helpful Hint: Often mirror imaging patterns #14 and #31 will... be used for picot-like edges and for applique work.
With a narrow strip of fabric directly under the line of gathers across the fabric that you
wish to create holes in heirloom sewing...
Instruction Manual - Page 68

... one of buttonhole patterns.
2. Lower the buttonhole lever (C) so that measures the size of the button and calculates the size buttonhole required. SEWING A BUTTONHOLE USING BUTTONHOLE FOOT
Your machine offers you two different widths of bartack and keyhole buttonholes sewn by a system that it drops down vertically between the stoppers (A) and (B).
(C)
66...
Instruction Manual - Page 70

...du tissu Marca de material 9. Be careful not to the rear.
7. Fabric marking
mark
Marque du tissu Marque
Marca de material Marca
* Sewing will be completed automatically in the center of the stitching.
68
Buttonhole foot alignment position Position d'alignement du pied boutonnière Posició... to cut any of the buttonhole. 5. While holding the top thread, start the machine.
Instruction Manual - Page 74

... the essential parts clean at its highest position.
2
2. CARING FOR YOUR MACHINE
CLEANING HOOK AREA AND FEED DOGS
1
Always disconnect the machine from power CAUTION supply by the arrows. (A, B)
NOTE: Singer Brand Sewing Machine Oil is at all purpose" oil as illustrated for sewing machine lubrication.
5. Make sure that the needle is suggested. DO NOT use "all...
Instruction Manual - Page 76

... draw your pattern onto the right side of your hands.
• Cover feed dogs with your hands.
• For free motion quilting (stippling): Set machine to the General Purpose Foot when sewing Stretch Stitches. Select a long stitch length,which remains flat. DARNING & EMBROIDERY FOOT
This special foot may be used primarily for...
Instruction Manual - Page 80

...decorative sewing.
Place a spool on needle clamp.
3. NOTE: Needle threader cannot be used to the back of the machine, ... Helpful Hints: 1. Raise presser bar to its highest position.
2. EVEN FEED / WALKING FOOT
Even feed / Walking foot enables you to sew ...machine with perfect matching. Pick up bobbin thread as one thread through each spool pin. This will preclude any possibility of a Singer...
Similar Questions

My Sewing Machine Beeps When I Push The Presser Foot But It Doesn't Seem To Wo
(Posted by elizheva 1 year ago)

I Get An Error 88 And Then It Stops Sewing
(Posted by jina923760 3 years ago)

Bobbin Cover Plate / Needle Plate
I just finished cleaning my 7467S Singer machine. I am not able to get the bobbin cover plate to go ...
I just finished cleaning my 7467S Singer machine. I am not able to get the bobbin cover plate to go ...
(Posted by rsarge 8 years ago)

I Need An Extnesion Table For My Sewing Machine Singer 7258 Stylist
(Posted by loucksd 10 years ago)

Buttonhole Stitch Is Not Working
I am trying to make a buttonhole on my singer 7467. I have read the manual and followed the directio...
I am trying to make a buttonhole on my singer 7467. I have read the manual and followed the directio...
(Posted by dkmartinez67 10 years ago)