Singer 7285Q Patchwork Support Question
Singer 7285Q Patchwork Support Question
Find answers below for this question about Singer 7285Q Patchwork.Need a Singer 7285Q Patchwork manual? We have 1 online manual for this item!
Question posted by mail4samual on December 9th, 2013
What Does An E2 Code Mean And How Can I Fix It?
I wound the bobbin but the 2 C's (one backward) reamined. Started sewing and it immediately quit and E2 code came up.
Current Answers
Related Singer 7285Q Patchwork Manual Pages
Instruction Manual - Page 2
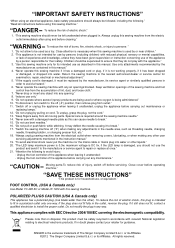
...bobbin, or changing presser foot, etc." 18. FOOT CONTROL (USA & Canada only)
Use Model YC-485 EC or Model JF-1000 with EEC Directive 2004/108/EC covering the electromagnetic compatibility. "IMPORTANT SAFETY INSTRUCTIONS"
"When using this sewing machine."
Return the sewing machine... use of the sewing machine and foot
control free from the electric outlet immediately after using and ...
Instruction Manual - Page 5
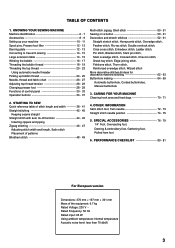
...SEWING MACHINE 0DFKLQHLGHQWL¿FDWLRQ 6 - 7 Accessories 8 - 9 Setting up your machine 10 - 11 Spool pins, Presser foot lifter 12 - 13 Darning plate 12 - 13 Converting to free-arm sewing 14 - 15 Large extension table 14 - 15 Winding the bobbin 16 - 17 Threading the bobbin...
3. CARING FOR YOUR MACHINE Cleaning hook area and feed dogs 70 - 71
4. STARTING TO SEW Quick reference table of...
Instruction Manual - Page 8
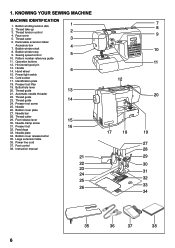
...Needle clamp screw
31. Large extension table
36. Bobbin winder shaft
8. Horizontal spool pin
13. Foot release lever
15
30. Needle plate
34. Foot control
38. 1. Face cover
5. Sewing speed control
5
10. Presser foot
16
32. Power line cord
37. KNOWING YOUR SEWING MACHINE
MACHINE IDENTIFICATION
1. Pattern number reference guide
11. Operation buttons...
Instruction Manual - Page 10
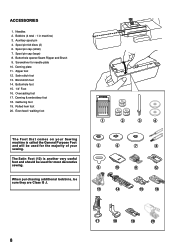
... foot
The Foot that comes on your sewing. Needles 2. Screwdriver for most decorative sewing. Buttonhole foot 15. 1/4" Foot 16. Overcasting foot 'DUQLQJ HPEURLGHU\IRRW 18. Bobbins (4 total - 1 in machine) 3.
The Satin Foot (12) is called the General Purpose Foot and will be used for the majority of your Sewing machine is another very useful foot and...
Instruction Manual - Page 16
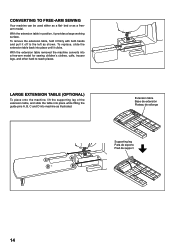
CONVERTING TO FREE-ARM SEWING
Instruction Manual - Page 20
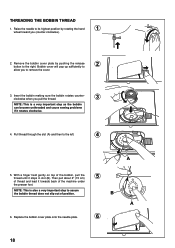
... unthreaded and cause sewing problems if it rotates clockwise.
4. Replace the bobbin cover plate onto the needle plate.
6
18 With a finger held gently on top of the bobbin, pull the thread until it towards back of thread and lead it stops in slot (B). Then pull about 6" (15 cm)
5
of the machine under
the presser...
Instruction Manual - Page 22
...of
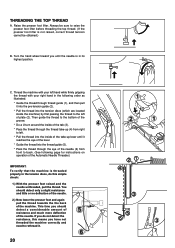
resistance and much more deflection
of plate (2). Turn the hand wheel toward you do this means you should detect only a slight resistance and little or no deÀection of the needle... page for instructions on operation of the Automatic Needle Threader.)
IMPORTANT:
To verify that the machine is not raised, correct thread tension cannot be obtained.)
B. Then guide the thread to ...
Instruction Manual - Page 26
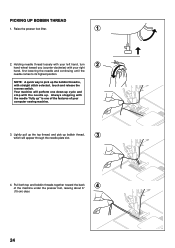
... back of the machine under the presser foot, leaving about 6"
4
(15 cm) clear.
24 Pull both top and bobbin threads together toward you (counter-clockwise) with straight stitch selected, touch and release the reverse switch. NOTE: A quick way to its highest position. PICKING UP BOBBIN THREAD
1. Holding needle thread loosely with your computer sewing machine.
3.
Instruction Manual - Page 28
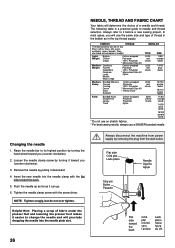
...use on stretch fabrics. * For best sewing results, always use the same size and type of thread in the bobbin as it easier to needle and thread ...selection. Push the needle up as far as in the top thread supply.
In most cases, you (counter-clockwise).
3. Insert the new needle into the needle plate slot.
26
Always disconnect the machine...
Instruction Manual - Page 30
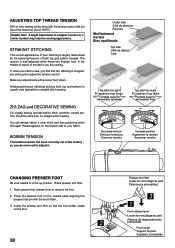
...DQ\DGMXVWPHQWVZLWKSUHVVHUIRRWµGRZQ
A balanced tension (identical stitches both top and bobbin threads.
Lower the presser foot lifter so that the foot holder snaps
on the foot.
... pin with the tension control dial (on top of the machine) set at "AUTO" . ZIG ZAG and DECORATIVE SEWING
For zigzag sewing and decorative stitch functions, thread tension should be done with the...
Instruction Manual - Page 32
... número de puntada
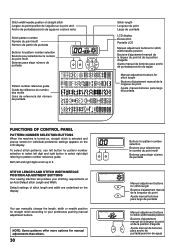
FUNCTIONS OF CONTROL PANEL
PATTERN NUMBER SELECTION BUTTONS
When the machine is turned on, straight stitch is selected and pop-up to pattern number reference .../posición de aguja STITCH LENGTH AND STITCH WIDTH/NEEDLE POSITION ADJUSTMENT BUTTONS
Your sewing machine will produce your preference pushing manual adjustment buttons. You can manually change the length,...
Instruction Manual - Page 34
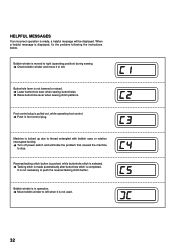
...fix the problem following the instructions below.
Bobbin winder is in foot control plug.
0DFKLQH LV ORFNHG XS GXH WR WKUHDG HQWDQJOHG ZLWK EREELQ FDVH RU URWDWLRQ interrupted forcibly. ÎTurn off power switch and eliminate the problem that caused the machine
to stop. Bobbin... sewing. ÎCheck bobbin winder and move it to push the reverse/tacking stitch button.
Instruction Manual - Page 36
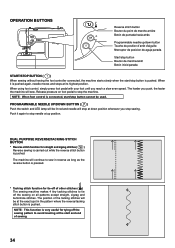
... out while the reverse stitch button is very useful for tie-off of other stitches ( ) The sewing machine makes 4 tiny tacking stitches to stop the machine. When it again to avoid raveling at its highest position. NOTE: When foot control is connected, start /stop button is pushed again, needle moves and stops at the...
Instruction Manual - Page 38
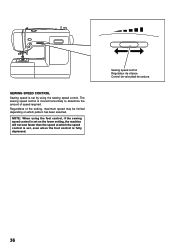
... depending on which the speed control is set on the lower setting, the machine will not sew faster than the speed at which pattern has been selected. SEWING SPEED CONTROL
Sewing speed is set by using the foot control, if the sewing speed control is set , even when the foot control is moved horizontally to...
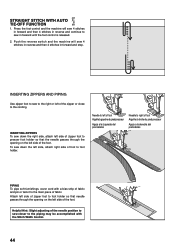
Instruction Manual - Page 44
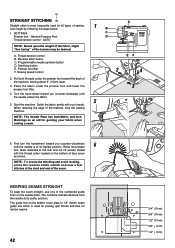
... on the bottom of face cover
as an aid for guiding your hands. Start/stop the sewing machine. When reaching the edge of sewing. The guide line on the bobbin cover plate is 1/4" (6mm) seam guide line which is at its highest position.
Sewing speed control
EF
2
4
2. Turn the hand wheel toward you (counter-clockwise)
6
until...
Instruction Manual - Page 46
...
Needle to the cording. Attach left side of the foot.
INSERTING ZIPPERS AND PIPING
Use zipper foot to sew to the main piece of the foot. Press the foot control and the machine will sew 4 stitches in reverse and then 4 stitches in forward until the foot control is released.
2. Helpful Hint: Slight adjusting...
Instruction Manual - Page 56
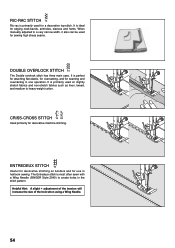
CRISS-CROSS STITCH
Used primarily for use in heirloom sewing. The Entredeux stitch is primarily used on borders and for decorative machine stitching. It is most often sewn with a Wing Needle ... and hems. When manually adjusted to a very narrow width, it also can be used for sewing high stress seams.
DOUBLE OVERLOCK STITCH
The Double overlock stitch has three main uses.
It is primarily...
Instruction Manual - Page 64
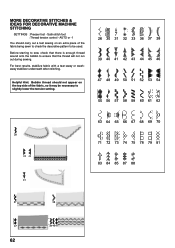
... being sewn to check the decorative pattern to ensure that there is enough thread wound onto the bobbin to be necessary to slightly lower the tension setting.
62 Before starting to sew, check that the thread will not run out during sewing.
Satin stitch foot :Thread tension control - For best results, stabilize fabric with a tear...
Instruction Manual - Page 68
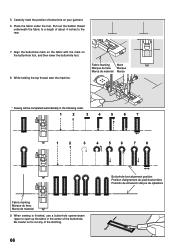
... marking 0DUTXHGXWLVVX 0DUFDGHPDWHULDO
0DUN 0DUTXH 0DUFD
* Sewing will be completed automatically in the center of buttonhole on the buttonhole... holding the top thread, start the machine. Place the fabric under the foot.
When sewing is finished, use a buttonhole opener/seam
ripper to cut any of about 4 inches to the rear.
7. Pull out the bobbin thread underneath the fabric to...
Instruction Manual - Page 82
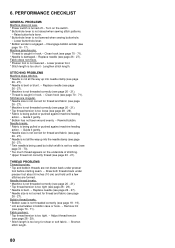
.... * Stitch length is not raised when sewing stitch patterns.
- Draw both threads back under...stitches are not drawn back under presser
foot before starting seam. - Remove lint (see page 70 - ... 29). * Fabric is being pulled or pushed against machine feeding
action. - Stitches are irregular. * Needle size...it gently. * Bobbin has not been wound evenly. - Replace needle (see page 20 - ...
Similar Questions

I Have A M3500 Singer Sewing Machine .got Tread Tangled In The Bobbin Area .just
(Posted by guitijoon 2 years ago)

Quit Zig Zag Stitching Model 7285q
only a straight stiched when set to 03 zig zag how do I fix this machine was purchased this year.
only a straight stiched when set to 03 zig zag how do I fix this machine was purchased this year.
(Posted by lindapopp 8 years ago)
7285q Patchwork Does Not Pick Up The Bobbin Thread, How Can I Fix?
It worked when I bought it, only used it 2 times, and now I can not get it to pick up the bobbin thr...
It worked when I bought it, only used it 2 times, and now I can not get it to pick up the bobbin thr...
(Posted by dwhiting45 9 years ago)

What Dies E7 Mean Of Sewing Machine Model 7256
(Posted by smtopliffe 10 years ago)
