Singer 7256 Fashion Mate Support Question
Singer 7256 Fashion Mate Support Question
Find answers below for this question about Singer 7256 Fashion Mate.Need a Singer 7256 Fashion Mate manual? We have 1 online manual for this item!
Question posted by scan1033486 on July 30th, 2015
Digital Display
not sewing..digital display reading backwards C followed by C
Current Answers
Related Singer 7256 Fashion Mate Manual Pages
Instruction Manual - Page 3
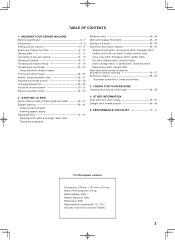
... equipment: 6.6 kg Rated Voltage: 230V ~ Rated Frequency: 50Hz Rated input: 65W Rated ambient temperature: 15 - 35°C Acoustic noise level: less than 70db(A)
3 KNOWING YOUR SEWING MACHINE Machine identification 6 - 7 Accessories 8 - 9 Setting up your machine 10 - 11 Spool pins, Presser foot lifter 12 - 13 Darning plate 12 - 13 Converting to free-arm...
Instruction Manual - Page 6
...
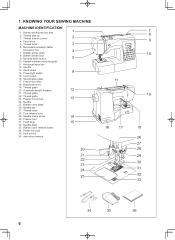
27. Needle clamp screw
14
30. Thread guide 23. Thread cutter
28. Bobbin cover release button
34. Cord socket
16. Thread guide
22. KNOWING YOUR SEWING MACHINE
MACHINE IDENTIFICATION
1. Bobbin winder stop 9. Needle
25. Hand wheel 14. Presser foot lifter
18. Feed dogs
15
32. Thread tension control
2
4. Thread cutter
3
6. Foot release lever...
Instruction Manual - Page 8
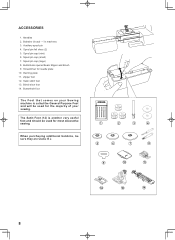
... bobbins, be used for needle plate 10. Needles 2. Spool pin cap (small) 7. Darning plate 11. Buttonhole foot
The Foot that comes on your sewing.
Bobbins (4 total - 1 in machine) 3. Screwdriver for the majority of your Sewing machine is another very useful foot and should be sure they are Class I5 J.
1
2
3
4
5
6
7
8
9
10
11
12
13
14...
Instruction Manual - Page 14
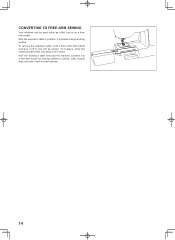
CONVERTING TO FREE-ARM SEWING
Your machine can be used either as a freearm model. With the extension table in position, it off to -reach places.
14 bed ... and pull it provides a large working surface. To replace, slide the extension table back into a free-arm model for sewing children's clothes, cuffs, trouser legs, and other hard-to the left as shown. With the extension table removed the...
Instruction Manual - Page 18
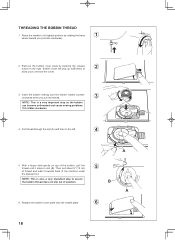
... cover will pop up sufficiently to assure the bobbin thread does not slip out of the machine under
the presser foot. NOTE: This is a very important step as the bobbin can become unthreaded and cause sewing problems if it rotates clockwise.
4. Insert the bobbin making sure the bobbin rotates counterclockwise when you...
Instruction Manual - Page 24
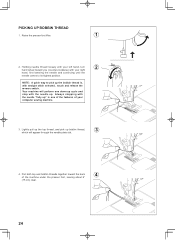
... to pick up the bobbin thread is one down-up cycle and stop with your computer sewing machine.
3. Your machine will appear through the needle plate slot.
4. Pull both top and bobbin threads together toward... of the features of your left hand, turn
2
hand wheel toward the back of the machine under the presser foot, leaving about 6"
4
(15 cm) clear.
24 NOTE: A quick way to ...
Instruction Manual - Page 26
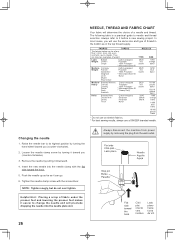
...downward. 4. Insert the new needle into the needle plate slot.
26
Always disconnect the machine from the wall-outlet. Always refer to change the needle and will preclude dropping the...use a SINGER branded needle.
Push the needle up as far as it before a new sewing project.
The following table is a practical guide to its highest position by pulling it toward you (counter-clockwise...
Instruction Manual - Page 28
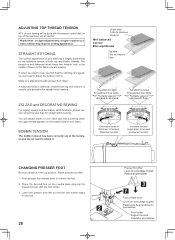
...the presser foot lifter so that the stitching is largely determined by the balanced tension of the machine) set at "AUTO" . A balanced tension (identical stitches both top and bobbin threads..... 2. Make any adjustments with the foot holder. 3.
ZIG ZAG and DECORATIVE SEWING
For zigzag sewing and decorative stitch functions, thread tension should be done with the tension control dial...
Instruction Manual - Page 30
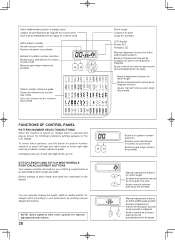
STITCH LENGTH AND STITCH WIDTH/NEEDLE POSITION ADJUSTMENT BUTTONS
Your sewing machine will produce your preference by pushing manual adjustment buttons.... largo de puntada
Manual adjustment buttons for individual preference settings appears on the LCD display. Left digit scrolls up to 6 and right digit scrolls up screen for stitch width/needle position Boutons d'ajustement manuel de la largeur...
Instruction Manual - Page 32
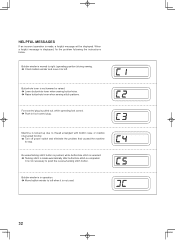
... off power switch and eliminate the problem that caused the machine
to left . Buttonhole lever is displayed, fix the problem following the instructions below.
When a helpful message is not lowered or raised. Lower buttonhole lever when sewing buttonholes. Raise buttonhole lever when sewing stitch patterns. HELPFUL MESSAGES
If an incorrect operation is made...
Instruction Manual - Page 34
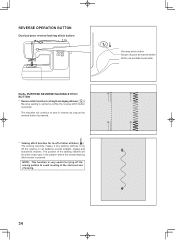
... exact spot in reverse as long as the reverse button is pressed.
* Tacking stitch function for tie-off of other stitches ( ) The sewing machine makes 4 tiny tacking stitches to sew in the pattern where the reverse/tacking stitch button is pushed. The position of the tacking stitches will continue to tie off the...
Instruction Manual - Page 38
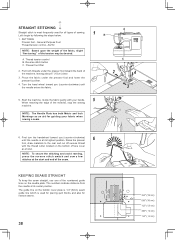
... of the numbered guide lines on the bottom of the material, stop the sewing
machine.
Thread tension control
C
B. Reverse stitch button
C.
First turn the handwheel toward you (counter-clockwise) until the needle enters the fabric.
2
4
3
5.
Let's begin by following the steps below.
1
B
1. Presser foot lifter
2. Guide the fabric gently with the thread...
Instruction Manual - Page 50
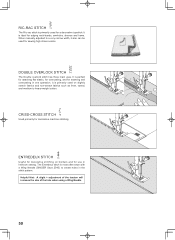
... very narrow width, it also can be used for a decorative topstitch. CRISS-CROSS STITCH
Used primarily for sewing high stress seams.
DOUBLE OVERLOCK STITCH
The Double overlock stitch has three main uses. Helpful Hint: A slight...
The Ric-rac stitch is primarily used for decorative machine stitching. The Entredeux stitch is most often sewn with a Wing Needle (SINGER Style 2040) to heavy-weight...
Instruction Manual - Page 54
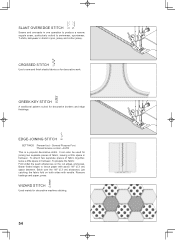
Stitch over the 1/8" (0.3 cm) allowance, just catching the fabric fold on the cut edges, and press. CROSSED STITCH
Use to sew and finish elastic fabrics or for decorative machine stitching.
54 AUTO
This is a popular decorative stitch. To prepare the fabric: Fold under the seam allowances on both sides with about 1/8" (0.3 cm) space...
Instruction Manual - Page 56
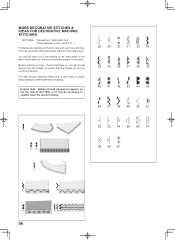
... to slightly lower the tension setting.
56 MORE DECORATIVE STITCHES & IDEAS FOR DECORATIVE MACHINE STITCHING
SETTINGS :Presser foot - AUTO or -1
Following are examples of how to ensure that the thread will not run out during sewing. Before starting to sew, check that there is enough thread wound onto the bobbin to use some other...
Instruction Manual - Page 60
... the fabric to the rear.
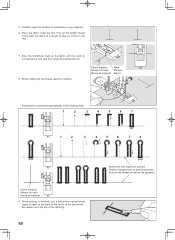
7. While holding the top thread, start the machine. When sewing is finished, use a buttonhole opener/seam
ripper to cut any of the buttonhole...fabric in the following order.
1
2
3
4
5
6
7
1
2
3
4
5
6
7
8
Fabric marking Marque du tissu Marca de material 9. Fabric marking
Mark
Marque du tissu Marque
Marca de material Marca
* Sewing will be ...
Instruction Manual - Page 64
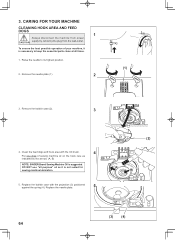
DO NOT use "all purpose" oil as
indicated by removing the plug from power CAUTION supply by the arrows. (A, B)
NOTE: SINGER Brand Sewing Machine Oil is not suited for sewing machine lubrication.
5. Remove the needle plate (1).
(1)
2
3. Clean the feed dogs and hook area with the projection (3) positioned against the spring (4). 3. Replace the needle plate.
5
(2)
(A) (B)
...
Instruction Manual - Page 66
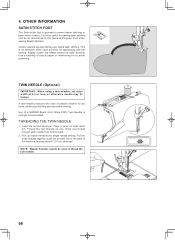
... easily. Use of thread. Thread the two threads as for satin stitching. Slightly loosen top thread tension for single needle sewing.
It is an attractive stitch used to the back of the machine, leaving about 6" (15 cm) of a SINGER Brand 3mm (Style 2025) Twin Needle is grooved to permit dense stitching to...
Instruction Manual - Page 70
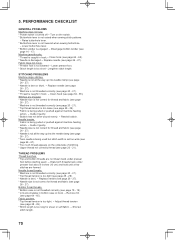
... not threaded correctly (see page 20 - 21). * Top thread tension is caught in hook. -
PERFORMANCE CHECKLIST
GENERAL PROBLEMS Machine does not sew. * Power switch is too tight. - THREAD PROBLEMS Thread bunches. * Top and bobbin threads are formed. Guide it gently. * Bobbin has not been wound evenly. - Fabric ...
Instruction Manual - Page 73
MS 199
PMS Warm Grey 5
7256
INSTRUCTION MANUAL MANUEL D'INSTRUCTION MANUAL DE INSTRUCCIONES
F-1
Similar Questions

How Do I Clear E7 Error Code On Singer Fashion Mate Model 7256 Sewing Machine
(Posted by cathyhowden1 2 years ago)

I Have A Singer Sew Mate 5400. It Shows A Backward C & A Frontward C & It Will
(Posted by ausmth 8 years ago)
Where To Oil Singer Sewing Machine 7256
My manual doesn't address where to oil my machine
My manual doesn't address where to oil my machine
(Posted by Anonymous-148513 9 years ago)

Beeping From Singer Sewing Machine Stylist Ii 5625
My sewing machine will beep and stop sewing after three inches of sewing. I have taken it to be repa...
My sewing machine will beep and stop sewing after three inches of sewing. I have taken it to be repa...
(Posted by arusheria 9 years ago)

7256 Sewing Machine Users Manual
I need the users manual for Singer sewing machine 7256.
I need the users manual for Singer sewing machine 7256.
(Posted by 7kAkqa3fP9 10 years ago)