Singer 5554 and 14HD854 HEAVY DUTY COMBO Support Question
Singer 5554 and 14HD854 HEAVY DUTY COMBO Support Question
Find answers below for this question about Singer 5554 and 14HD854 HEAVY DUTY COMBO.Need a Singer 5554 and 14HD854 HEAVY DUTY COMBO manual? We have 1 online manual for this item!
Question posted by lynnebennett on July 29th, 2015
Stitch Selection Dial Will Not 'seat' On Straight-stitch.
The selection dial will "seat" on corresponding special stitches, but not in the "gray" selections which is where the straight stitch selection is. I made an adjustment on the right-side, not front, of the machine and the machine worked, advancing the fabric, and going in the proper direction, and then, it decided to stop and not advance. Machine is sewing in reverse only. Thanks for any help you may offer. Lynne
Current Answers
Related Singer 5554 and 14HD854 HEAVY DUTY COMBO Manual Pages
Instruction Manual - Page 2

...this appliance only for examination, repair, electrical or mechanical adjustment. 4. Always unplug sewing machine from the electric outlet immediately
after using and before changing...21. Special care is intended for household use by a person responsible for use only. Do not pull or push fabric while stitching. Never drop or insert any other user servicing adjustments mentioned ...
Instruction Manual - Page 6

...Foot Lifter/ Adjusting Presser Foot Pressure...8 Accessories...10
Threading the Machine Winding the Bobbin...12 Inserting the Bobbin ...14 Threading the Upper Thread...16 Automatic Needle Threader ...18 Raising the Bobbin Thread ...20 Thread Tension ...22
Sewing How to Choose Your Pattern...24 Three Needle Position Dial ...26 Stitch Width Dial & Stitch Length Dial ...28 Sewing Straight Stitch...30...
Instruction Manual - Page 9

Pattern selector dial
8
14. Presser foot pressure adjustment
1
9
3. Presser foot
4
12
7. Stitch length dial
13. Thread tension dial
2. Reverse sewing lever
11
3
5. Removable extension table/ accessory storage
5
13
9. Three needle position dial
6
10. Thread take-up lever 2
10
4. Stitch width dial
7
12. One step buttonhole lever
14
15
2 Needle plate ...
Instruction Manual - Page 11

...
16
18. Power and light switch 19
22. Drop feed control
29. Upper thread guide
25. Face plate
20
26. EN Principal Parts of the Machine
16. Buttonhole stitch balance adjustment slot
18
21. Main plug socket
23.
Instruction Manual - Page 17

...o. Darning/ embroidery foot v. Even Feed foot w. Button sewing foot e. Seam ripper/ brush f. Blind hem foot s. All purpose foot b. they are not supplied with this machine; Hemmer foot q. Zipper foot c. Buttonhole foot d. Pack of needles h. Cording foot r. Quilting/ straight stitch foot t. Overcasting foot p. Gathering foot u. EN Accessories
Standard accessories...
Instruction Manual - Page 25

... the manual) to the resting position.
-
Attention: Turn power switch to its highest position.
- Set Stitch Width Dial (see item # 11 on page 2 of the needle clamp.
- Thread upper tension of machine up to Straight Stitch.
- Set the Pattern Selector Dial (see item # 9 on page 2 of the needle around the hook (D) from bottom to "0".
- Pass the...
Instruction Manual - Page 29

..., thread or fabric.
- Normal thread tension for all decorative sewing you
do not need to adjust it. B. Turn dial
to
lower number. D.
Lower thread tension
1
The bobbin tension has been set correctly at the factory, so you will be less than for straight stitch sewing. There is when a small amount of the upper
thread appears on...
Instruction Manual - Page 31

...setting the stitch width & the stitch length dials can adjust the density by moving the Stitch Length Dial to 1 to make the stitching closer, or towards 4 to "S1" or "S2", select the pattern desired with pattern selector dial, and adjust the stitch width with the stitch width dial. Stitch length dial e. To select the patterns indicated with the gray color, turn the stitch length dial to make...
Instruction Manual - Page 33

... Three Needle Position Dial
The needle position can be set the Three Needle Position Dial (See item # 9 on page 2 of topstitching, select needle position left , in the middle. a. Zig-zag L. Middle Needle Position R. For twin needle stitching, needle position is middle. For edge stitching or sewing parallel lines of the manual) to the left or right. Straight b.
Instruction Manual - Page 35

... increases as the dial approaches "4".
Standard zigzag stitches are usually achieved at Straight Stitch. Turn the Stitch Length Dial, and the length of stitch length dial while zig-zag stitching
Set the pattern selector dial to the straight stitch setting. The standard setting for the straight stitch infinite needle position. To use a longer stitch length when sewing heavier weight...
Instruction Manual - Page 37

EN Sewing Straight Stitch
To begin sewing, set the machine for straight stitch. (1)
Set the stitch length to start sewing. (3)
1
2
3
30 Place the fabric under the presser foot with the fabric edge lined up with the desired seam guide line on the needle plate. (2)
Lower the presser foot lifter, and then step on the foot controller to between 2 and 3.
Instruction Manual - Page 39

.... (2)
Cutting the Thread
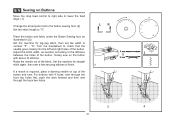
Pull the threads under and behind the presser foot. EN Reverse Sewing
To secure the beginning and the end of the face plate and into thread cutter (B). Sew a few reverse stitches. A
Release the lever and the machine will sew forward again. (1)
Removing the Work
Turn the handwheel toward you (counterclockwise) to bring...
Instruction Manual - Page 41
... for firm fabrics like denim, corduroy, poplin, duck, etc.
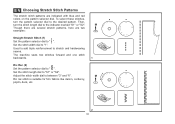
Adjust the stitch width dial to "1". EN Choosing Stretch Stitch Patterns
The stretch stitch patterns are two examples:
Straight Stretch Stitch (1) Set the pattern selector dial to stretch and hardwearing seams. The machine sews two stitches forward and one stitch backwards. Used to add triple reinforcement to " ".
Though...
Instruction Manual - Page 43

...is used for firm fabrics. Blind Hem:
Turn up the hem to make blind hem sewing even easier, use a blind hem
foot, available from your SINGER® retailer. (See...the machine settings are normally sewn
with the range shown on the
diagram at
a setting appropriate for the fabric.
M
Set the stitch length dial with a longer stitch length setting. Set the stitch width dial at...
Instruction Manual - Page 45
...'s chalk, mark the position of the buttonhole on stretch fabric, hook heavy thread or
cord under & to match the diameter of the gimp thread.
4. Set the stitch width at "6". Sew a test first to " ".
2. Stop the machine when the buttonhole cycle has completed. Set stitch length dial to determine this. 3. Lower the presser foot and start the...
Instruction Manual - Page 47

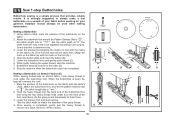
This dial should usually be adjusted by buttonhole balance control dial. EN Left and Right Side Balance for Buttonhole
Stitch density on right and left sides of buttonhole can be in a neutral position (between "+" and "-") If the stitches on the left side of buttonhole are too open, turn the dial to the left (+). * Turning dial to right closes...
Instruction Manual - Page 49
Set the machine for straight
a
2
ba b
stitch again, then sew a few securing stitches to finish.
1
If a shank is required, place a darning needle on Buttons
Move the drop feed control to right side to lower the feed dogs. (1)
Change the all purpose foot to the button sewing foot. (2) Set the stitch length to check that the needle goes cleanly...
Instruction Manual - Page 55

...Lycra®, swimsuit fabric, elastic.
For best sewing results always use the same thread in the ...EN Needle/ Fabric/ Thread Chart
NEEDLE, FABRIC, THREAD SELECTION GUIDE
NEEDLE SIZE 9-11 (70-80)
11-14 ...stitch length
to thread size and weight of fabric.
SINGER® 2032 Leather needles. 12 (80) to medium).
18 (110)
Heavy woolen, overcoat fabrics, upholstery fabrics, some Heavy duty...
Instruction Manual - Page 64
... bobbin case.
1. Insert a new needle. 3. Insert a new needle. 2. Replace the needle. The machine is not correctly threaded. 2. The bobbin case is not correctly inserted. 3.
The needle is not inserted correctly. 2. The stitch length is threaded wrong. 3. The bobbin case is adjusted wrong. 3. Fabric has been pulled. Replace the needle.
1. Thread the bobbin case...
Instruction Manual - Page 107

b. 3-thread Upper Looper Thread Wrapped Rolled Hem Stitching Set each tension dials to settings shown at right and test sew an a sample of your fabric. 2) a. 3-thread Standard Rolled Hem Stitching Set each tension dials to settings shown at right and test sew an a sample of your fabric.
Similar Questions

What Is The Cause Of My Singer Not To Stitch? I Did All The Maintenance Work And
(Posted by Rosebautista25rb 2 years ago)

Instructions For Machine Cutter Attachment Or Serger
(Posted by brendaprather 9 years ago)

How Do I Set Up The Machine To Correctly Sew On Jersey And Stretch Materials?
I tried the S1 and S2 and it didn't continue sewing but got stuck.
I tried the S1 and S2 and it didn't continue sewing but got stuck.
(Posted by shirlblissj 9 years ago)

Machine Will Not Pick Up Bobbin Thread & Stiff Hard To Move To Pick The Thread.
(Posted by Mparchapr 10 years ago)

My Curvy 8763 Wont Sew. Reverse Button Seems To Be Stuck In On Position.
lights flashing wont sew reverse button stuck in on position
lights flashing wont sew reverse button stuck in on position
(Posted by sandygregson 11 years ago)