Singer 4452 I HEAVY DUTY Support Question
Singer 4452 I HEAVY DUTY Support Question
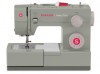
Find answers below for this question about Singer 4452 I HEAVY DUTY.Need a Singer 4452 I HEAVY DUTY manual? We have 1 online manual for this item!
Question posted by janofska on February 17th, 2016
Thanks... My Newer 4452 Has No Power... Reset Button?
was fine when used a day ago. Power strip is good... no light or power when turned on. suggestins
Current Answers
Answer #1: Posted by TechSupport101 on February 18th, 2016 12:14 PM
TechSupport101

Member since:
May 24th, 2013 Points: 12,171,275

Member since:
May 24th, 2013 Points: 12,171,275
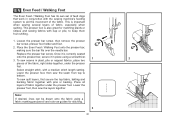
Hi. There is a Troubleshooting Guide on page 61 of the manual here https://www.helpowl.com/manuals/Singer/4452IHEAVYDUTY/221452 that should be able to assist with end-user power troubleshooting.
Related Singer 4452 I HEAVY DUTY Manual Pages
Instruction Manual - Page 2

... conditions is not operating properly. 18. Please turn all moving parts. The LED lamp maximum power is 0.3W, maximum voltage is intended for its service agent or a similar qualified person in order to be left unattended when plugged in. 2. EN IMPORTANT SAFETY INSTRUCTIONS
When using this sewing machine. DANGER - Always unplug this appliance is necessary...
Instruction Manual - Page 6

... of contents
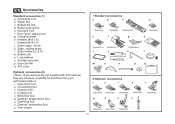
Machine Basics Principle Parts of the Machine ...2/4 Connecting Machine to Power Source...6 Two Step Presser Foot Lifter/ Adjusting Presser Foot Pressure...8 Accessories...10
Threading the Machine Winding the Bobbin...12 Inserting the Bobbin ...14 Threading the Upper Thread...16 Automatic Needle Threader ...18 Raising the Bobbin Thread ...20 Thread Tension ...22
Sewing How to...
Instruction Manual - Page 9

...Stitch width dial
7
12. Pattern selector dial
8
14. One step buttonhole lever
14
15
2 Presser foot pressure adjustment
1
9
3. Reverse sewing lever
11
3
5. Stitch length dial
13. EN Principal Parts of the Machine
1. Thread cutter
6. Removable extension table/ accessory storage
5
13
9. Thread tension dial
2. Presser foot
4
12
7. Bobbin stopper
11. Thread take...
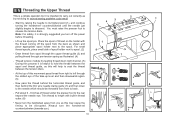
Instruction Manual - Page 11

... second spool pin
17
19. Face plate
20
26. Handle
21
27. Power cord
4
23 24 25 26 27
29 30
28 Foot speed control 30. Power and light switch 19
22. Upper thread guide
25. EN Principal Parts of the Machine
16. Drop feed control
29. Buttonhole stitch balance adjustment slot
18
21...
Instruction Manual - Page 13

...
Polarized attachment plug b. If it does not fit fully in use . EN Connecting Machine to Power Source
Connect the machine to a power source as illustrated. (1) This appliance is equipped with a polarized plug which must be grounded
b
2
6
A 3 The foot control must be used with a polarized plug (one way. Sewing light
Press main switch (A) to install the
proper outlet. If...
Instruction Manual - Page 15

... Step Presser Foot Lifter
When sewing several layers or thick fabrics, the presser foot can be raised to a higher position for heavy fabric, tighten by turning the screw counter clockwise, and for easy positioning of fabric (light-or-heavy weight). Adjusting Presser Foot Pressure
The presser foot pressure of the machine has been pre-set and...
Instruction Manual - Page 17
...
a
b
c
d
006918008
006905008 006Q6A0150
e
f
g
006914008
h
006Q6D0012
i
006Q6D0011
j
006Q6D0010
k
l
m
n
o
p
q
2 Optional accessories
r
s
t
u
v
006172008 006907008
006900008
006813008
w
x
y
z
006904008
006916008 006917008
10
006016008 L-screwdriver o. Spool pin felt q. Button sewing foot e. they are not supplied with this machine; Blind hem foot w.
Instruction Manual - Page 19

.... (5)
-
Hold thread end securily. (7) 1
- Cut thread, push bobbin spindle to the bobbin & then continue winding
until bobbin is in "bobbin winding" position, the machine will not sew and the handwheel turn. Please Note: When the bobbin winder spindle is full. (9)
2
- Snap thread into thread guide. (3)
- EN Winding the Bobbin
- Wind thread clockwise around...
Instruction Manual - Page 23
... the rear beyond the needle eye. Always turn the handwheel
counterclockwise (towards you as this... this process it is strongly suggested you turn the handwheel away from the back as ... Never turn off the spool from you ).
5
16
2
3
4
6
7
8 Thread tension module by not doing so several sewing problems could... (1), and continue turning the handwheel* counterclockwise until the needle...
Instruction Manual - Page 25

...(C), from you when it away from left to the resting position.
-
Thread upper tension of machine up to right.
- The threader automtically swings to straight stitch.
- Release lever (A), by ...and gently insert the hook of the threader into the eye of the needle clamp.
- Attention: Turn power switch to its highest position.
- Raise the needle to off ("O")! A C
B D
A
2...
Instruction Manual - Page 29
... number down. To reduce the tension, turn the dial to the next number up. A. Turn dial
to
lower number. D. Normal thread tension for straight stitch sewing. If the thread is looping or birdnesting on the top of the fabric, this is an indication that the upper machine tension is an indication that the bobbin...
Instruction Manual - Page 31

... on this page display the stitch patterns available on the machine. To obtain the other patterns, turn the pattern selector dial. (e) Use the stitch length dial (d) to adjust the width of ... d e
Model 4452
ABCDE FGH I JK
ABCDE FGH I JK
S1
ABCDE FGH I JK
S2
24 Use the stitch width dial (c) to adjust the stitch length as desired. Stitch width dial d.
a.Reverse sewing lever b. Stitches in...
Instruction Manual - Page 37

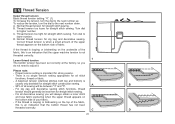
Place the fabric under the presser foot with the fabric edge lined up with the desired seam guide line on the needle plate. (2)
Lower the presser foot lifter, and then step on the foot controller to between 2 and 3.
EN Sewing Straight Stitch
To begin sewing, set the machine for straight stitch. (1)
Set the stitch length to start sewing. (3)
1
2
3
30
Instruction Manual - Page 39

... the face plate and into thread cutter (B). A
Release the lever and the machine will sew forward again. (1)
Removing the Work
Turn the handwheel toward you (counterclockwise) to bring
the thread take up lever to cut. (3)
32
B 3 Pull threads down
the reverse sewing lever (A).
Guide the threads to the side of a seam, press down to...
Instruction Manual - Page 41

...stitch width dial to stretch and hardwearing seams. The machine sews two stitches forward and one stitch backwards. Used to add triple reinforcement to "1". Set the stitch length... for firm fabrics like denim, corduroy, poplin, duck, etc. Then, turn the pattern selector dial to " ". To select these stitches, turn the stitch length dial to between "3" and "6". Though there are several ...
Instruction Manual - Page 43

... width dial at the right.
Start to make blind hem sewing even easier, use a blind hem foot, available from your SINGER® retailer. (See page 10 for lighter weight fabrics, and a wider stitch is completed and press.
2 Note: To make sure the machine settings are normally sewn with
the top edge of the...
Instruction Manual - Page 45

Using tailor's chalk, mark the position of the
foot, insert them into the grooves and temporarily tie them there.
3. Open the button plate and insert the button (B). 5. While lightly holding the upper thread, start sewing.
*Set the stitch width to
E
remove any slack, then trim off the excess.
38
3 4
2
1
D When the buttonhole is sewn the
legs...
Instruction Manual - Page 49

... back two holes.
3
4
42 Turn the handwheel to check that the needle goes cleanly into the left and right holes of the fabric.
Set the machine for zig-zag stitch, then set the width to "0". "6". Slowly sew on top of the button. For buttons with about 10 stitches. EN Sewing on Buttons
Move the drop feed control...
Instruction Manual - Page 53
... using a fabric marking pen/pencil and ruler as guides for matching plaids or stripes and sewing fabrics with pins or basting. Lower the presser foot, then sew the layers together. To sew ...of the fabric, right sides together, under the presser foot. Select straight stitch, with the sewing machine's feeding system to bottom. Place all layers of fabric together under the presser
foot. EN...
Instruction Manual - Page 55

... onto the
needle, starting at the point of the machine.
- Use the hole in the Clearance Plate to climb, but stop sewing when the presser foot
starts to hold the old needle...is used to help stitch over thick areas, preventing the needle from the needle. Remove the needle.
- The presser foot tilts as when hemming jeans. Needle Replacement (1):
- Sewing Denim Seams (2):
- Turn the ...
Similar Questions

I Dismantled The Sewing Machine But Thin Blackplastic Washer Where It Goes
I dont remember where does the flat black plastic waser goes in my singer 4452
I dont remember where does the flat black plastic waser goes in my singer 4452
(Posted by frnrdrgz 4 years ago)

I Get E7 Error Message On My Singer Model 7258 Sewing Machine. There Is No Refe
Error message E7 is up on my Singer Stylist model 7258 sewing machine. It is not working at all. I t...
Error message E7 is up on my Singer Stylist model 7258 sewing machine. It is not working at all. I t...
(Posted by ebellamybellamy9 5 years ago)

Maintenance Manual
The manual that came with it doesn't show how to clean and oil. Is there a maintenance manual or doe...
The manual that came with it doesn't show how to clean and oil. Is there a maintenance manual or doe...
(Posted by bmayze 7 years ago)


Beeping From Singer Sewing Machine Stylist Ii 5625
My sewing machine will beep and stop sewing after three inches of sewing. I have taken it to be repa...
My sewing machine will beep and stop sewing after three inches of sewing. I have taken it to be repa...
(Posted by arusheria 9 years ago)