Singer 4423 Heavy Duty Support Question
Singer 4423 Heavy Duty Support Question
Find answers below for this question about Singer 4423 Heavy Duty.Need a Singer 4423 Heavy Duty manual? We have 1 online manual for this item!
Question posted by Chex1985 on December 28th, 2013
How Do You Install A Bobbin Case On Singer 4423
The person who posted this question about this Singer product did not include a detailed explanation. Please use the "Request More Information" button to the right if more details would help you to answer this question.
Current Answers
Related Singer 4423 Heavy Duty Manual Pages
Instruction Manual - Page 2

... attachments recommended by the manufacturer as threading needle, changing needle, threading bobbin, or changing presser foot, and the like. 10. Never operate the appliance with
same type rated 15 watts (110-120V area / 220-240V area). Always use only. Switch the sewing machine off ("O") when making any object into water. Do not operate...
Instruction Manual - Page 6

...Threading the Machine Winding the Bobbin...12 Inserting the Bobbin ...14 Threading the Upper Thread...16 Automatic Needle Threader ...18 Raising the Bobbin Thread ...20 Thread Tension ...22
Sewing How ...Patterns ...34 Blind Hem ...36 Sew 1-step Buttonholes ...38 Left and Right Side Balance for Buttonhole ...40 Sewing on Buttons ...42
General Information Installing the Removable Extension Table ...44...
Instruction Manual - Page 9
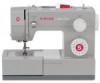
... take-up lever 2
10
4. Bobbin stopper
11. Automatic threader 15. Presser foot
4
12
7. Reverse sewing lever
11
3
5. Stitch length dial
13. Three needle position dial
6
10. Presser foot pressure adjustment
1
9
3. Removable extension table/ accessory storage
5
13
9. Stitch width dial
7
12. EN Principal Parts of the Machine
1. Thread tension dial
2. Thread...
Instruction Manual - Page 11
... lifter 22
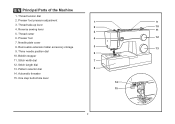
28. Power and light switch 19
22. Hole for second spool pin
17
19. Handle
21
27. Bobbin thread guide
24. Foot speed control 30. EN Principal Parts of the Machine
16. Horizontal spool pin
17. Buttonhole stitch balance adjustment slot
18
21. Power cord
4
23 24 25 26 27...
Instruction Manual - Page 13

.... Conductor intended to install the proper outlet.
Co., Ltd. (Vietnam)
Sewing light
1
Press main switch (A) to fit in a polarized outlet only one blade is wider than the other). Foot control The foot control pedal regulates the sewing speed. (3)
Attention: Consult a qualified electrician if in any way. Unplug power cord when machine is intended to...
Instruction Manual - Page 15
....
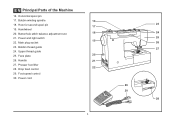
8 EN Two Step Presser Foot Lifter
When sewing several layers or thick fabrics, the presser foot can be raised to a higher position for heavy fabric, tighten by turning the screw counter clockwise,... and for easy positioning of the work. (A)
A
Adjusting Presser Foot Pressure
The presser foot pressure of the machine has been...
Instruction Manual - Page 17

...
n. they are not supplied with this machine; Darning/ embroidery foot v. Twin needle
2 Optional accessories
n
o
p
q
r
006172008 006907008
006900008
006813008
006904008
s
t
u
v
w
006916008 006917008
006016008
0061850081
10 All purpose foot b. Bobbin (3x) j. Cording foot r. EN Accessories
Standard accessories (1) a. Button sewing foot e. Spool pin felt m. Satin stitch...
Instruction Manual - Page 19

... the left (10) and remove.
Please Note:
When the bobbin winder spindle is in "bobbin winding"
position, the machine will not sew and the handwheel turn. Thread bobbin as illustrated and place on to left
(sewing position).
4
3
5
6
7
8
9
10
12 Snap thread into thread guide. (3)
- To start sewing, push the bobbin winder spindle to right. (6)
- Step on foot control...
Instruction Manual - Page 21
... (A).
3. B 3
14
A 2
C
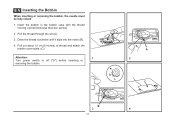
4 Pull out about 15 cm (6 inches) of thread and attach the bobbin cover plate. (C)
Attention:
1
Turn power switch to off ("O") before inserting or
removing the bobbin. Insert the bobbin in the bobbin case with the thread running counterclockwise direction (arrow).
2. EN Inserting the Bobbin
When inserting or removing the bobbin, the needle must be fully raised.
1.
Instruction Manual - Page 29

... seams.
- Proper tension setting is
usually only desirable for straight stitch
sewing.
- Normal thread tension for straight stitch sewing.
Lower thread tension
The bobbin tension has been set correctly at the factory, so you will be less than for straight stitch construction sewing.
- 90% of all stitch
functions, thread or fabric.
- A
B
-
EN Thread Tension...
Instruction Manual - Page 31

... patterns available on the machine. To select the patterns indicated with the gray color, turn the Pattern Selector Dial. (e) Use the Stitch Length Dial (d) to sew these stretch patterns is on... a stretch stitch pattern, and information on how to adjust the stitch length as desired. Reverse Sewing Lever b. Three Needle Position Dial c.
Stitch Length Dial e. EN How to adjust the width...
Instruction Manual - Page 37

EN Sewing Straight Stitch
To begin sewing, set the machine for straight stitch. (1) Place the fabric under the presser foot with the fabric edge lined up with the desired seam guide line on the needle plate. (2) Lower the presser foot lifter, and then step on the foot controller to start sewing. (3)
1
2
3
30
Instruction Manual - Page 39

... secure the beginning and the end of the face plate and into thread cutter (B). A
Release the lever and the machine will sew forward again. (1)
Removing the Work
Turn the handwheel toward you (counterclockwise) to bring
the thread take up lever to the side of a seam, press down ...
Instruction Manual - Page 41

... color on the Pattern Selector Dial. Used to add triple reinforcement to between "3" and "6". Adjust the Stitch Width Dial to stretch and hardwearing seams. The machine sews two stitches forward and one stitch backwards. Then, turn the Pattern Selector Dial to the desired pattern.
Ric Rac Stitch is suitable for firm fabrics...
Instruction Manual - Page 43

...Set the Stitch Width Dial at the right.
Sew a test first to make blind hem sewing even easier, use a blind hem foot, available from your SINGER retailer. (See page 10 for part number...lighter weight
fabrics, and a wider stitch is completed and press.
2 Note: To make sure the machine settings are normally sewn
with the range shown on curtains, trousers, skirts, etc.
EN Blind Hem...
Instruction Manual - Page 45
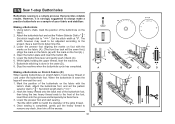
... will overcast the cord.
1. Lower the buttonhole lever and gently push it is completed, gently pull the heavy thread to " ".
2. Stop the machine when the buttonhole cycle has completed. While lightly holding the upper thread, start sewing.
*Set the stitch width to determine this. 3.
Buttonhole stitching is a simple process that provides reliable
results...
Instruction Manual - Page 49
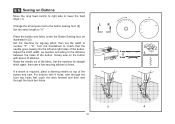
..., place a darning needle on top of the button. Adjust the stitch width, as illustrated in (3).
LR
Place the button and fabric under the Button Sewing foot, as needed, according to number "3" - Set the machine for zig-zag stitch, then set the width to the distance between the holes of the button and...
Instruction Manual - Page 55

...needle sizes. SINGER® 2032 Leather needles. 12 (80) to medium). Also sweater knits, Lycra®, swimsuit fabric, elastic. For best sewing results always use... first thread breakage or skipped stitches.
48 Always use genuine SINGER® needles. 2.
Heavy woolen, overcoat fabrics, upholstery fabrics, some Heavy duty thread, carpet thread.
Knits-polyesters, interlocks, tricot, single ...
Instruction Manual - Page 62

B A
Should there be any problem, consult your SINGER® retailer. 1
C
2
55 EN Changing the Bulb
Disconnect the machine from the power supply by removing the plug from the main socket! Loosen screw (A) as illustrated. (1) - Remove the face plate (B). -
Unscrew the bulb and install a new one (C). (2) -
Replace the face plate and tighten screw. Replace bulb...
Instruction Manual - Page 64

.... 3. Rethread the machine. 2. Remove and reinsert the needle. (flat side towards the back) 2. Remove and reinsert the bobbin case and pull on the hook or needle bar. 2. Insert the needle correctly. (flat side towards the back) 3. Check the threading. 2. Loosen the thread tension.
1. Do not pull on the fabric while sewing, let the feed...
Similar Questions

I've Cleaned The Bobbin Case Of Fluff And Broken Thread, Oiled, Timing Was Off
I've fixed timing. Changed needle changed bobbin and thread. It does not sew now.
I've fixed timing. Changed needle changed bobbin and thread. It does not sew now.
(Posted by Lefulton1970 1 year ago)

How Can I Find A Bobbin Case For My Pixie Plus Craft Machine?
(Posted by srheilek 3 years ago)

My Singer Sewing Machine 4423 Will Not Do Anything. All You Can Hear Is Motor
I hear motor the shaft spins how to change bel
I hear motor the shaft spins how to change bel
(Posted by Marybeverly4576477 8 years ago)
Bobbin Case On Singer 9960 Quantum Stylist Noisey
when I sew I hear a clicking sound and some rattling of the bobbin occurs. more so when I sew on the...
when I sew I hear a clicking sound and some rattling of the bobbin occurs. more so when I sew on the...
(Posted by sdshowen 8 years ago)

Bobbin Case, Singer 4423 Hd#q6a0764000
When I get to start sewing put bobben in place turn round nob on far right foot down catch the bobbe...
When I get to start sewing put bobben in place turn round nob on far right foot down catch the bobbe...
(Posted by p111657s 11 years ago)