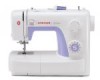
Singer 3232 Simple Support Question
Singer 3232 Simple Support Question
Find answers below for this question about Singer 3232 Simple.Need a Singer 3232 Simple manual? We have 1 online manual for this item!
Question posted by redowljr on November 28th, 2013
Installation Of And Operation Of Machine Part.
How do I install Blind Hem Foot part #006812008 to machine and then what are the instructions for operation ?
Current Answers
Related Singer 3232 Simple Manual Pages
Instruction Manual - Page 2
...
rated 10 watts (110-120V area) or 15 watts (220-240V area). SAVE THESE INSTRUCTIONS
This sewing machine is used as threading needle, changing needle, threading bobbin, or changing presser foot, and the like. 10. Always unplug before cleaning. 3. Never operate the appliance with the appliance. Never drop or insert any other user servicing adjustments...
Instruction Manual - Page 6

...Removing the Work/ Cutting the Thread ...29 Choosing Stretch Stitch Patterns...31 Blind Hem ...33 Sew 1-Step Buttonhole ...35 Sewing on Buttons (Model 3221)...37 Sewing on Buttons (Model 3232)...39
General Information Installing the Removable Accessory Storage ...41 Attaching the Presser Foot Shank ...43 Needle/Fabric/Thread Chart ...45 Darning Plate ...48
Maintenance and Troubleshooting Inserting...
Instruction Manual - Page 9
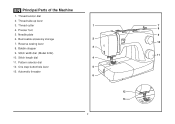
Automatic threader 6
12 13
2 Bobbin stopper
3
9. Needle plate
9
6. Stitch width dial (Model 3232)
11
10. One step buttonhole lever
5
13. Stitch length dial
4
11. Presser foot
8
5. Reverse sewing lever
10
8. EN Principal Parts of the Machine
1. Thread tension dial
2. Removable accessory storage
2
7. Pattern selector dial
12. Thread cutter
1
7
4. ...
Instruction Manual - Page 11

...
23
21. Handle
24. Hole for second spool pin
14
20
17. Presser foot lifter
25. EN Principal Parts of the Machine
14. Power cord
18
19 25
26
4 Handwheel
15
18. Main plug socket
16
22
20. Foot speed control
26. Upper thread guide 24
22. Power and light switch
21
19...
Instruction Manual - Page 13
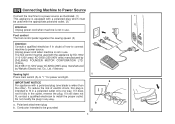
Unplug power cord when machine is not in any way. Co., Ltd. (Vietnam)
Sewing light
1
Press main switch (A) to install the proper outlet. If it ... outlet. (2)
Attention: Unplug power cord when machine is not in a polarized outlet only one blade is wider than
the other).
Foot control The foot control pedal regulates the sewing speed. (3)
Attention: Consult a qualified electrician ...
Instruction Manual - Page 16
...
t
u
v
006812008
006016008
006917008 006916008 006815008
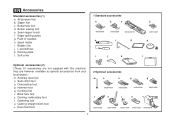
9 All purpose foot b. Zipper foot c. Edge/ quilting guide g. Buttonhole foot d. Seam ripper/ brush f. Satin stitch foot o. Quilting/ straight stitch foot v. they are not supplied with this machine; Gathering foot u. Blind hem foot s. Spool holder i. L-screwdriver k. Overcasting foot p. Hemmer foot q. Auxiliary...
Instruction Manual - Page 18
.... (9)
- Place thread and corresponding spool holder on to left (sewing position).
7
11
3
5
6
8
9
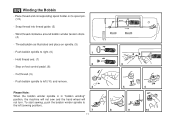
10 Push bobbin spindle to spool pin. (1/2)
- To start sewing, push the bobbin winder spindle to right. (6)
1
- Push...: When the bobbin winder spindle is in "bobbin winding" position, the machine will not sew and the hand wheel will not turn. Hold thread end. (7) 2
- Step on ...
Instruction Manual - Page 24
... as by not doing so several sewing problems could result.
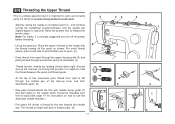
- Place the... to release the tension discs. Draw thread from front to back.(See page 19 for instructions on the holder with built in thread cutter. (8)
5
6
7
8
17 Start ... take-up lever and then
downwards again. (6)
2
3
4
- Raise the presser foot to the rear beyond the needle
eye. Note: For safety, it is helpful to hold...
Instruction Manual - Page 30
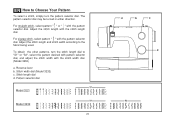
... " " with the pattern selector dial. Reverse lever b. Stitch width dial (Model 3232) c. Adjust the stitch length and stitch width according to "S1" or "S2",... the pattern selector dial. Pattern selector dial
S1
Model 3221
Model 3232
S1
23
a
b
c
d
S2 Adjust the stitch length with the stitch width dial. (Model 3232)
a.
Stitch length dial d. EN How to Choose Your Pattern
To...
Instruction Manual - Page 32
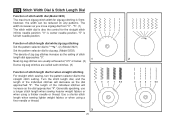
..., the width can be reduced on any patterns. "5". (1)
The stitch width dial is also the control for when straight stitching
For straight stitch sewing, turn the pattern selector dial to zig-zag. (Model 3232)
The density of zig-zag stitches increase as the dial approached "0". Generally speaking, use a longer stitch length when...
Instruction Manual - Page 34
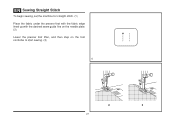
EN Sewing Straight Stitch
To begin sewing, set the machine for straight stitch. (1) Place the fabric under the presser foot with the fabric edge lined up with the desired seam guide line on the needle plate. (2) Lower the presser foot lifter, and then step on the foot controller to start sewing. (3)
1
2
3
27
Instruction Manual - Page 36
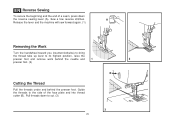
... reverse stitches. Guide the threads to its highest position, raise the
presser foot and remove work behind the needle and 1
2
presser foot. (2)
B
Cutting the Thread
Pull the threads under and behind the presser foot. A
Release the lever and the machine will sew forward again. (1)
Removing the Work
Turn the handwheel toward you (counterclockwise) to bring...
Instruction Manual - Page 38
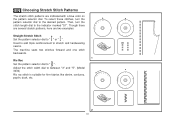
Used to add triple reinforcement to stretch and hardwearing seams. The machine sews two stitches forward and one stitch backwards.
1 Ric Rac Set the pattern selector dial to between "3" and "5". (Model 3232) Ric rac stitch is suitable for firm fabrics like denim, corduroy, poplin, duck, etc.
2 31 Adjust the stitch width dial to " ". Though...
Instruction Manual - Page 40

... is completed and press.
2
Note:
To make sure the machine settings are normally sewn with a longer stitch length setting. Blind hems, however, are appropriate for part number)
33 Sew a test first to sew slowly on the right of the page.
Start to make blind hem sewing even easier, use a blind hem foot, available from your SINGER® retailer. (See page 9
for...
Instruction Manual - Page 42
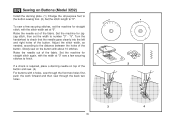
... buttonhole on the foot (b).)
4. Stop the machine when the buttonhole cycle has completed. While lightly holding the upper thread, start sewing.
*Set the stitch width to " ". EN Sew 1-Step Buttonhole
Buttonhole sewing is strongly suggested to determine this.
3. However, it back (C).
6.
Lower the buttonhole lever and gently push it is a simple process that provides reliable...
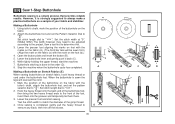
Instruction Manual - Page 44
... the button in the desired position and lower the foot.
EN Sewing on Buttons (Model 3221)
Install the darning plate. (1) Change the all purpose foot to button sewing foot. (2)
Position the work forward and then sew through the back two holes.
3
4
37 Slowly sew on the button with 4 holes, sew through the front two holes first,
push the work...
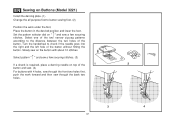
Instruction Manual - Page 46
... machine for straight stitch, with the stitch width set the width to number "3" - Slowly sew on the button with 4 holes, sew through the front two holes first, push the work forward and then sew through the back two holes.
3
4
39
EN Sewing on Buttons (Model 3232)
Install the darning plate. (1) Change the all purpose foot to the button sewing foot...
Instruction Manual - Page 55
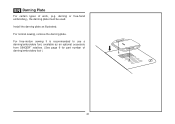
... the darning plate. For free-motion sewing it is recommended to use a darning/embroidery foot, available as illustrated. EN Darning Plate
For certain types of darning/embroidery foot )
48 darning or free-hand embroidery), the darning plate must be used. Install the darning plate as an optional accessory from SINGER® retailers. (See page...
Instruction Manual - Page 59
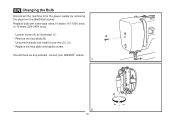
... watts (110-120V area) or 15 watts (220-240V area).
- Remove the face plate (B). - Replace the face plate and tighten screw. Unscrew the bulb and install a new one (C). (2) - EN Changing the Bulb
Disconnect the machine from the power supply by removing the plug from the electrical socket!
Instruction Manual - Page 61
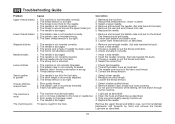
... stitch length. 3. Do not pull on the fabric while sewing, let it be lubricated.
1. Replace the needle. The machine is too tight. 3. The thread tension is not threaded ... new needle. 2. Choose a needle to suit the thread and fabric. 4. Select the correct foot.
1. The machine is not correctly inserted. 3. Thread tension wrong.
1. Check the threading. 2. The needle size...
Similar Questions

How Do You Oil This Machine.? It's Completely Jammed And Brand New.
Singer 3232
Singer 3232
(Posted by Kmdigiacomo 7 years ago)
Please Help!!!!!!!!!!!!!!tension Problem
I am busy making a quilt, and machine work fine sofar, however today i want to sew decorative stich ...
I am busy making a quilt, and machine work fine sofar, however today i want to sew decorative stich ...
(Posted by Gemman 8 years ago)

Why Won't My Machine Work?
I have to manually force the machine to start sewing with the side wheel. I can have the foot pedal ...
I have to manually force the machine to start sewing with the side wheel. I can have the foot pedal ...
(Posted by Rosepulido 9 years ago)

Problems With Singer 3232
I have a problem with my new singer3232 it bunches up when I do the straight stitch and makes a nois...
I have a problem with my new singer3232 it bunches up when I do the straight stitch and makes a nois...
(Posted by Becberry1 10 years ago)

When I Clean My Singer3232 Machine, Do I Have To Oil Any Of The Parts?
(Posted by jlacycreates 11 years ago)