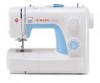
Singer 3221 Simple Support Question
Singer 3221 Simple Support Question
Find answers below for this question about Singer 3221 Simple.Need a Singer 3221 Simple manual? We have 1 online manual for this item!
Question posted by mbgarfield on March 21st, 2016
The Needle Will Hit The Plate And Break
singer 3221 will sew for a few min. then the needle will hit the plate and break
Current Answers
Answer #1: Posted by TechSupport101 on March 21st, 2016 5:12 AM
TechSupport101

Member since:
May 24th, 2013 Points: 12,171,315

Member since:
May 24th, 2013 Points: 12,171,315
Related Singer 3221 Simple Manual Pages
Instruction Manual - Page 2
... or plug, if it must be supervised to break. 7. Use this appliance from all moving parts. Return the appliance to break. 9. Special care is not working properly, if...needles. 8. Do not use the proper needle plate. Do not pull or push fabric while stitching. Switch the sewing machine off the machine or unplug when the machine is fixed with the appliance. Always unplug sewing machine ...
Instruction Manual - Page 6

... Patterns...31 Blind Hem ...33 Sew 1-Step Buttonhole ...35 Sewing on Buttons (Model 3221)...37 Sewing on Buttons (Model 3232)...39
General Information Installing the Removable Accessory Storage ...41 Attaching the Presser Foot Shank ...43 Needle/Fabric/Thread Chart ...45 Darning Plate ...48
Maintenance and Troubleshooting Inserting & Changing Needle...50 Changing the Bulb ...52 Troubleshooting...
Instruction Manual - Page 9
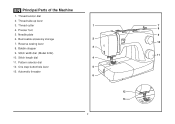
Needle plate
9
6. Pattern selector dial
12. Thread take-up lever
3. Reverse sewing lever
10
8. Removable accessory storage
2
7. Bobbin stopper
3
9. EN Principal Parts of the Machine
1. One step buttonhole lever
5
13. Thread cutter
1
7
4. Presser foot
8
5. Stitch width dial (Model 3232)
11
10. Automatic threader 6
12 13
2 Stitch length dial
4
11. ...
Instruction Manual - Page 11

Bobbin winding spindle
16. Bobbin thread guide
17
23
21. Upper thread guide 24
22. Handwheel
15
18. Handle
24. Foot speed control
26. Face plate
23. Horizontal spool pin
15. Power and light switch
21
19. Presser foot lifter
25. Power cord
18
19 25
26
4 Main plug socket
16
...
Instruction Manual - Page 13
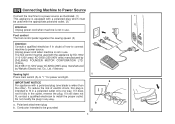
... a polarized plug (one blade is
intended to fit in a polarized outlet only one way. To reduce the risk of how to connect machine to power source.
a.
Co., Ltd. (Vietnam)
Sewing light
1
Press main switch (A) to be grounded
b 2
6
A 3 If it still does not
fit, contact a qualified electrician to install the proper outlet. If...
Instruction Manual - Page 16
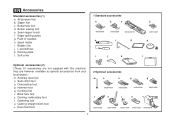
Pack of needles h. Bobbin (3x) j. Soft cover
1 Standard accessories
a
b
c
006806008
006905008
006Q6A0150
e
f...sewing foot e. Seam ripper/ brush f. Spool holder i. EN Accessories
Standard accessories (1) a. Zipper foot c. they are not supplied with this machine; Quilting/ straight stitch foot v. Satin stitch foot o. Overcasting foot p. L-screwdriver k. Darning plate...
Instruction Manual - Page 18
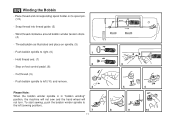
... thread and corresponding spool holder on to the left (10) and remove.
4
Please Note: When the bobbin winder spindle is in "bobbin winding" position, the machine will not sew and the hand wheel will not turn. Hold thread end. (7) 2
- Step on spindle. (5)
- EN Winding the Bobbin
- Snap thread into thread guide...
Instruction Manual - Page 24
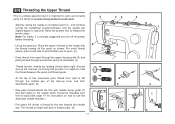
...needle
eye.
EN Threading the Upper Thread
This is a simple operation but it is strongly suggested you turn off the spool as shown. Start by leading thread down to the needle...up left
through pre-tension spring as by not doing so several sewing problems could result.
- Trim thread to use the Automatic needle threader.)
- Draw thread from right to left channel. (5) During...
Instruction Manual - Page 28
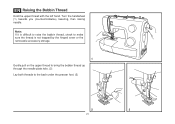
... not trapped by the hinged cover or the removable accessory storage.
1
Gently pull on the upper thread to bring the bobbin thread up through the needle plate hole. (2) Lay both threads to the back under the presser foot. (3)
2
3
21 Turn the handwheel (1) towards you (counterclockwise) lowering, then raising...
Instruction Manual - Page 32
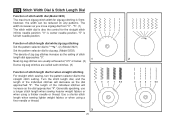
... straight stitch infinite needle position. Function of stitch length dial while zig-zag stitching
Set the pattern selector dial to " ". (2) (Model 3221)
Set the pattern...zigzag dial from "0" - "0" is center needle position, "5" is full left needle position. Generally speaking, use a longer stitch length when sewing heavier weight fabrics or when using a finer needle or thread.
4
32
1 0.5
2
...
Instruction Manual - Page 34
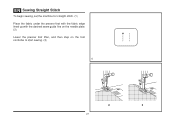
EN Sewing Straight Stitch
To begin sewing, set the machine for straight stitch. (1) Place the fabric under the presser foot with the fabric edge lined up with the desired seam guide line on the needle plate. (2) Lower the presser foot lifter, and then step on the foot controller to start sewing. (3)
1
2
3
27
Instruction Manual - Page 36
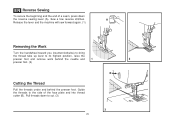
... beginning and the end of a seam, press down to the side of the face plate and into thread cutter (B). Guide the threads to cut. (3)
3
29 Pull threads down
the reverse sewing lever (A). A
Release the lever and the machine will sew forward again. (1)
Removing the Work
Turn the handwheel toward you (counterclockwise) to bring
the...
Instruction Manual - Page 38
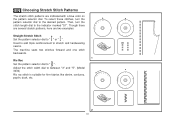
... stitch width dial to " ". Then, turn the pattern selector dial to the desired pattern. Used to add triple reinforcement to stretch and hardwearing seams. The machine sews two stitches forward and one stitch backwards.
1 Ric Rac Set the pattern selector dial to between "3" and "5". (Model 3232) Ric rac stitch is suitable for...
Instruction Manual - Page 40

... the right. Fold back
(as shown in the diagram on the fold, making sure the needle touches slightly the folded top to catch one or two fabric threads. (2)
Unfold the fabric ... the machine settings are normally sewn with the range shown on curtains, trousers, skirts, etc. Blind Hem:
Turn up the hem to make blind hem sewing even easier, use a blind hem foot, available from your SINGER®...
Instruction Manual - Page 42
... foot and start the machine.
7. Using tailor's chalk, mark the position of the foot,
insert them into the grooves and temporarily tie them there.
3. Set stitch length dial to " ". However, it back (C).
6. Set stitch length dial to " ".
2. Mark the position of your fabric and stabilizer. Once sewing is a simple process that provides reliable...
Instruction Manual - Page 44
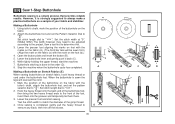
EN Sewing on Buttons (Model 3221)
Install the darning plate. (1) Change the all purpose foot to button sewing foot. (2)
Position the work forward and then sew through the front two holes first,
push the work under the foot.
Select one of the two narrow zig-zag patterns according to check if the needle goes into the right...
Instruction Manual - Page 46
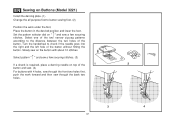
... stitch again, with the width at "0". Raise the needle out of the fabric.
To sew a few securing stitches, set the machine for zigzag stitch, then set at "0" sew a few securing stitches to finish.
1
2
If a shank is required, place a darning needle on Buttons (Model 3232)
Install the darning plate. (1) Change the all purpose foot to the button...
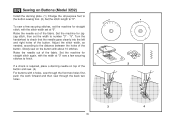
Instruction Manual - Page 52
...Heavyweight fabrics-canvas, woolens, outdoor tent and results.
For best sewing results always use the same thread on natural woven fabrics for double knits.
Always use genuine SINGER® needles.
2.
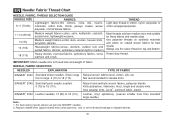
NEEDLE, FABRIC SELECTION
NEEDLES
EXPLANATION
TYPE OF FABRIC
SINGER® 2020 Standard sharp needles. Replace needle often (approximately every other garment ) and/ or at first...
Instruction Manual - Page 55
... certain types of darning/embroidery foot )
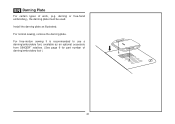
48 For normal sewing, remove the darning plate. darning or free-hand embroidery), the darning plate must be used. Install the darning plate as an optional accessory from SINGER® retailers. (See page 9 for part number of work, (e.g. For free-motion sewing it is recommended to use a darning/embroidery foot...
Instruction Manual - Page 61
...thread. 2. Remove bobbin case, thread and insert correctly. 3. Only use good quality sewing machine oil.
4. Remove the upper thread and bobbin case, turn the handwheel backwards and forwards by the machine.
1. The needle is incorrectly adjusted. 3. Insert a new needle. 3. Insert the needle correctly. (flat side towards the back) 5. Thread the bobbin case as described.
1. The...
Similar Questions

Singer Simple 3116 - Needle Hits The Exterior Case That Holds The Bobbin
hello, trying to determine if timing is off as when the needle travels to its lowest point the metal...
hello, trying to determine if timing is off as when the needle travels to its lowest point the metal...
(Posted by jfister77 1 year ago)

Needle Hitting The Plate
Hi, please l have singer 3221 and it's giving me problems off late. The needle keeps hitting the pla...
Hi, please l have singer 3221 and it's giving me problems off late. The needle keeps hitting the pla...
(Posted by thessyobeng80 1 year ago)

Needle Off Center
my needle arm seams to want to be off center when I turn the machine on. I am free quilting and I do...
my needle arm seams to want to be off center when I turn the machine on. I am free quilting and I do...
(Posted by Melischief22 6 years ago)

Singer C500 Singer Sewing Machine Needle Hitting Needle Plate? New To Me Have
(Posted by Anonymous-134344 9 years ago)
Replaceing Needle On Model 3221
how do I replace a needle on a Singer simple 3221
how do I replace a needle on a Singer simple 3221
(Posted by lilbiggs125 10 years ago)