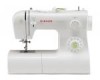
Singer 2277 Tradition Support Question
Singer 2277 Tradition Support Question
Find answers below for this question about Singer 2277 Tradition.Need a Singer 2277 Tradition manual? We have 1 online manual for this item!
Question posted by karonschmitt on March 15th, 2014
Extension Table
Is there an extension table that I can order for my Singer Tradition 2277?
Current Answers
Related Singer 2277 Tradition Manual Pages
Instruction Manual - Page 2

... Never place anything on cord. SAVE THESE INSTRUCTIONS
This sewing machine is intended for its service agent or a similar qualified person in order to break. 9. To reduce the risk of electric ... by or near children. 2. DANGER - Special care is 75dB(A). 17.
Switch the sewing machine off ("O") position, then remove plug from the electrical outlet when removing covers, lubricating, ...
Instruction Manual - Page 6

... Your Pattern...23 Stitch Width Dial & Stitch Length Dial ...25 Sewing Straight Stitch ...27 Reverse Sewing/Removing the Work/Cutting the Thread...29 Choosing Stretch Stitch Patterns ...31 Blind Hem...33 Sew 1-Step Buttonhole...35 Sewing on Buttons ...37
General Information Installing the Removable Extension Table ...39 Attaching the Presser Foot Shank...41 Needle/Fabric/Thread...
Instruction Manual - Page 9

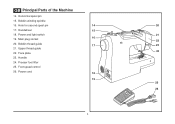
Reverse sewing lever 8. Bobbin stopper 9. GB Principal Parts of the Machine
1. Thread tension dial 2. Presser foot 5. Automatic threader
1
7
8
9 2
10 3
PUSH
4
11
5 6
12
PUSH
13
2 Stitch width dial 10. Stitch length dial 11. One step buttonhole lever 13. Pattern selector dial 12. Thread take-up lever 3. Removable extension table/ accessory storage 7. Needle plate 6....
Instruction Manual - Page 11
... thread guide 24
22. Bobbin thread guide
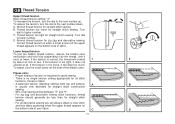
17
23
21. Handle
24. Horizontal spool pin
15. Bobbin winding spindle
16. GB Principal Parts of the Machine
14.
Instruction Manual - Page 13

Co., Ltd. (Vietnam)
Sewing light
1
Press main switch (A) to install the proper outlet. IMPORTANT NOTICE For appliance with a polarized plug (one way. If it does
not fit fully in use .
If it still does not
fit, contact a qualified electrician to " l " for power and light. b a. Unplug power cord when machine is not in the...
Instruction Manual - Page 16

...c. L-screwdriver k. they are not supplied with this machine; Overcasting foot p. Gathering foot u. Buttonhole foot d. Seam ripper/ brush f. Satin stitch foot o. Evenfeed foot
2 Optional accessories
m
n
o
p
q
006804008
006803008
006800008
006810008
r
s
t
u
v
006812008
006016008
006917008 006916008 006815008
9 Button sewing foot e. Edge/ quilting guide g. Cording foot...
Instruction Manual - Page 18

... thread guide. (3)
- Push bobbin spindle to the left (10) and remove.
4
Please Note: When the bobbin winder spindle is in "bobbin winding" position, the machine will not sew and the hand wheel will not turn. Wind thread counterclockwise around bobbin winder tension discs. (4)
- Step on spindle. (5)
- Hold thread end. (7) 2
- Push bobbin spindle...
Instruction Manual - Page 20

...). (3)
1
- Pull the thread through the slit and under the finger. (4) Leave a 6 inch tail of thread.
- Hold the bobbin case by the hinged latch. (5)
- Remove the extension table, then open the hinged cover. (1)
- GB Inserting the Bobbin
When inserting or removing the bobbin, the needle must be fully raised.
- Pull the bobbin case...
Instruction Manual - Page 22
...the small screw on
the bottom side of fabric. Thread tension too tight for straight stitch sewing.
If the tension is correct, the thread will always obtain a nicer stitch
and less ... the upper thread appears on the side of the bobbin case.
Proper setting of all decorative sewing you will unwind
1
2
by suspending it
once or twice. GB Thread Tension
Upper thread ...
Instruction Manual - Page 24

... right channel and up left channel. (5) During this movement pass thread from right to left
through pre-tension spring as by not doing so several sewing problems could result.
-
Raise the presser foot to back.(See page 19 for instructions on the holder with built in thread cutter. (8)
5
17...
Instruction Manual - Page 28

...: If it is difficult to raise the bobbin thread, check to make sure the thread is not trapped by the hinged cover or the Removable Extension Table.
1
Gently pull on the upper thread to bring the bobbin thread up through the needle plate hole. (2) Lay both threads to the back under the...
Instruction Manual - Page 30
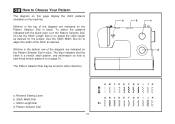
...sew these stretch patterns is a stretch stitch pattern, and information on how to Choose Your Pattern
The diagram on this page display the stitch patterns available on the Pattern Selector Dial in either direction. Stitches in the bottom row of the diagram are indicated on the machine.... The Pattern Selector Dial may be turned in blue. Stitch Length Dial d. Reverse Sewing Lever b.
Instruction Manual - Page 34

GB Sewing Straight Stitch
To begin sewing, set the machine for straight stitch. (1) Place the fabric under the presser foot with the fabric edge lined up with the desired seam guide line on the needle plate. (2) Lower the presser foot lifter, and then step on the foot controller to start sewing. (3)
1
2
3
27
Instruction Manual - Page 36
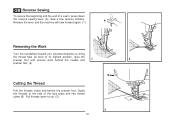
... the beginning and the end of a seam, press down to the side of the face plate and into thread cutter (B). Release the lever and the machine will sew forward again. (1)
A
Removing the Work
Turn the handwheel toward you (counterclockwise) to bring
the thread take up lever to its highest position, raise the...
Instruction Manual - Page 38
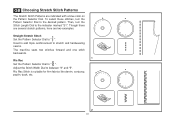
... several stretch patterns, here are indicated with a blue color on the Pattern Selector Dial. Used to add triple reinforcement to stretch and hardwearing seams. The machine sews two stitches forward and one stitch backwards.
1 Ric Rac Set the Pattern Selector Dial to between "3" and "5". Adjust the Stitch Width Dial to " ". GB Choosing...
Instruction Manual - Page 40

...is used for lighter weight fabrics, and a wider stitch is completed and press.
2
Note: To make sure the machine settings are normally sewn with
1
the top edge of the hem extending about 7 mm (1/4") to the desired width... needle touches slightly the folded top to make blind hem sewing even easier, use a blind hem foot, available from your SINGER retailer. (See page 9 for firm fabrics.
Instruction Manual - Page 42

... with the mark on a sample of your fabric and stabilizer. Lower the presser foot and start the machine. 7. Once sewing is completed, gently pull the heavy thread to match the diameter of the buttonhole on stretch fabric, hook... temporarily tie them
there.
3. When the buttonhole is done in the order (D). 8. GB Sew 1-Step Buttonhole
Buttonhole sewing is strongly suggested to " ".
Instruction Manual - Page 44

... width, as needed, according to the distance between the holes of the fabric. Raise the needle out of the button. Set the machine for straight stitch, with the width at "0".
"5". To sew a few securing stitches to check that the needle goes cleanly into the left and right holes of the fabric. Slowly...
Instruction Manual - Page 46

To open, flip cover down as an accessory box.
GB Installing the Removable Extension Table
Hold the removable extension table horizontally, and push it in the direction of the removable extension table can be utilized as shown. (2)
2
39 PUSH
1 The inside of the arrow. (1) To remove the extension table, pull it toward the left.
Instruction Manual - Page 59

...is too thick for the fabric. 2. The machine must suit the fabric and thread. 4. Clean the hook and feed dog as illustrated. 3. Only use good quality sewing machine oil.
4. The thread is caught in ...
by hand and remove the thread. Poor quality thread. 2. Do not pull on the fabric while sewing, let it be lubricated.
1. Poor quality oil has been used . 4. The thread tension is ...
Similar Questions

How Do I Switch The Needle To To Right On. Singer Model 2277
(Posted by Lehmanbrenda8 2 years ago)

I Get E7 Error Message On My Singer Model 7258 Sewing Machine. There Is No Refe
Error message E7 is up on my Singer Stylist model 7258 sewing machine. It is not working at all. I t...
Error message E7 is up on my Singer Stylist model 7258 sewing machine. It is not working at all. I t...
(Posted by ebellamybellamy9 5 years ago)

I Have A Singer 2277 Traditional Machine. The Bobbin Shuttle Fell Out.
Having trouble reinserting bobbin shuttle on model 2277 singer sewing machine.
Having trouble reinserting bobbin shuttle on model 2277 singer sewing machine.
(Posted by adeleacosta 8 years ago)

Beeping From Singer Sewing Machine Stylist Ii 5625
My sewing machine will beep and stop sewing after three inches of sewing. I have taken it to be repa...
My sewing machine will beep and stop sewing after three inches of sewing. I have taken it to be repa...
(Posted by arusheria 9 years ago)
Where Can I Find A Case For The Singer Tradition 2277 Sewing Machine?
(Posted by kartys 10 years ago)