Singer 14CG754 ProFinish Support Question
Singer 14CG754 ProFinish Support Question
Find answers below for this question about Singer 14CG754 ProFinish.Need a Singer 14CG754 ProFinish manual? We have 1 online manual for this item!
Question posted by vanitaashton on July 22nd, 2016
Oiling The Machine What Areas Do You Oil
Where are the areas to oil on the server?
Current Answers
Answer #1: Posted by Brainerd on July 22nd, 2016 10:27 AM
Brainerd

Member since:
May 24th, 2014 Points: 759,630

Member since:
May 24th, 2014 Points: 759,630
Hi, please download and refer to the instructions manual here:
https://www.helpowl.com/manuals/Singer/14CG754ProFinish/179410
I hope this helps you!
Please press accept to reward my effort or post again with more details if not satisfied.
Regards, Brainerd
Related Singer 14CG754 ProFinish Manual Pages
Instruction Manual 15 - Page 1
14SH744/14CG744 (2.3.4 THREAD OVERLOCK MACHINE) 14SH754/14CG754 (2.3. 4 THREAD OVERLOCK MACHINE WITH DIFFERENTIAL FEED)
Operator's Guide
SINGER
SINGER
Instruction Manual 15 - Page 2

...children or infirm persons without notification or obligation. 14SH744/14CG744 14SH754/14CG754
PREFACE
Thank you for your sewing machine. IMPORTANT SAFETY INSTRUCTIONS
Ak
* If the supply cord is documented... dealer.
®Singer is a registered trademark of your purchase of this sewing machine when considered necessary without supervision. * Young children should be supervised to ensure...
Instruction Manual 15 - Page 3

...or mechanical adjustment.
• Never operate the machine with care and avoid dropping it to the off when making any other user servicing adjustments mentioned in the needle area, such as the rated voltage of lint, dust...electric outlet (wall receptacle) is required around the sewing machine needle.
• Do not pull or push fabric while stitching. Read all controls to break.
.
Instruction Manual 15 - Page 5

...
46
•Cleaning the machine
46
•Oiling the machine
46
•How to Adjust the Presser Foot Pressure
22
16. How to Adjust the Seam Width
21
• Width adjustment by chaining off
45
25. Free Arm Sewing (Tubular Work)
27
20. Troubleshooting Chart
48
27. Needle Information
7
5. Preparation Prior to Disengage Movable...
Instruction Manual 15 - Page 6
... to heavy weight stretchy fabrics
such as double knits and swim wear.
35
(514)
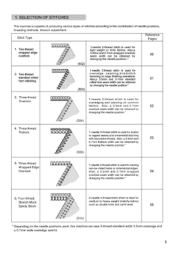
* Depending on edge finishing operations. SELECTION OF STITCHES
This machine is ideal for
overedge seaming,blindstitch
hemming on the needle positions used for sewing
/ \\
narrow rolled hems or ornamental edges. Also,a
-
3.5mm and 5.7mm wrapped overlook seam width can...
Instruction Manual 15 - Page 10

..." on following page.
9 Irt
tl a-
®
8. PREPARATION PRIOR TO SEWING
• Connect the controller / electric plug 1 to the machine receptacle 2 .
• Plug power line 3 into electric outlet 4 .
... Power Switch: Push "-" mark side to the right as far as it will sew.
• To stop the machine from sewing, remove your foot from the controller. HOW TO OPEN LOOPER COVER
A Caution ...
Instruction Manual 15 - Page 14

...thread down to make certain it is properly located in between the tension discs 3 .
3 4
• Thread the looper area of the throat plate.
I
• Thread the hole in threading the looper.
• Pull about 10cm (4 inches)... tweezers provided in the accessory set to aid in the upper looper from front to the back of the machine following the orange color coded thread guides ( 4 - 7 ).
Instruction Manual 15 - Page 16

...
co
0
15 • Turn the hand wheel toward you until the lower looper is at the far right.
• Thread the looper area of the looper 10 . Note: Use the tweezers provided in the accessory set to aid in threading the looper.
• The thread should ... behind and over the top of the upper looper and to aid in the end of the machine following the yellow color coded thread guides 4 - 7 .
Instruction Manual 15 - Page 23

...
4.5 3.5 /Rolled hem (When shipped from factory.) 3.0mm
Caution: Always close looper cover before operating machine. Push
15. Increase the pressure
Pr"
A
22 HOW TO ADJUST THE PRESSER FOOT PRESSURE
•...is necessary when sewing lightweight and heavyweight fabrics.
• In such case, insert screwdriver through access hole (A) in top cover and into slot (B) in this machine is preadjusted ...
Instruction Manual 15 - Page 28

... is especially suited for sewing hard to the right until tab on cloth plate with groove in cylinder cover and slide to reach garment areas such as armholes and overcasting trouser cuffs.
• Place garment over the free arm and sew. FREE ARM SEWING (TUBULAR WORK)
This machine become a free arm machine simply by removing the...
Instruction Manual 15 - Page 30

... holding the chain and press on the foot controller until the chain is completely threaded, bring all of the presser foot and sew a test sample. SUOMI
5- 7.5 cm 2 - 3);)
• Place fabric under the front of the threads over the ...hand wheel toward you 2 or 3 complete turns to break.
29 21.
CHAINING OFF AND TEST SEWING
• When the machine is 5 - 7.5cm (2 - 3 inches) in length.
Instruction Manual 15 - Page 37

crepe.
Machine Set Up
• Remove the left needle.
• Move seam width finger knob to setting R . (See
page 28 )
•...8226; Set stitch length dial to "F 2" and a fine seam will
(11
be
used for heavy or stiff fabrics. HOW TO SEW A ROLLED HEM s.
• This machine can be sewn.
• Needle: Singer Needle #2022 size 80/11 or 90/14
• Thread: A variety of thread ...
Instruction Manual 15 - Page 40

... the stitches. Additional Information About Rolled Hemming
• Hold the thread chain when you begin sewing to keep it from curling into the seam.
0
• Place a slight tension on the material in the sewing direction and a finer seam finish can be obtained.
• The minimum overedge stitch width that can be set below...
Instruction Manual 15 - Page 41

....
(0 0
V Remove
(2) Flatlocking a Seam
• Place the fabric wrong sides together to sew a decorative stitch on the underside of the fabric.
• The lower looper thread will form a ...STITCH VARIATIONS AND SEWING TECHNIQUES
How to flatten the seam.
• The flatlock stitch can be used as a construction and decorative stitch or for ornamentation only.
(1) Machine Set Up
•...
Instruction Manual 15 - Page 43

...overlook blind hem is almost invisible. Remove
42 I I I
• Remove the left needle and adjust machine for sewing knit wear. Note: The rolled hem stitch can also be used .
• Set the stitch length ...• Remove the left needle and adjust machine for a narrow 3-thread overlook stitch. It provides a durable finish that is best suited for a narrow 3-thread overlook stitch.
Instruction Manual 15 - Page 44

... stitch beyond point (A) and stop.
• Raise needle and presser foot.
• Pull the fabric to the rear of the machine just enough to sew.
(2) Inside Corner
• Cut fabric at seam edge. Cutting line"."'
12 cm 2 cm
\''
• Turn the fabric and lower the presser foot so that the ...
Instruction Manual 15 - Page 46

How to Reinforce a Seam
• Inserting twill tape while overedge sewing will stabilize the seam.
• Insert the tape through the hole in the front of the foot.
• Position the tape under the foot ...or twill tape through the hole in the front of the foot.
• Position the filler cord under the foot to the back of the machine and sew the garment seam.
• The tape is sewn.
Instruction Manual 15 - Page 47

... the looper and knife area often with a dry lint brush.
Do not use any other oil or damage could result. Note: Lint brush is produced due to the cutting action of lint is an optional part. f
'
SINGI
or ar
1
Oiling the Machine
A Danger: Before lubricating your machine.
Note: Use sewing machine oil. 25. O
e
46 MACHINE MAINTENANCE
An overlock requires...
Instruction Manual 15 - Page 49
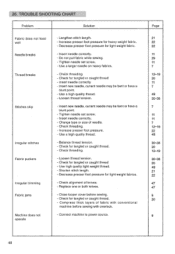
... foot pressure for tangled or caught thread. - Check for light weight fabrics.
- Connect machine to power source. Insert needle correctly. - Insert needle correctly. - Check threading.
-...needle may be bent or have a
blunt point. - Close looper cover before sewing with conventional
machine before sewing. -
Decrease presser foot pressure for tangled or caught thread. - Use a ...
Instruction Manual 15 - Page 51

... Cat. No. 2022 #11, #14
14SH744/14CG744 14SH754/14CG754
2,3,4
2,3,4
338
338
280
280
265
265
6.0
6.0
50 28. SPECIFICATION
Item
Specification
Sewing speed Stitch length (feed amount) Differential feed ratio Overedge stitch width
Needle bar stroke Presser foot rise Needle
Model Number of threads Machine dimensions (mm)
Width Depth Height
Weight (Kg)
1,300 spm...
Similar Questions

How To Oil The Model 3223 Of Singer Sewing Machine
I have the sewing machine singer, model 3223, I have the Manual too, BUT in the manual doesnt appear...
I have the sewing machine singer, model 3223, I have the Manual too, BUT in the manual doesnt appear...
(Posted by obejassainzanaeulalia 5 months ago)

My Singer 2932 Is Squeaking While Sewing. Have Cleaned All Areas, Keep It Oiled.
I use my singer 2932 daily and keep it oiled and cleaned from lint. I use good AlbaChem machine oil....
I use my singer 2932 daily and keep it oiled and cleaned from lint. I use good AlbaChem machine oil....
(Posted by blmoersch 6 years ago)

Does My 44s Classic Heavy Duty Sewing Machine Need Oiling?
Can not find in manual.
Can not find in manual.
(Posted by alicegreen35160 7 years ago)
Will Not Sewing Material
I have the machine threaded properly, but the machine will not sew. It was sewing properly when last...
I have the machine threaded properly, but the machine will not sew. It was sewing properly when last...
(Posted by darlenedeadder 8 years ago)

Where To Oil Singer Sewing Machine 7256
My manual doesn't address where to oil my machine
My manual doesn't address where to oil my machine
(Posted by Anonymous-148513 9 years ago)