Singer 1004 VIVO Support Question
Singer 1004 VIVO Support Question
Find answers below for this question about Singer 1004 VIVO.Need a Singer 1004 VIVO manual? We have 1 online manual for this item!
Question posted by chiefmorales on October 18th, 2015
Replacement Of The Plastic Bobbin Case On A Singer 1004 Model
The person who posted this question about this Singer product did not include a detailed explanation. Please use the "Request More Information" button to the right if more details would help you to answer this question.
Current Answers
Related Singer 1004 VIVO Manual Pages
Instruction Manual - Page 1
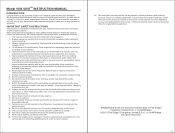
.... If there is no increased tension, the machine is usually caused by bringing the thread down ...1004
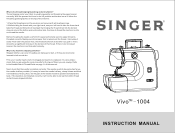
INSTRUCTION MANUAL Next, check that you are sewing. Before threading the needle, perform this manual. With the presser foot lever in the tension of fabric you are incorrectly inserted into the tension channel around the bottom and up the bobbin thread and will not be replaced...
Instruction Manual - Page 2
... needle, threading the bobbin, changing the presser foot, etc. 13. Do not use bent needles. 11. To disconnect, turn all moving parts. SINGER and VIVO are being used by...machine. Keep fingers away from the electrical outlet. 18. Switch the sewing machine off position, then remove the plug from all controls to the off when making any air openings blocked. Model 1004 VIVO...
Instruction Manual - Page 3
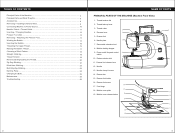
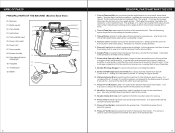
... Machine to Power Source 10 Needle / Fabric / Thread Guide 11 Inserting / Changing Needles 12 Presser Foot Lifter...12 Removing / Attaching the Presser Foot 13 Winding the Bobbin 14 Inserting the Bobbin 15 Threading the Upper Thread 15 Raising the Bobbin Thread 17 Choosing a Stitch Pattern 18 Straight Stitching...18 Thread Tension...19 Reverse Sewing/Cutting...
Instruction Manual - Page 4
... flat surface for best stitch results.
13. Pattern Selector Dial is used to set the machine for the stitch you select just the right tension for higher speed.
10. The screw ... while sewing. Use only SINGER brand needles for the fabric while sewing.
7. It is built-in the process of winding the bobbin.
9. It holds the presser foot in sewing light
26 30. Bobbin winder
30...
Instruction Manual - Page 5
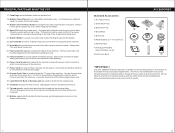
... end that connects into the guide.
32. Use only SINGER® brand metal Class 15 bobbins in Sewing Light are used to the right of the machine is where the power cord is located at the back of the machine. Bobbin Cover Plate sits over the bobbin and bobbin case. Always turn the hand wheel toward you.
24. The...
Instruction Manual - Page 6
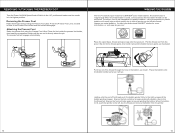
...not modify the plug in order to sew pants or sleeve hems, as well as illustrated. The machine will have set it at the "H" position in order to sew at the right side of the ...hard-to stabilize it as shown. The inside of the machine to -reach areas. For machines with the appropriate power outlet. Once removed, you will sew according to where you push the extension bed in place...
Instruction Manual - Page 7
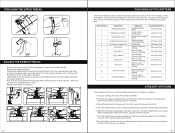
... size needles for lighter weight fabrics and larger size needle for use SINGER® brand needles. Remove the old needle and discard it also to achieve the best results for your machine, depending on the type of fabric you are sewing. Problems can occur with various fabrics, for best results. Blunt needles
PRESSER...
Instruction Manual - Page 8
...
Raise the presser foot using transparent or plastic bobbins will engage automatically.
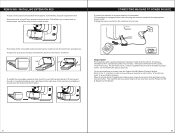
REMOVING / ATTACHING THE PRESSER FOOT
Turn the Power On/Off & Speed Control Switch to the right, up against the bobbin winding stopper.
Removing the Presser Foot
Raise the Presser Bar by SINGER®uses metal bobbins.The bobbin case is directly above the pin. using...
Instruction Manual - Page 9

...Switch to descend.
or
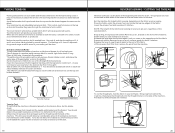
Thread the machine with your left . 5.Place the thread into the bobbin case. If it turns in a counter... thread down into the channel, as shown.
3.Do a U-turn it over and replace it is larger in a horizontal position.
Raise the presser foot lifter, which will ...the fabric when you start to achieve the correct sewing results. If the presser foot is not raised so...
Instruction Manual - Page 10
... controller. Raise the presser foot lifter. When reaching the edge of the fabric, stop the sewing machine. 6.Turn the hand wheel counter-clockwise (toward the back of the machine, as shown.
18 Guide the fabric with your hands. Replace the bobbin cover plate.
(1)
(2)
(3)
(4)
(5)
(6)
(7)
(8)
17
STRAIGHT STITCHING
The straight stitch is the most frequently used to...
Instruction Manual - Page 11
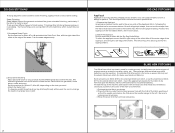
...known as they pass through the machine to ensure a well balanced stitch. NOTE: The length of the sewing machine to form a stitch. This time you continue to sew, slowly turn the tension dial ...and 5 are trimmed. REVERSE SEWING / CUTTING THE THREAD
Reverse sewing is threaded properly in the bobbin. The purpose is produced. Lower the presser foot and sew about midway between the start and...
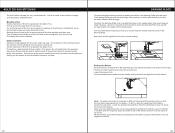
Instruction Manual - Page 12
... the Appliqué fabric, following the manufacturer's recommendations.
Sew, with a thread color that matches or blends as closely as possible to your project.
1.Overedged Seam Finish Set the machine for Stitch #7 or #8 and attach the Satin Foot. Thread the top of the machine and bobbin with the right side of the stitch at the...
Instruction Manual - Page 13
... correct zig-zag stitch setting for the button. Turn the hand wheel toward you find the one that the fabric doesn't feed through. Sewing on a Button Set the machine for the needle on the distance between the holes of interfacing or small fabric scrap (similar fabric type and color) behind the tear...
Instruction Manual - Page 14
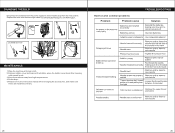
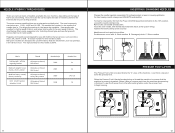
.... 5.Please turn to solve common problems
TROUBDLAERSNHINOGOTPILNAGTE Solution
Rethread the upper thread and bobbin
25
26 Replace the bulb with the same type rated
+-
1-(1)
LED Φ5MM DC3V 0.6W
-
+-
+
+
1-(2)
2
3
4
MAINTENANCE
1.Wipe the machine with clean cloth. 2.Remove bobbin cover and take out the bobbin, place the bobbin cover back after cleaning
with a small brush. 3.Keep the...
Similar Questions

What Cords?
I lost my foot pedal and power cord and was wondering what cords I would need to look for to replace...
I lost my foot pedal and power cord and was wondering what cords I would need to look for to replace...
(Posted by Scriptdoodles 1 year ago)

I Am Looking For Singer Vivo 1004 Model Bobbin Cover Plate
(Posted by shibukmani 2 years ago)

Bobbin Plate
Hi, I lost the bobbin plate of my Singer Vivo sewing machine. Where can I get a new one. Which model...
Hi, I lost the bobbin plate of my Singer Vivo sewing machine. Where can I get a new one. Which model...
(Posted by imonicasky 8 years ago)

How Do You Replace The Bobbin Casing In A Singer 5500 Fashion Mate
(Posted by Tr3troy 10 years ago)
Adjust Bobbin On The Singer Sewing Machine Heavy Duty Hd-110 Serial Nbynber C913
Everythime I sew the needle thread breaks and the bobbin pukles up in the bobbin case. The needle co...
Everythime I sew the needle thread breaks and the bobbin pukles up in the bobbin case. The needle co...
(Posted by msturdivant 10 years ago)