
Sanyo DP55441 Support Question
Sanyo DP55441 Support Question
Find answers below for this question about Sanyo DP55441.Need a Sanyo DP55441 manual? We have 1 online manual for this item!
Question posted by Brtrh3 on June 21st, 2014
Sanyo Dp55441 Can't Access Advanced Mode
The person who posted this question about this Sanyo product did not include a detailed explanation. Please use the "Request More Information" button to the right if more details would help you to answer this question.
Current Answers
Related Sanyo DP55441 Manual Pages
Owners Manual - Page 3

...avoid injury from the apparatus.
11. When a cart is connected to the television equipment, be taken to provide some protection against voltage surges and built up
...build-up static charges. Please read all servicing to grounding electrodes, and requirements
for choosing SANYO. The product should not be dangerous.
When installing an outside antenna system should be ...
Owners Manual - Page 4

...the separation between the equipment and receiver. - "As an Energy Star® Partner, Sanyo Electric co., Ltd. It is encouraged to try to meet ENERGY STAR requirements. Consult ...energy efficiency, select default picture mode. HANDLING PRECAUTIONS
• Handle by one or more of this equipment does cause harmful interference to radio or television reception, which the receiver is...
Owners Manual - Page 5

... OUT JACKS 12
PC CONNECTIONS 13 PC MONITOR OPERATION 13
SPORTS MODE 14
ON-SCREEN MENU OPERATION 15 MENU NAVIGATION MAP 15 CHANNEL ADJUSTMENT 15 CHANNEL LIST OPERATION 16 PARENT ADJUSTMENT 17 PICTURE/ AUDIO/ ADVANCED ADJUSTMENT 19 PICTURE 19 AUDIO 19 ADVANCED 20 SYSTEM 22 USB PHOTO VIEWER 25
4
HELPFUL HINTS - Problems / Solutions...
Owners Manual - Page 7

... Inserts
Mounting screws measurements: 55" TV M8 Diameter, Length - 13mm (min.); 16mm (max.)
Wall
• (60mm)
6 English
INSTALLATION POSITIONING THE LCD HDTV
Always use a firm-flat surface when positioning your HDTV to secure it to a wall mounting kit. NOTE: 1. Do not position the unit in inches.
* Diagonal screen: 54.6 inches
WALL...
Owners Manual - Page 9

...that accepts uncompressed video signals for updating the television's firmware and accessing JPEG files.
8 This terminal is separated from...Out Cable to connect Digital Audio Output to an advanced stereo home theater system equipped with analog audio ... NPUT
GETTING STARTED-CONTROLS AND JACKS
Input / OK button
LEFT-SIDE PANEL BACK-SIDE PANEL
Y
PC INPUT
PC AUDIO
INPUT
Pb
Pr
Pb
L
Pr
R
...
Owners Manual - Page 10

... OK Button -
Press this button to display RESET menu. SLEEP Button- Press this button to switch CC mode among Off, 30 min, 60 min, 90 min, 120 min, 150 min and 180 min. Press 6 then 1--... Press to select Energy saving mode options Off, ECO1, ECO2, and ECO3 in turn .
GUIDE Button- RECALL Button- Press to switch to...
Owners Manual - Page 12
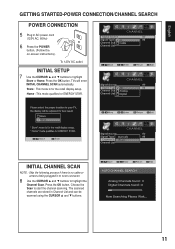
Press the OK button. TVs will enter INITIAL CHANNEL SCAN automatically. Store : This mode is no cable or antenna being plugged-in to tuner connector.
8 Use the CURSOR...Plug in Channel List and can be scanned using the CURSOR ▲ and ▼ buttons.
11 Home : This mode qualifies for the retail display setup. Move
OK Enter
INITIAL CHANNEL SCAN
NOTE : Skip the following process if there is ...
Owners Manual - Page 13

..., DVD Player, and Game System.
BACK-SIDE VIEW OF HDTV
DIGITAL AUDIO 1 Connect the Digital Audio output to select the input signal as shown. English
ADVANCED AV CONNECTIONS
ADVANCED DIGITAL SIGNAL CONNECTIONS-HDMI TO HDMI
Connect compatible Digital devices such as shown.
Owners Manual - Page 15

... announcements, powerful banging sounds
NOTE : When the "SPORTS" button is pushed, an OSD showing the current sports mode will not appear on the upper right of the screen.
14 If the channel or input source is changed under...the screen. Once the channel or the input source is changed , the sports mode will automatically be set to "Off", and the "Sports Off" OSD will appear on the lower left of...
Owners Manual - Page 17
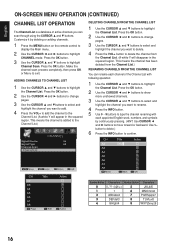
... adding channels.
1 Press the MENU button on the remote control to display the Main menu.
2 Use the CURSOR ◄ and ► buttons to highlight
CHANNEL mode. ADDING CHANNELS TO CHANNEL LIST
1 Use the CURSOR ▲ and ▼ buttons to highlight
Channel Scan. Number Button Characters Number Button Characters
0
0.,?!`-()@/+=
5
JKLjkl5
1
1
6
MNOmno6
2
ABCabc2...
Owners Manual - Page 18

...lock will automatically return to highlight
V-Chip. ON-SCREEN MENU OPERATION (CONTINUED)
English
PARENT ADJUSTMENT
This SANYO television is equipped with a D and V content rating could still be viewed.
1 Press the MENU... Picture Association of America) and TV Parental Guidelines rating codes. Use this password to access the PARENT menu from the second time.
1 Press the MENU button and then use...
Owners Manual - Page 19

...OK button.
2 Enter your password. Press the OK button.
4 Use the CURSOR ► buttonto highlight ADVANCED.
5 Use the CURSOR ▲ and ▼ buttons to select the option you want to highlight ... are received with an antenna. Press the OK button.
2 Enter your password. An advanced V-Chip ratings system for digital channels including RRT5 data.
18 This function is only effective...
Owners Manual - Page 20

PICTURE/ AUDIO/ ADVANCED ADJUSTMENT
PICTURE
ADJUSTING THE PICTURE LEVELS PICTURE MODE OPERATION
1 Press the MENU button on the remote control to display the Main menu....
19
English NOTE: • These items will be grayed out if you are not select the
User mode. • User mode (Picture Mode) will allow to highlight Color Temperature. Press the OK button.
3 Use the CURSOR ▲ and &#...
Owners Manual - Page 21

...to adjust the
audio setting. During this setting, the audio input signal will appear in Digital.
ADVANCED
SPORTS OPERATION (See PAGE 14)
1 Press the MENU button on the remote control to display ...20
3 Use the CURSOR ▲ and ▼ buttons to highlight
ADVANCED. It can reset previous adjusting settings during the AUDIO mode to the factory default value.
1 Use the CURSOR ◄ and...
Owners Manual - Page 22

....
5 Use the CURSOR ◄ and ► buttons to adjust the 120Hz Condition setting to highlight
ADVANCED. HD: Full / WaterGlass / Zoom1 / Zoom2
SD: Standard / WaterGlass / Zoom1 / Full / ...ADVANCED.
Press the OK button.
3 Use the CURSOR ▲ and ▼ buttons to highlight
ADVANCED. NOTE : Please set Light sensor operation to highlight
ADVANCED. The options during the Pix Shape mode...
Owners Manual - Page 23

....
2 Use the CURSOR ◄ and ► buttons to highlight
SYSTEM. Press the OK button. Press the OK button. Reset the previous adjustment settings under the ADVANCED mode to the factory default value.
1 Use the CURSOR ◄ and ► buttons to highlight
Language option. NOTE : Press the MENU button to return to select...
Owners Manual - Page 25

... (Local broadcasters decide which caption signals to set. Reset the previous adjustment settings under the CC Style Setting for each nine categories under the SYSTEM mode to the factory default value.
1 Use the CURSOR ◄ and ► buttons to highlight
SYSTEM. A function linked to the default value. English
CC STYLE SETTING...
Owners Manual - Page 26
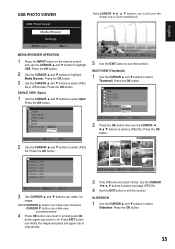
... a JPEG file. CURSOR ▼ button can rotate view counterclockwise
4 Press OK button can zoom in x2 and press OK button again can zoom in Zoom mode(x2,x4)
English
MEDIA BROWSER OPERATION
1 Press the INPUT button on the remote control and use the CURSOR ◄
►▲ ▼ buttons to original...
Owners Manual - Page 29

...broadcast.
• Adjust antenna. • Try a different channel. • Execute Channel Scan in CHANNEL mode.
• Turn antenna, install signal booster.
• Weak Signal.
• Check CHANNEL menu, Signal...connections.
• Press the INPUT button on the remote control.
28
select captioning mode.
• Select another channel.
to find one or more possible solutions. up ...
Owners Manual - Page 31
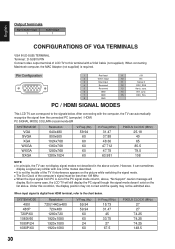
...(MHz) 27 27
74.25 74.25 74.25 148.5
30 Vert. PC SIGNAL MODE COLUMN (recommended)®
SYSTEM MODE VGA SVGA XGA
WXGA WXGA SXGA
Resolution 640x480 800x600 1024x768 1360x768 1280x768 1280x1024
V-Freq.(Hz)...similar with a VGA Cable (not supplied). Under this terminal with one of the modes described.
■■ It is not the trouble of the TV if interference appears on the picture while...
Similar Questions

Sanyo 27 Inch And 32 Inch Tv Set
What retailers in Northern Virginia sell Sanyo 27 in flat screen television set? What retailers in N...
What retailers in Northern Virginia sell Sanyo 27 in flat screen television set? What retailers in N...
(Posted by bbriston 9 years ago)

Can I Connect My Care Sara Hydrophone To My Sanyo Dp46840 Flat Panel Tv
(Posted by freespirittonya 9 years ago)
Can I Connect My Care Sara Hydrophone To My Sanyo Dp46840 Flat Panel Tv And How
(Posted by freespirittonya 9 years ago)

Game Mode
How do I turn the game mode on on my sanyo dp55441 tv? The game mode option does not light up or hig...
How do I turn the game mode on on my sanyo dp55441 tv? The game mode option does not light up or hig...
(Posted by jford31 10 years ago)