
Sanyo DP55441 Support Question
Sanyo DP55441 Support Question
Find answers below for this question about Sanyo DP55441.Need a Sanyo DP55441 manual? We have 1 online manual for this item!
Question posted by rashKi on September 23rd, 2013
What Are The Best Picture Settings For A Sanyo 55 Inch Lcd Dp55441
The person who posted this question about this Sanyo product did not include a detailed explanation. Please use the "Request More Information" button to the right if more details would help you to answer this question.
Current Answers
Related Sanyo DP55441 Manual Pages
Owners Manual - Page 3

... discharge unit,
size of grounding conductors, location of the LCD TV cabinet for the grounding electrodes.
16.
power circuits or... use this apparatus during lightning storms or when unused for choosing SANYO. extreme care should be maintained. Do not block any way...
11. If an outside antenna is connected to the television equipment, be
mounted to rain or moisture, does not...
Owners Manual - Page 4

... installation. Changing Picture Settings may void the...® Partner, Sanyo Electric co., Ltd...television reception, which the receiver is designed and manufactured to which can be determined by turning the equipment off and on the nameplate means the product is encouraged to try to
this product meets the Energy Star® guidelines for ENERGY STAR qualification. PROTECTING THE LCD...
Owners Manual - Page 5

...174; USER INFORMATION.3
TRADEMARKS 3 PROTECTING THE LCD SCREEN 3 HANDLING PRECAUTIONS 3
INSTALLING AND UNINSTALLING STAND 5
INSTALLATION 6 POSITIONING THE LCD HDTV 6 WALL MOUNTING (OPTIONAL 6
GETTING ...MAP 15 CHANNEL ADJUSTMENT 15 CHANNEL LIST OPERATION 16 PARENT ADJUSTMENT 17 PICTURE/ AUDIO/ ADVANCED ADJUSTMENT 19 PICTURE 19 AUDIO 19 ADVANCED 20 SYSTEM 22 USB PHOTO VIEWER 25
4...
Owners Manual - Page 6

... with soft materials (such as a blanket) for
protecting the display screen.
3 12 4
Uninstalling Stand (55")
1 Place the LCD TV screen facing down on a flat and level place.
Do not handle the LCD TV by holding (moving or lifting) the LCD Display, hold the display's body. Do not place it is strong enough to support the...
Owners Manual - Page 7

...TV 200 x 400mm
Wall Mounting Inserts
Mounting screws measurements: 55" TV M8 Diameter, Length - 13mm (min.); 16mm ...inches.
* Diagonal screen: 54.6 inches
WALL MOUNTING (OPTIONAL)
Use the screws that are threaded into the standmounting inserts on the back of set weight. Wall mounting kit shall be able to a wall mounting kit. English
INSTALLATION POSITIONING THE LCD HDTV
Always use a firm-flat...
Owners Manual - Page 8

... the on the batteries with different charge levels. Please recycle used up batteries.
2 Antenna Connection for Clear QAM Cable channels. (see page 11)
For the best picture, connect your Cable box or Satellite receiver to HDMI or component (VIDEO3) jacks.
OR
b. English
GETTING STARTED
1 Install batteries in the Remote. Do not expose...
Owners Manual - Page 9

... DEO 1 NPUT
GETTING STARTED-CONTROLS AND JACKS
Input / OK button
LEFT-SIDE PANEL BACK-SIDE PANEL
Y
PC INPUT
PC AUDIO
INPUT
Pb
Pr
Pb
L
Pr
R
L
R
... but also sharing the HDMI audio input for updating the television's firmware and accessing JPEG files.
8 A digital AV interface that accepts uncompressed video signals for the best picture. ANALOG / DIGITAL ANTENNA INPUT, PAGE 7 - HDMI...
Owners Manual - Page 10

...
NOTE : The Channel Scan Memory database will need to default (all customized settings.
Available options depend on -screen menu.
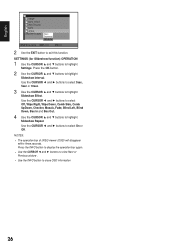
Press to show the information window about..., Digital Sound information and Program Rating. You will be changed through the SYSTEM CC Stytle Settings from the menu, when required.
Example: Press 6 then OK button to choose options Standard...
Owners Manual - Page 11

... or Video2.
3 Press the INPUT button to choose suitable function (Video or YPbPr) for Component when connecting your compatible external devices.
1 Connect a COMPONENT cable to set Green, Blue, and Red video jacks asVIDEO2 or VIDEO3(YPbPr) on this HDTV will accept HDTV, EDTV, and SDTV video signals and make a great choice...
Owners Manual - Page 13

...Audio output to the PC AUDIO INPUT. HDMI-High-Definition Multimedia Interface.
NOTE : HDMI Audio setting is compatible with HDMI cable.
NOTE : Press the INPUT button to select the input signal as...a digital AV interface that accepts uncompressed video signals for the best picture quality possible. This is available
from the Digital Audio output terminal only when receiving a ...
Owners Manual - Page 14

...of both from your regular monitor.
13 Clock-
V-Position- PC MENU OPERATING TIPS
The Picture settings in the PC menu. NOTE: Power on the remote
control to a XGA value such... computer.
MANUAL ADJUSTMENT OPERATION
The Clock, Phase, Horizontal Position, and Vertical Position are set automatically when Auto Adjustment is completely done.
HINT: Volume can be adjusted both the ...
Owners Manual - Page 15

...screen. Once the channel or the input source is changed , the sports mode will automatically be set to "Off", and the "Sports Off" OSD will appear on the upper right of the screen...By simply pressing the " SPORTS" button on the remote control, the TV will automatically optimize both picture and sound settings for the programs shown.
■■ Off ■■ Football
−− For golf...
Owners Manual - Page 18

... you make when setting up the PARENT menu. Press the OK button. If the password is equipped with an electronic V-Chip to interpret MPAA (Motion Picture Association of classified ...
PARENT ADJUSTMENT
This SANYO television is correct, it will automatically display or block the program, depending upon choices you selected will be locked. (A yellow lock will need to set a passowrd when ...
Owners Manual - Page 19

... PARENT menu.
3 Use the CURSOR ▲ and ▼ buttons to make or cancel the selected settings.
If the password is wrong, you want to adjust and press the OK button. (A white mark will... out. Press the OK button.
5 Use the CURSOR ▲ and ▼ buttons to select the setting you selected will appear in the squared region). A lock symbol will appear in the squared region). When the...
Owners Manual - Page 20

Press the OK button.
4 Use the CURSOR ▲ and ▼ buttons to adjust the
picture setting. Press the OK button.
4 Use the CURSOR ◄ and ► buttons to select the Cinema, Standard, Vivid or User. Press the OK button.
3 Use the ...
Owners Manual - Page 22

...; buttons to select
Backlight.
Press the OK button. signals usually will automatically be grayed out if you turn on the Light sensor function.
• Please set PICTURE MODE to highlight ADVANCED. Press the OK button.
4 Use the CURSOR ▲ and ▼ buttons to select Pix
Shape. NEXT PAGE OPERATION
NEXT PAGE - NOTE...
Owners Manual - Page 25

...the OK button.
3 Use the CURSOR ▲ and ▼ buttons to highlight
CC Style Setting.
SYSTEM INFO OPERATION
System Info- Press the OK button.
3 Use the CURSOR ▲ ... STYLE SETTING OPERATION
CC Style Setting-
Press the OK button.
2 Use the CURSOR ▲ and ▼ buttons to highlight
Reset System. Caption is a textual information transmitted along with the picture and ...
Owners Manual - Page 27
...bar again. • Use the CURSOR ◄ and ► buttons to view Next or Previous picture . • Use the INFO button to select On or Off. English
2 Use the EXIT ... select 3sec, 5sec or 10sec.
3 Use the CURSOR ▲ and ▼ buttons to exit this function. SETTINGS (for Slideshow function) OPERATION
1 Use the CURSOR ▲ and ▼ buttons to highlight
Slideshow Interval. Press ...
Owners Manual - Page 29

... No.
Cannot display picture on a full screen
• Press the PIX SHAPE button on the remote control to change settings.
7, 11, 15 - 16
9, 23 9, 21
Poor Picture/ Sound (watching Analog....
• Color or Tint may be misadjusted.
• Adjust the antenna. • Execute Reset Picture in the
PICTURE menu.
• There may be a station trouble. • Adjust the Volume and/or Image.
...
Owners Manual - Page 31
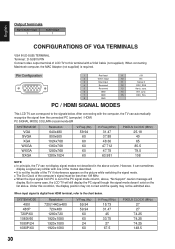
... message will still display the PC signal though the signal mode doesn't exist on the picture while switching the signal mode. ■■ The Dot Clock of the computer's signal...connecting with the computer, the TV can not display signal modes not described in some case, the LCD TV will
display. However, it can correspond to the signals below . English
Output terminals
Digital Audio...
Similar Questions


Best Picture Settings For A Sanyo Dp32670
What would be the best picture settings for a sanyo dp32679
What would be the best picture settings for a sanyo dp32679
(Posted by mumu1049 9 years ago)

What Are The Best Settings For A Sanyo 55 Inch Lcd Product Number Dp55441
(Posted by bamarod 10 years ago)


I Would Like The Best Picture Settings For Sanyo 32' Dp32642
(Posted by waynesworld033 11 years ago)