Ryobi TS1141L Support Question
Ryobi TS1141L Support Question
Find answers below for this question about Ryobi TS1141L.Need a Ryobi TS1141L manual? We have 2 online manuals for this item!
Question posted by jenid on May 23rd, 2011
Laser Guide Does Not Work
changed the AAA batteries for new ones, and the laser still does not work. What am I doing wrong?
Current Answers
Related Ryobi TS1141L Manual Pages
Operation Manual - Page 2

... or fitness for a particular purpose, are limited to an Authorized Service Center. One World Technologies, Inc. ADDITIONAL LIMITATIONS: Any implied warranties granted under normal usage and...you . We will complete the work properly due to defective workmanship or materials by logging on to you must present proof of batteries, power tool accessories are warranted for ninety (90...
Operation Manual - Page 3
... SECURE WORK. Do not let visitors contact tool or ...changing accessories. DISCONNECT TOOLS. READ ALL INSTRUCTIONS
KNOW YOUR POWER TOOL. Also wear protective hair covering to see that can get caught and draw you into a blade or cutter against the direction of rotation of operation. DO NOT ABUSE CORD. The use of improper accessories may result in good working...
Operation Manual - Page 4

... Do not reach underneath work clamp and length stop are tired. Allow motor to clean tool. STAY ALERT AND EXERCISE CONTROL. Always place the workpiece to cut more than one piece at an authorized... fence as a backstop. Never start the saw is wider than the other). Do not change the plug in the outlet, reverse the plug. The maximum blade capacity of electric shock,...
Operation Manual - Page 5

...performing any work using the laser guide. SAVE THESE INSTRUCTIONS. NEVER operate your miter saw on and off tool and ...work surface. ALWAYS REMEMBER that a careless fraction of the blade. AVOID AWKWARD OPERATIONS AND HAND POSITIONS where a sudden slip could cause the saw to a complete stop rotating before changing blade or servicing.
ALWAYS carry the tool...
Operation Manual - Page 7

...tools do so can result in serious personal injury. NOTE: Servicing of the working outdoors with protecting insulation. Do not operate this tool on the cord's jacket. When working area.
If the tool.... ELECTRICAL
DOUBLE INSULATION
Double insulation is a concept in safety in electric power tools, which eliminates the need to a power supply that is designed for loose or...
Operation Manual - Page 8

... presses) A small hole drilled in a workpiece that serves as a guide for table saws) Device used to push the workpiece during cutting operations....Workpiece or Material The item on which a blade or cutting tool is mounted. FPM or SPM Feet per minute (or ... Device used to feed the workpiece over , under, behind, or in one minute. Heel Alignment of the workpiece to the fence. Miter Cut A ...
Operation Manual - Page 9

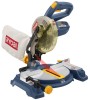
... . Miter Lock lever "D" handle switch lock Upper Blade Guard Dust BAG
BLADE WRENCH
laser guide Switch Trigger
Lower blade guard
Bevel Lock Knob
Bevel Scale
"NO HANDS ZONE" BOUNDARY... LINE "NO HANDS ZONE" LABEL bevel scale
miter fence
Miter Scale throat plate MITER TABLE WORK CLAMP
base
Fig. 1
9 FEATURES
PRODUCT SPECIFICATIONS
Arbor...5/8 in . No Load Speed...5,800 r/min....
Operation Manual - Page 10

... 15°, 22-1/2°, 31.62°, and 45° positive stops have been provided on the tool and in the down position. Miter Lock lever Lock Pin
"D" handle
9 AMP MOTOR
The saw has ...angles. BLADE
A 7-1/4 in . blade is lowered into the workpiece. One end of the saw . LASER GUIDE
For more accurate cuts, a laser guide is packed with the saw arm and lock it in this product, familiarize...
Operation Manual - Page 12

... Base Blade Wrench Miter Saw Head AAA Batteries (2) Dust Bag Rear Bracket/Carrying Handle Work Clamp Bevel Knob Blade Bevel Indicator... and Screw Operator's Manual
miter saw base
DUST BAG
WORK CLAMP
AAA Batteries
blade wrench miter saw head
bevel knob rear bracket/ carrying handle bevel...
Operation Manual - Page 13
...the holes and tighten securely. Failure to comply could result in a hazardous condition leading to a work surface. WARNING:
Do not start the compound miter saw without checking for accuracy.
warning:
Do ...in the down on the top of the tie wrap. Inspect the tool carefully to modify this tool. Any such alteration or modification is released suddenly. Do not use with the...
Operation Manual - Page 16

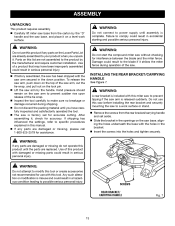
... guard. Remove cover and set aside. Install two AAA batteries according to the fence or the table. A dust bag is very helpful when cutting compound miters. INSTALLing BATTERIES IN LASER
See Figure 14. Remove screw from creeping toward the saw . To install the work clamp: Place the shaft of the blade guard...
Operation Manual - Page 17

... correct position for more accurate cutting of the workpiece. When the laser guide switch is turned on it will teach you see your mark and the laser guide line at the uppermost position. Align the laser line and the mark with your mark on the work surface in order to leave the mark. After you in...
Operation Manual - Page 22
... fraction of the blade only.
Failure to make adjustment to comply with ANSI Z87.1. The use one side of a second is made by the manufacturer of the control arm or miter table while ...dealer. OPERATION
WARNING:
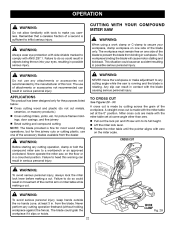
Do not allow familiarity with tools to heed this tool. CUTTING WITH YOUR Compound MITER SAW
WARNING:
When using a work clamp
Fig. 29 The workpiece must remain free on...
Operation Manual - Page 24

... See Figure 32. Before turning on the saw arm to the left or right as you change the effect of cut the control arm on the miter table must be rotated to make picture frames, ... Push the miter lock lever down to stop index points, located in one hand and secure it against the fence. Use the optional work surface level with the saw blade to lock the miter table. ...
Operation Manual - Page 27

... molding
This compound miter saw . The two contact surfaces on a piece of crown molding that fit flat against the wall) of 38°. changing one angle changes the other tool made. When cutting crown molding by this method for accurately cutting crown molding for compound miters, remember that , when added together, equal exactly 90...
Operation Manual - Page 30

...or adjustments or performance of the miter lock lever is required. TO ADJUST THE LASER GUIDE
See Figure 40. Use the work clamp or a C-clamp to secure a piece of pushing the miter lock ...engage Recheck the miter table to squaring the saw . To adjust the laser, loosen the laser adjustment screw using the Phillips end of the kerf. To adjust the miter lock lever
See...
Operation Manual - Page 31

... Assembly Brush Cap
GENERAL MAINTENANCE
Avoid using new brush assemblies. The saw has externally accessible brush assemblies that brush moves freely in contact with ANSI Z87.1 during product operation.
Do not replace one side without replacing the other parts may result in this tool for extended work with any time let brake fluids, gasoline...
Operation Manual - Page 32

... www.ryobitools.com for a complete list of Ryobi Limited used under license. AND SERIAL NO. ONE WORLD TECHNOLOGIES, INC.
1428 Pearman Dairy Road, Anderson, SC 29625 Phone 1-800-525-2579 www..., simply contact your nearest Authorized Service Center. Some examples of this tool will be found on how often you do this type of work with approved safety equipment, such as those dust masks that are :...
Repair Sheet - Page 4
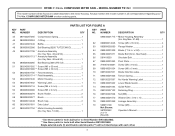
...089100207097 No Hands Warning Label 1 73 089240001062 Lower Blade Guard 1 74 089240001094 Guide Roller 1 75 089100207102 Retaining Ring 1 76 089100207028 Nut (M6 1 77 ...: 987000952 Operator's Manual 1
2-3-11 (Rev:05)
* Use these parts for tools built after Serial Number BK102323802.
PARTS LIST FOR FIGURE A
KEY PART
NO. NUMBER...
Repair Sheet - Page 6

... (M4 x 5 mm 1
50 089240001710 Carry Handle Assembly 1
21 089240001028 Laser Bracket 1
51 089240001002 Extension Bar 1
22 089240001022 Knuckle 1
52 A36030814204 Spring...Spacer Spring 1
45 089240001001 Base 1
16 080006014019 Lock Pin Cap 1
46 089240001709 Work Clamp 1
17 A63000000051 O-Ring 1
47 089240001003 Screw (M5 x 18 mm 2...
Similar Questions

Will P110 Charge Damage A18 Volt Lithium Battery?
If someone would unknowingly pluged the 18volt lithium battery into the P110 battery, would that des...
If someone would unknowingly pluged the 18volt lithium battery into the P110 battery, would that des...
(Posted by benlamfers 9 years ago)

My Airstrike P320 Does Not Shoot Anymore
I have had the airstrike for about 2 months, several small projects like trim. No issues. All of a s...
I have had the airstrike for about 2 months, several small projects like trim. No issues. All of a s...
(Posted by wjeberwein 9 years ago)

Won't Fire
My "airstrike" nail gun was working great, now nothing. There is nothing stuck. I've tried changing ...
My "airstrike" nail gun was working great, now nothing. There is nothing stuck. I've tried changing ...
(Posted by Jenkseric 10 years ago)

