
Ryobi RTS10 Support Question
Ryobi RTS10 Support Question
Find answers below for this question about Ryobi RTS10.Need a Ryobi RTS10 manual? We have 4 online manuals for this item!
Current Answers
Related Ryobi RTS10 Manual Pages
English Manual - Page 2

...General Safety Rules...3-4 Specific Safety Rules...5 Symbols...6-7 Electrical...8 Glossary of Terms...9 Features...10-12 Tools Needed...13 Loose Parts...14-15 Assembly...16-19 Operation...20-29 Adjustments...30-31 Maintenance...32 Troubleshooting...33 Parts Ordering / Service...Back...
English Manual - Page 3
... it is in length. Do not use of electric shock.
ALWAYS KEEP THE BLADE GUARD AND SPREADER (SPLITTER) IN PLACE and in use an outdoor extension cord marked "W-A" or "W". Don't use and reduce the risk of the tool, a guard or other part that it was not designed for a purpose not intended.
USE...
English Manual - Page 4
...sure all nails from the rotating blade.
Inspect EXTENSION CORDS periodically and replace if damaged.
GROUND ALL TOOLS. Make sure blade is necessary, do not connect ... 3-wire extension cords that have repaired by a qualified electrician.
Keep TOOL dry, clean, and free from blades. Never use brake fluids, gasoline, petroleum-based products, or any medication.
&#...
English Manual - Page 5
...through the workpiece as in line with the path of saw blade. Keep the blade guard down, the anti-kickback pawls down, and the spreader in... place and operating. d) Not releasing the work firmly against the rip fence or miter gauge. c) Keep hands out of the line of the saw blade using your hand into the cutting tool...
English Manual - Page 10

... in . Cutting Depth at 0 3 in . Cutting Depth at 45 2-5/8 in . Input 120 V, AC only, 60 Hz, 13 A No Load Speed 4,800 r/min. (RPM)
spreader
BLADE GUARD ASSEMBLY
BLADE
RIP FENCE
ANTI-KICKBACK PAWLS
MITER GAUGE
FRONT RAIL
LOCKING LEver
BEVEL LOCKING
LEVER
BLADE ADJUSTING
HANDLE
BEVEL INDICATOR
SWITCH assembly
trigger Lock
Fig. 2 10 FEATURES
product specifications...
English Manual - Page 11

... switch before tilting the blade. BLADE ADJUSTING HANDLE - BLADE GUARD -
The switch key must be operated. To cut lengthwise (rip cuts). The toothed pawls are toothed plates mounted on the front of the blade projects up and cutting across the grain (cross cuts or miter cuts), use the tool.
11 BEVEL SCALE -
SWITCH ASSEMBLY - Place the key...
English Manual - Page 14
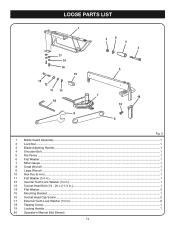
... LIST
1
17 14 16 15
13 12 11 14 10
9
2
6
3
4
5
7
19
18
8
1 2
3 4 5 6 7 8 9 10 11 12 13 14 15 16 17 18 19 20
Fig. 5
Blade Guard Assembly...1 Lock Nut...1 Blade Adjusting Handle...1 Shoulder Bolt...1 Rip Fence ...1 Flat Washer...1 Miter Gauge ...1 Small Wrench...1 Large Wrench...1 Hex Key (5 mm)...1 Flat Washer (1/4 in.)...1 Internal Tooth Lock Washer...
English Manual - Page 16

...; Take 4 legs and 8 braces from a small hardware pack:
16 - 5/16 in. 18-UNC 5/8 in. Do not reach over or across the blade.
ASSEMBLY
UNPACKING
This product requires assembly. Carefully remove the tool and any parts are damaged or missing do not operate this warning can result in serious personal injury. WARNING:
Do not...
English Manual - Page 19

...properly aligned, securely retighten the screws.
19 See the following section for instructions.
If the blade guard assembly is needed to install and adjust the blade guard assembly correctly.
TO INSTALL BLADE GUARD Assembly
See Figure 13. Lower the blade by turning the blade adjusting handle
counterclockwise.
Place a framing square or straight edge beside the saw has...
English Manual - Page 21

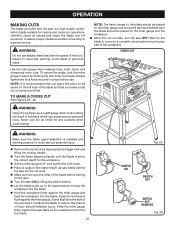
...the blade. Bevel cuts are with making cross cuts, rip cuts, bevel cuts, and miter cuts before attempting any operation. The rip fence must always be wider than the speed of this tool....that is vertical. To avoid kickback while making
the cut , make sure the blade guard and anti-kickback pawls are made with an angled blade on the waste side of the measuring line.
Cut the wood ...
English Manual - Page 25
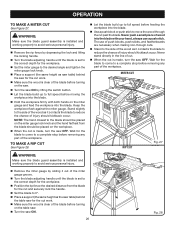
...as saw table) behind
the saw for the blade to come to heed this tool.
Carefully check all setups and rotate the blade one full revolution to assure proper clearance before removing...the miter gauge in kickback which can cause serious personal injury. WARNING:
Make sure the blade guard assembly is installed and working properly to avoid serious personal injury.
Remove the rip ...
English Manual - Page 26
... hand, always use of push blocks, push sticks, and featherboards are necessary when making non-through the cut past the blade.
MITER cut
rip cut
Fig. 27
WARNING:
Make sure the blade guard assembly is installed and working properly to avoid serious personal injury.
Remove the rip fence by depressing the lock and...
English Manual - Page 27

...to avoid serious personal injury.
27
Fig. 30
WARNING:
Make sure the blade guard assembly is installed and working properly to avoid serious personal injury.
...the rip fence to unlock it out of the blade to unlock. WARNING:
Make sure the blade guard assembly is clear of the blade before moving
the workpiece into the blade. Hold the workpiece firmly with both hands...
English Manual - Page 28
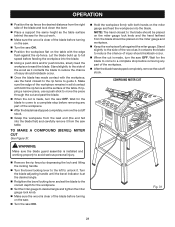
... workpiece from the lead end (the end fed into the blade first) and carefully remove it . COMPOUND MITER cut
WARNING:
Make sure the blade guard assembly is installed and working properly to avoid serious personal injury....of injury should be placed on the miter gauge lock knob and the hand farthest from the blade should kickback occur.
When the cut is made , turn the saw table. ...
English Manual - Page 29

... cuts are complete:
Unplug the saw ON. Feed the workpiece into the power source. Turn the saw .
Lower the blade and reinstall the blade guard assembly using the two socket head cap screws, lock washers, and flat washers.
operation
To make a NON-THROUGH cut . For example, if your hands when...
English Manual - Page 30

... are not true, repeat the process. WARNING:
To reduce the risk of injury, always make sure the tool is unplugged from the power supply and the switch is in the OFF position. If the cuts
are not...
Fig. 33
30
Do not start any operation.
Unplug the saw then remove the blade guard assembly.
Unlock the rip fence by turning clockwise to increase tightness of the rear of the...
English Manual - Page 32
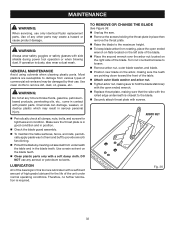
...blade washer, and blade. Position new blade on the blade teeth. Clean plastic parts only with side shields during power tool operation or when blowing dust. LUBRICATION
All of the bearings in this tool...; Remove the screws holding the throat plate in position.
Check the blade guard assembly. To maintain the table surfaces, fence, and rails, periodi- Most...
Repair Sheet - Page 3
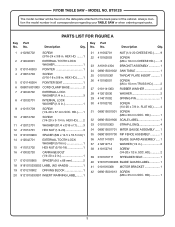
... the model number in . Description
Qty. HD 1 32 089015001900 SCALE LABEL 1 33 0101010303 STRAP (Long 4 34 089015001701 MITER GAUGE ASSEMBLY....... 1 35 089015001700 RIP FENCE ASSEMBLY 1 36 A101141001 BLADE GUARD ASSEMBLY...... 1 37 412012714 WASHER (1/4 in 2 38 410152716 SCREW (1/4-20 x 1/2 in .
BBTTSS1122SS
The model number will be found on the data...
Repair Sheet - Page 5
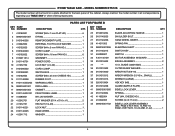
...0101140205 HAND WHEEL 1 24 412011712 WASHER 1
25 0152010204 BLADE ADJUSTING HANDLE 1
26 0101140203 SHOULDER BOLT 1
27 0101140206 HAND WHEEL INSERT 1
28 414011003 SPRING PIN 1
29 089015001006 ELEVATING SHAFT 1
30 0101140213 SWITCH KEY 1
31 452020007 SWITCH 1
32 A101140109 MOTOR ASSEMBLY W/GUARD 1
33 0101015002 BRUSH ASSEMBLY 2
34
*** 10 in. PAGE 2 KEY NOS. 13 AND...
Repair Sheet - Page 7

... parts. KEY NOS. 18-19 1 21 0101010102 GEAR HOUSING 1 22 420110004 NEEDLE BEARING 3 23 A101010501 JACKSHAFT ASSEMBLY (ARBOR 1 987000372 OPERATOR'S MANUAL 1
9-30-08 (REV:00)
NUMBER
DESCRIPTION
QTY.
1 0101210210 LOWER BLADE GUARD 1 2 451020004 WIRE CONNECTOR 2 3 0101140703 MOTOR CORD 1 4 451010001 STRAIN RELIEF 1 5 412042001 EXTERNAL TOOTH LOCK WASHER 2 6 410252001...
Similar Questions


Lower Blade Guard
My lower blade guard is stuck, any ideas on getting it loose?
My lower blade guard is stuck, any ideas on getting it loose?
(Posted by kendallbailey969 9 years ago)

Can't Install Blade Guard And Paul. Diagram To Small To See Details Of Attachme
(Posted by pwinn4 10 years ago)

Blade Guard Assembly
For life of me I can not get the blade guard in correct position for the saw to cut strait. I even w...
For life of me I can not get the blade guard in correct position for the saw to cut strait. I even w...
(Posted by hadifallah 12 years ago)
Lower Blade Guard Ts1342l Miter Saw
How do I replace the spring on my TS1342L 10" lower blade guard?
How do I replace the spring on my TS1342L 10" lower blade guard?
(Posted by MRELVIS 12 years ago)