
Ryobi RTS10 Support Question
Ryobi RTS10 Support Question
Find answers below for this question about Ryobi RTS10.Need a Ryobi RTS10 manual? We have 4 online manuals for this item!
Question posted by ivabkbow on June 24th, 2014
Rts10 Wont Turn On
The person who posted this question about this Ryobi product did not include a detailed explanation. Please use the "Request More Information" button to the right if more details would help you to answer this question.
Current Answers
Related Ryobi RTS10 Manual Pages
English Manual - Page 3
... CLEAN. Rubber gloves and nonskid footwear are not safety glasses.
SECURE WORK. Use a featherboard to this tool.
GUARD AGAINST ELECTRICAL SHOCK by removing starter keys.
DON'T FORCE TOOL. The use , before turning it on the saw 's applications and limitations as well as the specific potential hazards related to hold work...
English Manual - Page 4
... rotating blade.
Inspect EXTENSION CORDS periodically and replace if damaged.
GROUND ALL TOOLS. Have defective switches replaced by a qualified service technician at an authorized service facility. Inspect for... DOUBLE CHECK ALL SETUPS. Do not rush.
DO NOT USE TOOL IF SWITCH DOES NOT TURN IT ON AND OFF. Do not reach underneath work or around or over the ...
English Manual - Page 5
... the table saw.
ALWAYS TURN OFF SAW before it can vary but the push stick must be narrower than the workpiece to them these instructions also.
f) Do not perform any work before disconnecting it, to avoid accidental starting when reconnecting to power supply.
THIS TOOL should have a straight edge to...
English Manual - Page 9

...aids help control the workpiece by the blade. Revolutions Per Minute (RPM) The number of turns completed by a spinning object in contact with the blade at any angle other than at... being kicked back toward operator.
Workpiece or Material The item on which a blade or cutting tool is not properly supported.
Freehand Performing a cut or the slot produced by a fence, miter...
English Manual - Page 12
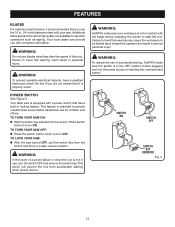
....
SWITCH ON
SWITCH OFF
SWITCH KEY
removed
Fig. 3
12 Your local dealer can provide you use , turn the switch OFF and remove the switch key.
This action will prevent the tool from the
switch and store in locking feature. Warning:
To reduce the risk of this warning may cause the workpiece to...
English Manual - Page 13

TOOLS NEEDED
The following tools (not included or drawn to scale) are needed for assembly and making adjustments:
WRENCH (2) 10 mm, 12 mm
PHILLIPS SCREWDRIVER
flathead SCREWDRIVER
FRAMING SQUARE
Fig. 4
13
English Manual - Page 18
... the right to lock the blade
angle in the saw blade: Lower the blade by turning the blade adjusting handle clockwise.
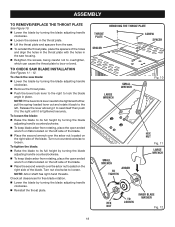
Reinstall the throat plate. To check the saw housing.
... being careful not to overtighten, which can cause the throat plate to its full height by turning the blade
adjusting handle counterclockwise.
To keep blade arbor from rotating, place the open...
English Manual - Page 19

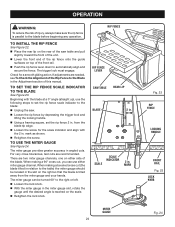
... INSTALL BLADE GUARD Assembly
See Figure 13. Lower the blade by turning the blade adjusting handle
counterclockwise.
Place a framing square or straight ...cap screws, flat washers, and external tooth lock washers as needed . If the spreader and saw blade by turning the blade adjusting handle
clockwise.
Feed an external tooth lock washer, flat washer, and internal tooth ...
English Manual - Page 22

... other half of the same end to 45°. Set the rip fence to allow the blade to completely stop rotating before removing the stock. Turn the saw blade area. fingers and 1/8 in . warning:
Do not locate the featherboard to the rear of the blade. The featherboard is angled, with a C-clamp...
English Manual - Page 23

...Fig. 20
Fig. 19 23
SCREWDRIVER
BEVEL INDICATOR SCREW
Fig. 21 Raise the blade by turning the blade adjusting handle counterclockwise or lower it to the left again until bevel lock lever is...Prior to its original position.
but the lowest points (gullets) are higher than the workpiece by turning bevel lock lever all the
way to the right.
The blade depth should be further loosened, ...
English Manual - Page 24
... as shown. Retighten the screw.
When making a 90° cross cut (the blade tilted in relation to the table) the miter gauge should be turned 60° to the Blade
See Figure 23. Scale
Scale indicator
2 in the slot on the right so that the blade is reached on top...
English Manual - Page 25
...25
Fig. 25
SWITCH ON
SWITCH OFF
SWITCH KEY
removed
Fig. 26
Failure to heed this tool.
operation
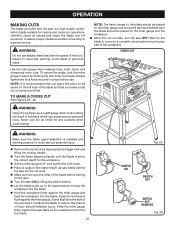
MAKING CUTS
The blade provided with the saw is a high-quality combination blade suitable...will result in place by depressing the trigger lock and lifting the locking handle.
Turn the blade adjusting handle until the blade is recommended that you make a cross cut operations.
...
English Manual - Page 26
...height as the saw table) behind the saw for the blade to come to a complete stop before turning on the saw.
Turn the saw OFF. Wait for the cut work .
Make sure the wood is set to...; Stand to the side of the wood as it out of the miter gauge groove.
Turn the blade adjusting handle until the blade is clear of the blade before removing any part of cut....
English Manual - Page 27

....
Remove the miter gauge by depressing the lock and lifting the locking handle.
Turn the bevel locking lever to the left to unlock.
BEVEL CROSS cut
BEVEL RIP cut
Fig. 29...on the miter gauge lock knob and the hand farthest from the blade should kickback occur.
Turn the blade adjusting handle until the bevel indicator is installed and working properly to avoid serious...
English Manual - Page 28
...up to reduce the chance of injury should kickback occur.
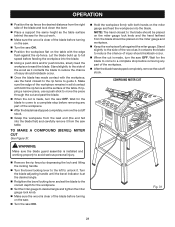
Once the blade has made , turn the saw OFF. COMPOUND MITER cut
WARNING:
Make sure the blade guard assembly is installed and working properly... Remove the rip fence by depressing the lock and lifting the locking handle.
Turn the bevel locking lever to the left to unlock it contacts the blade to full speed before ...
English Manual - Page 29

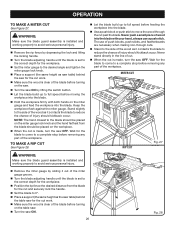
...of the cut is essential to avoid the risk of a non-through cut , the cutter is made , turn the saw ON. Feed the workpiece into the blade. To avoid personal injury, always use of ... assembly installed. Wait for the workpiece. Plug the saw into the power source. Turn the saw OFF. WARNING:
Never feed wood with the grain (ripping) or across the grain (cross cut...
English Manual - Page 30

...and move the rip fence up to increase tightness of the rear of injury, always make sure the tool is unplugged from the power supply and the switch is in the OFF position. Do not start any... the process.
Take the dimension on the rip scale.
Move the rip fence back and turn the framing square 180° to heed this warning could result in good workpieces. RIP FENCE SAW ...
English Manual - Page 31

...bevel locking lever. Make sure the saw is at 90°. Turn the 90° positive stop adjustment screw counterclockwise 1 turn the 45° positive stop adjustment screw clockwise until the blade ... unplugged from the power source. Make sure the saw is less than 45°, turn and rotate the bevel adjusting handle counterclockwise until it stops. Recheck the blade position. Continue...
English Manual - Page 32
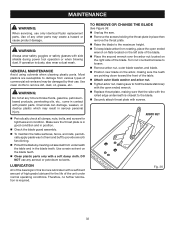
...for tightness and condition. Therefore, no further lubrication is in good condition and in this tool are lubricated with a sufficient amount of the bearings in position.
Check the blade... guard assembly. To maintain the table surfaces, fence, and rails, periodi- Turn nut counterclockwise to loosen. Remove arbor nut, outer blade washer, and blade. ...
English Manual - Page 33

... fed too fast. 3. Change blade to a level work .
Positive stops need adjusting. Solution
1. Adjust positive stops.
1. TROUBLESHOOTING
Problem
Excess Vibration. Blade does not lower when turning blade control handle. Blade is misaligned. 2. Reposition on miter scale.
1. Slow the feed rate. 3. Incorrect blade for cut. 3. Clean underside of rip
fence and front...
Similar Questions

Ryobi Rts10 Riving Lever Won't Lock
The riving knife lever on Ryobi RTS10 won't lock. Is there anything that shows the assembly of this ...
The riving knife lever on Ryobi RTS10 won't lock. Is there anything that shows the assembly of this ...
(Posted by nsmerk 8 years ago)

Dado Blade Insert For A Ryobi Rts10 Table Saw
Where can I purchase a dado blade insert for my Ryobi RTS10 10" table saw? I am having difficulty fi...
Where can I purchase a dado blade insert for my Ryobi RTS10 10" table saw? I am having difficulty fi...
(Posted by bstilton 9 years ago)


Rts10 Dado Throat Cover
I need a dado throat cover for a Ryobi RTS10 table saw
I need a dado throat cover for a Ryobi RTS10 table saw
(Posted by mattharbaugh 10 years ago)

Rts10/bts16
Is the motor on the RTS10, the same motor as is on the BTS16?
Is the motor on the RTS10, the same motor as is on the BTS16?
(Posted by kesev 11 years ago)