Ricoh Aficio SP C242SF Support Question
Ricoh Aficio SP C242SF Support Question
Find answers below for this question about Ricoh Aficio SP C242SF.Need a Ricoh Aficio SP C242SF manual? We have 1 online manual for this item!
Question posted by yubing1011 on February 21st, 2016
Scan To My Email
may I know how to scan my document to my email from printer? understand I need to set my email address in the printer. how to set and save my email address inside printer ? Thanks .Yu Bing
Current Answers
Answer #1: Posted by freginold on February 22nd, 2016 4:29 AM
freginold

Member since:
December 20th, 2011 Points: 23,253,885

Member since:
December 20th, 2011 Points: 23,253,885
Hello, there are two parts to set up scanning to email from your Ricoh. The first part is configuring the email scanning settings (SMTP settings). The second part is entering the email address you wish to scan to.
To see how to enter your email address into the scanner, see page 11 of the "Initial Guide for Scanner and Fax." To see how to set up the SMTP (scan to email) settings, see the "Configuring the SMTP Settings" section in the "User Guide." Both manuals can be downloaded here.
To see how to enter your email address into the scanner, see page 11 of the "Initial Guide for Scanner and Fax." To see how to set up the SMTP (scan to email) settings, see the "Configuring the SMTP Settings" section in the "User Guide." Both manuals can be downloaded here.
Related Ricoh Aficio SP C242SF Manual Pages
User Manual - Page 5
... the Scanner Function Guide to the Scanner Function...5
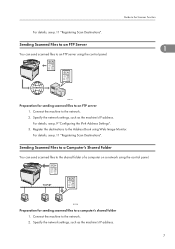
Scanning from a Computer...5 Sending Scanned Files via E-mail...6 Sending Scanned Files to an FTP Server...7 Sending Scanned Files to a Computer's Shared Folder 7 Sending Scanned Files to a USB Flash Disk 8 Configuring the IPv4 Address Settings...9 Registering Scan Destinations...11 Scanning Using the Control Panel...16 Basic Operation for...
User Manual - Page 9
... with USB connection 1. Scanning from the computer
TWAIN scanning allows you to send scanned files via e-mail (Scan to E-mail), to an FTP server (Scan to FTP), or to operate the machine from the computer (TWAIN scanning) and scanning using a TWAIN-compliant application, such as Presto! TWAIN scanning is required for scanning from your computer directly.
Scanning from a Computer...
User Manual - Page 10
... details about installing the scanner driver, see the instructions provided on the driver CD-ROM.
4.
Sending Scanned Files via E-mail
You can send scanned files via e-mail 1. For details, see p.9 "Configuring the IPv4 Address Settings". 3. 1. Preparation for sending scanned files via e-mail using the control panel. If a TWAIN-compliant application is not installed on the...
User Manual - Page 11
... to the shared folder of a computer on a network using the control panel.
Specify the network settings, such as the machine's IP address. For details, see p.9 "Configuring the IPv4 Address Settings". 3.
Sending Scanned Files to an FTP Server
You can send scanned files to an FTP server using the control panel.
Guide to the Scanner Function
1
CES187...
User Manual - Page 12
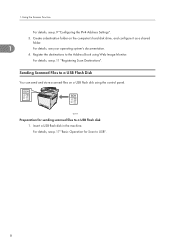
... USB flash disk using Web Image Monitor. CES198
Preparation for Scan to the Address Book using the control panel. 1. For details, see your operating system's documentation.
4. Register the destinations to USB".
8
Sending Scanned Files to a USB flash disk 1. For details, see p.9 "Configuring the IPv4 Address Settings".
3. Using the Scanner Function
For details, see p.17 "Basic...
User Manual - Page 13
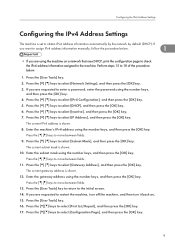
... the password using the number keys, and then press the [OK] key. Configuring the IPv4 Address Settings
Configuring the IPv4 Address Settings
The machine is set to select [Inactive], and then press the [OK] key. 7. Enter the machine's IPv4 address using the number keys, and then press the [OK] key. Enter the subnet mask using the...
User Manual - Page 14

Using the Scanner Function
18. The IPv4 address setting will appear under "TCP/IP" on the configuration page.
1
10 1. The configuration page is printed. Press [Yes] in the confirmation screen.
User Manual - Page 15
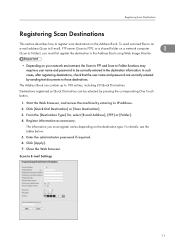
... network environment, the Scan to FTP and Scan to Folder functions may require a user name and password to E-mail Settings
11 The Address Book can be correctly entered in the Address Book. In such cases, after registering destinations, check that the user name and password are correctly entered by sending test documents to those destinations. For...
User Manual - Page 16
...Scale)
Required File format of the scanned file when scanning in color. Scan Size
Optional Select the scanning size for the original.
Scan to which a notification is sent after transmission.
Density
Optional
Specify the image density by clicking the right or left buttons. Notification E-mail Address Optional
E-mail address to FTP Settings
12
Sender's Name
Optional Name...
User Manual - Page 17
... IP address of the FTP server directory where scanned files are stored.
Directory
Optional
Name of the FTP server. Scan Size
Optional Select the scanning size for logging in to which a notification is sent after transmission. Density
Optional
Specify the image density by clicking the right or left buttons.
13 Registering Scan Destinations
Item
Setting
Description...
User Manual - Page 18
... Login Password Directory
Optional Optional Optional Optional
Notification E-mail Address Optional
File Format (Color/Gray Scale)
Required
Description
Select when setting the destination as a Quick Dial entry. File format of the destination. Name of the scanned file when scanning in color.
14 Consists of the IP address or name of the destination computer, and name...
User Manual - Page 19
...
Optional Select the scanning size for the original. Registering Scan Destinations
Item
Setting
Description
File Format (Black & White) Required
File format of the domain to USB function does not require destinations registered in the Address Book.
• For details about SMTP and DNS settings, see "Configuring the DNS Settings" and "Configuring the SMTP Settings", User Guide .
15...
User Manual - Page 20
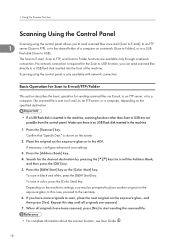
... panel.
Press the [Scanner] key. When all originals are scanned. 7. If necessary, configure advanced scan settings.
3. Search for sending scanned files via e-mail (Scan to E-mail), to an FTP
1
server (Scan to FTP), or to the shared folder of the machine. The Scan to E-mail, Scan to FTP, and Scan to a computer. No network connection is inserted in the...
User Manual - Page 21
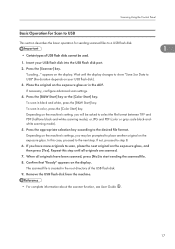
...Save Scn Data to USB" (the duration depends on your USB flash disk into the USB flash disk port. 2. If not, proceed to the desired file format. If you have been scanned, press [No] to start sending the scanned file. 8. The scanned... glass, and then press [Yes]. To scan in the ADF. "Loading..." If necessary, configure advanced scan settings. 4. Press the appropriate selection key according ...
User Manual - Page 22
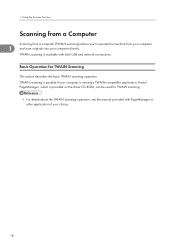
... possible if your computer is available with PageManager or other application of your computer directly. Presto! Basic Operation for TWAIN scanning.
• For details about the TWAIN scanning operation, see the manual provided with both USB and network connections. 1.
PageManager, which is provided on the driver CD-ROM, can be used for...
User Manual - Page 23

... For details, see p.21 "Connecting to the Address Book using as a fax machine 1. For details, see p.23 "Configuring Telephone Network Settings". 3. Connect the machine to the Fax Function
This... machine as a Fax Machine
CES188
Preparation for voice calls.
19 Configure the telephone network settings. Using the Machine with an External Telephone
You can use this machine as a fax ...
User Manual - Page 32
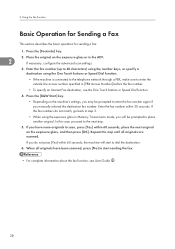
..., use the One Touch buttons or Speed Dial function.
4. When all originals are scanned. Enter the fax number (up to 40 characters) using the number keys, or specify...to enter the outside line access number specified in the ADF.
2
If necessary, configure the advanced scan settings.
3. Using the Fax Function
Basic Operation for Sending a Fax
This section describes the basic operation ...
User Manual - Page 33
... the reception modes and the basic operations for receiving a fax when the reception mode is set the external telephone answering device to answer calls before the machine starts to receive faxes. Press the [ ][ ] keys to select [Reception Settings], and then press the [OK] key. 4. When you hear a fax calling tone or no sound...
User Manual - Page 34
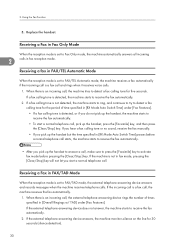
... up the handset, press the [Facsimile] key, and then press the [Clear/Stop] key.
When there is an incoming call is set to FAX/TAD mode, the external telephone answering device answers and records messages when the machine receives telephone calls.
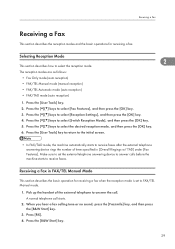
Receiving a Fax in Fax Only Mode
When the reception mode is...
User Manual - Page 35
The external telephone answering device records messages.
2
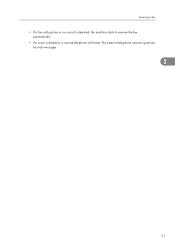
31 Receiving a Fax
• If a fax calling tone or no sound is detected, the machine starts to receive the fax automatically.
• If a voice is detected, a normal telephone call starts.
Similar Questions


How To Scan Documents On A Ricoh Aficio Mpc3001 Copier
(Posted by denlzy3 9 years ago)


Scanning Documents Multiple Vs Single Pages
Our new RICOH MP 2852 is set to create a separate.pdf file for each individual page in a scanned doc...
Our new RICOH MP 2852 is set to create a separate.pdf file for each individual page in a scanned doc...
(Posted by sdovell 11 years ago)
