Ricoh Aficio MP C4502 Support Question
Ricoh Aficio MP C4502 Support Question
Find answers below for this question about Ricoh Aficio MP C4502.Need a Ricoh Aficio MP C4502 manual? We have 2 online manuals for this item!
Question posted by Hellkb on June 28th, 2014
How To Set Finishing Settings On The Ricoh C4502
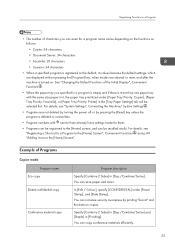
The person who posted this question about this Ricoh product did not include a detailed explanation. Please use the "Request More Information" button to the right if more details would help you to answer this question.
Current Answers
Related Ricoh Aficio MP C4502 Manual Pages
General Settings Guide - Page 11
... [Printer Features]. Always quit
User Tools when you have finished. ❒ Any changes you to contact for system settings differ from normal operations. ZCAS100N
B Select the menu. To ... the display, and then press
[OK].
3 Reference p.4 "Quitting User Tools"
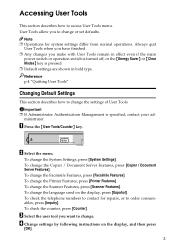
Changing Default Settings
This section describes how to access User Tools menu.
To change the Facsimile Features, press [...
General Settings Guide - Page 51
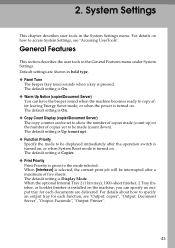
... five sheets. General Features
This section describes the user tools in the System Settings menu. The default setting is pressed.
When the optional Internal Tray 2 (1 bin tray), 1000-sheet finisher, 2 Tray finisher, or booklet finisher is turned on the machine, you can be set to be interrupted after a maximum of copies made (count down). The default...
General Settings Guide - Page 52
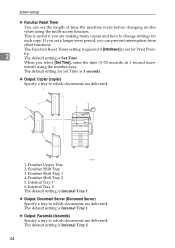
... is Internal Tray 1.
❖ Output: Facsimile (facsimile) Specify a tray to which documents are delivered.
Finisher Shift Tray 3. The default setting is Set Time.
Finisher Upper Tray 2. The default setting is Internal Tray 2.
44
The default setting for Set Time is Internal Tray 1.
❖ Output: Document Server (Document Server) Specify a tray to which documents are making...
General Settings Guide - Page 53

When the 1000-sheet finisher, 2 Tray finisher or booklet finisher is installed and stapling or shift-sorting is installed, perform a stapling test (five to the finisher shift tray, finisher shift tray 1 or finisher shift tray 2 regardless of the output tray specified.
45 The output trays set on the printer driver have priority over the output tray specified above...
General Settings Guide - Page 57
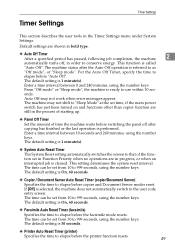
... Auto Reset Timer (printer)
Specifies the time to as
"Off mode", or "Sleep mode". The default setting is referred to elapse before copier and Document Server modes reset. The machine status after copying has finished or the last operation is ready to 999 seconds, using the number keys.
Enter a time interval between...
General Settings Guide - Page 87
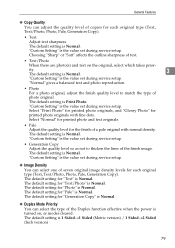
... on the original, select which takes prior-
The default setting is Normal.
3
"Custom Setting" is the value set during service setup. "Custom Setting" is the value set during service setup. The default setting is Normal. ity.
Select "Print Photo" for printed photo originals, and "Glossy Photo" for the finish of a pale original with fine dots. The default...
General Settings Guide - Page 101

... can select to have Batch mode or SADF mode displayed when you press
the [Special Original] key. The default setting is No.
• Yes You can make copies, but sorted pages will finish even if you have left the machine.
• No When paper of scanned originals first, and then automatically proceed...
General Settings Guide - Page 102
... "Batch mode", Copy/ Document Server Reference "Sort", Copy/ Document Server Reference
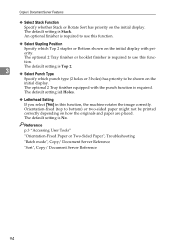
94 The optional 2 Tray finisher or booklet finisher is required to be printed correctly depending on the initial display. The default setting is Stack.
The default setting is Top 2.
3
❖ Select Punch Type
Specify which Top 2 staples or Bottom shown on the
initial...
General Settings Guide - Page 144

... switches between 1 and 0. G Press [OK].
Important
❒ Access to some User Parameter Settings may need to change . C Press [TNext].
J Press the {User Tools/Counter} key... . The display returns to set parameters.
I After all the settings are finished, press [Exit].
H Repeat step E through step G to change any bit switches other settings may require options, or other...
General Settings Guide - Page 170

...place. When a destination is changed, a document is set which destination to the new destination. If there is no...as an alternative destination. See "Parameter Settings" (switch 32, bit 0). Reference p.131 "Parameter Settings" p.163 "Programming a password" p.163... using the destination list, the settings of the specified type, you can set to print, contact your service representative...
General Settings Guide - Page 181

... who stored a file in the machine.
This menu can be selected only when a finisher (optional) is installed.
❖ Auto Delete Temporary Print Jobs
You can enable Job Separation. The default setting is Off. The default setting is Off. Default settings are shown in bold type.
❖ Print Error Report
Select this to automatically delete...
Manuals - Page 55
...Special Original, paper tray, Store File (except for User Name and Password), Create Margin, Finishing, Cover/Slip Sheet (except for Designate: Copy, Designate: Blank, and Chapter in Designate ...Security Settings), Select Stored File, Store File (except for User Name and Password), Preview, Text, Subject, Security, Recept. Notice This section explains how to Bottom, Booklet, Magazine, Finishing, ...
Manuals - Page 57
... the Machine/ System Settings .
• Programs are cleared or reset, and after the machine is turned on. In [Edit / Colour], specify [CONFIDENTIAL] under [Paper Tray Priority: Copier], [Paper Tray Priority: Facsimile], or [Paper Tray Priority: Printer] in [Finishing]. See "Changing the Default Functions of the Initial Display", Convenient Functions .
• When the...
Manuals - Page 58
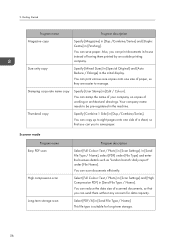
...Photo] in [Scan Settings] and [High Compression PDF] in [Send File Type / Name]. Select [PDF/A] in [Send File Type / Name].
Stamping corporate name copy
Specify [User Stamp] in [Finishing].
This file type is...copy
Specify [Mixed Sizes] in [Special Original] and [Auto Reduce / Enlarge] in [Scan Settings]. You can reduce the data size of scanned documents, so that you can you can stamp...
Manuals - Page 64
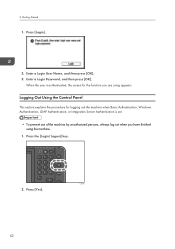
... Out Using the Control Panel
This section explains the procedure for the function you have finished using appears. Getting Started
1. Enter a Login User Name, and then press [OK...the machine when Basic Authentication, Windows Authentication, LDAP Authentication, or Integration Server Authentication is set.
• To prevent use of the machine by unauthorized persons, always log out when you are using...
Manuals - Page 70

3. When the copy job is finished, press the [Reset] key to clear the settings.
68 Copy
7.
Manuals - Page 83
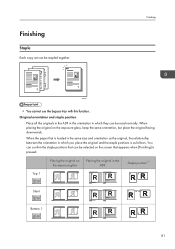
...original and the staple positions is pressed. When placing the original on the screen that appears when [Finishing] is as the original, the relationship between the orientation in the ADF
Staple position*1
Top 1
Slant...which they can be stapled together.
Finishing
Staple
Each copy set can be read normally. Finishing
CKN021
• You cannot use the bypass tray with this function.
Manuals - Page 85
Finishing
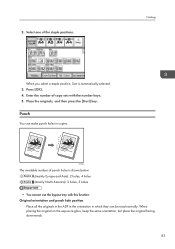
When you select a staple position, Sort is shown below: (mainly Europe and Asia): 2 holes, 4 holes (mainly North America): 2 holes... all the originals in the ADF in the orientation in which they can make punch holes in copies. Select one of copy sets with this function.
Place the originals, and then press the [Start] key. CKN022
The available number of punch holes is ...
Manuals - Page 87

Select one of copy sets with the number keys. 5.
Place the originals, and then press the [Start] key.
85 Finishing
2. Enter the number of the punch hole positions.
3. 1. Press [OK]. 4. Press [Finishing].
Manuals - Page 103
...ROM.
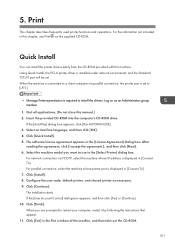
101 The installation starts. For network connection via parallel connection, the printer port is set . Click [Finish]. Using Quick Install, the PCL 6 printer driver is displayed in [Connect To]. 7. Select... is installed under network environment, and the Standard TCP/IP port will be set to install the drivers. Print
This chapter describes frequently used printer functions and ...


