Ricoh Aficio MP C3500 Support Question
Ricoh Aficio MP C3500 Support Question
Find answers below for this question about Ricoh Aficio MP C3500.Need a Ricoh Aficio MP C3500 manual? We have 9 online manuals for this item!
Question posted by karen41842 on May 23rd, 2011
Start Button Red Light
everytime i try to scan or fax the start button turns red and the touch screen locks. I can make copies and i am able to send from my computer to print. what is causing the red light? I just can't seem to scan or fax. network is working for everything else in the office.
Current Answers


Related Ricoh Aficio MP C3500 Manual Pages
Network Guide - Page 39
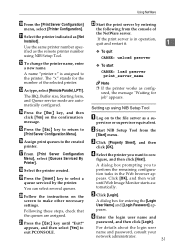
...
screen to select a
queue serviced by entering
the following from the
[Start] menu.
Click [OK], and then wait until "Exit?" S Press the {Insert} key to make other necessary settings.
Following these steps, check that the queues are automatically configured.
B Start NIB Setup Tool from the console of the selected printer.
Using NetWare
J From the [Print...
Network Guide - Page 68
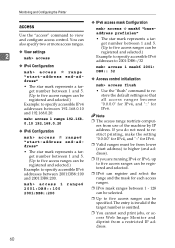
... comput-
The entry is invalid if the target number is omitted.
❒ You cannot send print jobs, or access Web Image Monitor and diprint from use of the machine by IP address...192.168.0.20
❖ IPv6 Configuration
msh> access
range6
"start address) to higher (end address).
❒ If you do not need to restrict printing, make the setting "0.0.0.0" for IPv4, and "::" for IPv6.
...
Network Guide - Page 130

...online whenever a connection to the delivery server is made ap- mation for the connected devices
using the
I /O settings of
client computers, Auto Document
Link, and DeskTopBinder Lite...8226; When using the above listed software. Telephone charges may be made . es, make unnecessary connections when using ScanRouter V2 Professional, DeskTopBinder Lite/Professional, Auto Document Link, or...
PostScript Supplement - Page 56
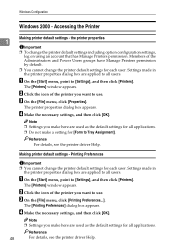
...] dialog box appears.
D Make the necessary settings, and then click [OK]. Printing Preferences
Important ❒ You cannot change the printer default settings for each user.
C On the [File] menu, click [Properties].
Settings made in
the printer properties dialog box are applied to use . A On the [Start] menu, point to [Settings], and then click...
PostScript Supplement - Page 58
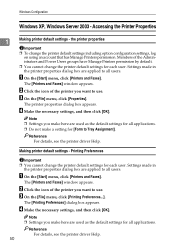
...of the printer you make a setting for all users.
Making printer default settings - A On the [Start] menu, click [Printers and Faxes].
A On the [Start] menu, click [Printers and Faxes].
Reference For details, see the printer driver Help.
50
The [Printers and Faxes] window appears. Windows Configuration
Windows XP, Windows Server 2003 -
Printing Preferences
Important ❒...
Copy/Document Server Reference - Page 46
... and then press [OK]. C Align the rear and left edges of the originals and makes copies. F Press the {Start} key.
22 Placing Originals
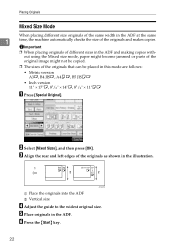
Mixed Size Mode
When placing different size originals of the same width...
❒ When placing originals of different sizes in the ADF and making copies without using the Mixed size mode, paper might become jammed or parts of the original image might not be...
Copy/Document Server Reference - Page 49
... number keys so that the machine accepts copy jobs. F Press the {Start} key. Copying
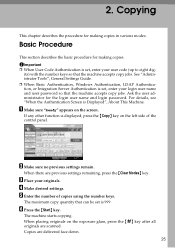
This chapter describes the procedure for making copies in various modes.
For details, see "When the Authentication Screen is set , enter your originals. B Make sure no previous settings remain.
A Make sure "Ready" appears on the left side of copies using the number keys. When placing...
Copy/Document Server Reference - Page 50
... then press the {Start} key. AQI033S
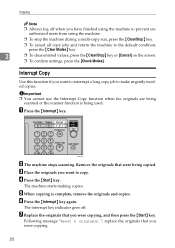
B The machine stops scanning. The machine starts making copies. E When copying is being copied. F Press the {Interrupt} key again.
G Replace the originals that you want to the default condition, press the {Clear Modes} key.
2
❒ To clear entered values, press the {Clear/Stop} key or [Cancel] on the screen.
❒ To confirm...
Copy/Document Server Reference - Page 59
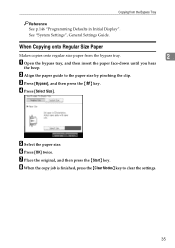
... the paper size by pinching the clip. D Press [Select Size]. G Place the original, and then press the {Start} key.
B Align the paper guide to clear the settings.
35
When Copying onto Regular Size Paper
Makes copies onto regular size paper from the Bypass Tray
Reference See p.146 "Programming Defaults in Initial Display". See "System...
Copy/Document Server Reference - Page 60
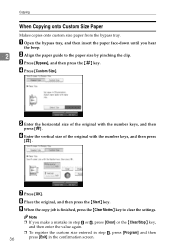
... paper face-down until you make a mistake in step E or F, press [Clear] or the {Clear/Stop} key,
and then enter the value again.
❒ To register the custom size entered in step F, press [Program] and then
36
press [Exit] in the confirmation screen. D Press [Custom Size].
I When the copy job is finished, press...
Copy/Document Server Reference - Page 154

... ❒ You cannot use the bypass tray with the image moved to the center of the copy paper. D Press [OK]. F Place your originals, and then press the {Start} key.
E Select the paper size. Centering
You can make copies with this function. ❒ The paper sizes and directions for centering are listed below.
130
Reference...
Copy/Document Server Reference - Page 169
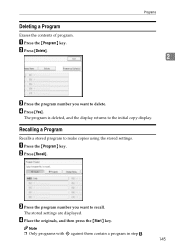
... {Program} key. The program is deleted, and the display returns to make copies using the stored settings.
Note
❒ Only programs with m against them contain a program in step C. 145 D Press [Yes]. A Press the {Program} key. D Place the originals, and then press the {Start} key. B Press [Recall]. The stored settings are displayed.
C Press the...
Copy/Document Server Reference - Page 188
...
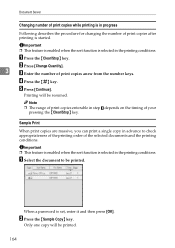
Following describes the procedure for changing the number of print copies after printing is started.
D Press the {q} key. Printing will be resumed.
A Select the document to check appropriateness of the printing order of the selected documents and the printing conditions. Document Server
Changing number of print copies while printing is in step C depends on the timing of your...
Facsimile Reference - Page 6
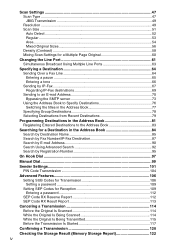
... Sizes 56 Density (Contrast) ...58 Mixing Scan Settings for a Multiple Page Original 60
Changing the Line Port 61 Simultaneous Broadcast Using Multiple Line Ports 63
Specifying a Destination 64 Sending Over a Fax Line 64 Entering a pause 65 Entering a tone ...66 Sending by IP-Fax...67 Regarding IP-Fax destinations 69 Sending to an E-mail Address 70 Bypassing the...
Facsimile Reference - Page 74
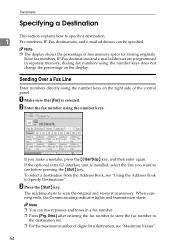
... free memory space for a destination, see "Using the Address Book to use before pressing the {Start} key. A Make sure that [Fax] is installed, select the line you make a mistake, press the {Clear/Stop} key, and then enter again.
Sending Over a Fax Line
Enter numbers directly using the number keys. To select a destination from the Address Book...
Facsimile Reference - Page 262
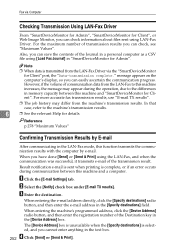
...D 252 Click [Send] or [Send & Print]. Fax via the "SmartDeviceMonitor for Client" port, the "Data-transmission complete."
Also, you can easily ascertain the communication progress.
The [Device Address] box is... directly, click the [Specify destinations] radio button, and then enter the e-mail address in the text box. For more accurate fax transmission results, use "E-mail TX results".
...
Printer Reference - Page 82
...,
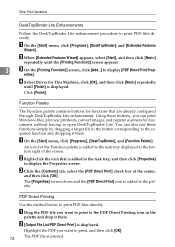
and then click [OK]. erties]. Function Palette
The Function palette contains buttons for This Machine, click [OK], and then click [Next>] repeatedly
until the [Printing Function2] screen appears.
3
C On the [Printing Function2] screen, click [Add...] to the required function and dropping it there. A On the [Start] menu, click [Programs], [DeskTopBinder], and [Function Palette]. C Click the...
Printer Reference - Page 137
...cable using the hook. A Attach the hook on the machine.
If you want to start PictBridge printing on the machine and the digital camera. Attach the hook where it will fail.
❒... as a PictBridge device.
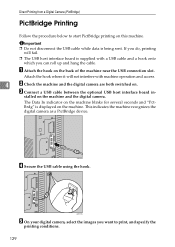
Direct Printing from a Digital Camera (PictBridge)
PictBridge Printing
Follow the procedure below to print, and specify the
printing conditions.
129 stalled on this machine.
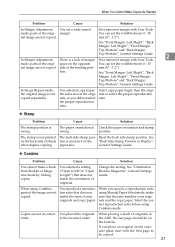
Troubleshooting - Page 35
... side of originals in correct order.
position. paper size.
Copies are not copied.
When You Cannot Make Copies As Wanted
Problem
Cause
Solution
In Margin Adjustment You set the width between 0 - 30 mm (0" - 1.2"). nal image are not copied. Set a narrower margin with User Tools. The stamp is not copied repeatedly. Change the setting. When placing a stack of...
Quick Reference Guide - Page 8
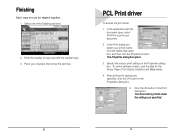
... the Stapling positions.
2. In the Print dialog box, select your originals, then press the start key. Click the OK button in the Properties dialog box. The Properties dialog box opens.
3. Specify the various print settings in the Print dialog box. The document is printed under the settings you specified.
8
9 Finishing
Each copy set can be stapled together...
Similar Questions

Ricoh Aficio Mp C3500 How To Set Up Scan On Network
(Posted by jadi206 10 years ago)
Ricoh Aficio Mp 4001 How To Scan To Network Folder
(Posted by JeffKL 10 years ago)

How To Set Up A Ricoh Aficio Mp 3500 To Scan To Network
(Posted by aliBoboS 10 years ago)
Where To Buy A New Touch Screen For Ricoh Aficio Mp C3500
(Posted by n8tscott5 10 years ago)

How Do I Enable The Buttons In The Touch Screen Pad?
The buttons on the touch screen have ceased to function.
The buttons on the touch screen have ceased to function.
(Posted by dconner 12 years ago)