Ricoh Aficio MP C300 Support Question
Ricoh Aficio MP C300 Support Question
Find answers below for this question about Ricoh Aficio MP C300.Need a Ricoh Aficio MP C300 manual? We have 1 online manual for this item!
Question posted by info10752 on October 9th, 2012
How Do I Clear Full Fax Memory We View Before Printing Now It Needs Deleted
The person who posted this question about this Ricoh product did not include a detailed explanation. Please use the "Request More Information" button to the right if more details would help you to answer this question.
Current Answers
Answer #1: Posted by freginold on October 9th, 2012 8:46 AM
freginold

Member since:
December 20th, 2011 Points: 23,253,885

Member since:
December 20th, 2011 Points: 23,253,885
Hi, are you referring to the reception file? You can delete faxes stored in this file by selecting Change TX Status on the main fax screen, toward the top (on some models it may be called something similar, like Check TX Status) then choosing the option for Print/Delete Reception file. Here you will see a list of all the faxes stored in memory. Just select Delete, and choose all of the files to delete.
Related Ricoh Aficio MP C300 Manual Pages
Quick Use Guide - Page 3
... Scanner Mode / Allows scan to Locked Print & Online / Off Line) 5. Energy saver button (Put the Copier in Standby mode or wakes up the copier from standby) 3 Printer button (Access to email) 6. Start button (Used to Copier Mode) 2. Clear/Stop button (Stops the current Job / Clears the Page count / Fax Number) 9. Chapter 2: Navigating the Ricoh...
Quick Use Guide - Page 5
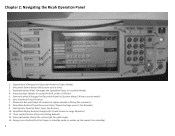
Continued Making a Copy:
Paper Size (default is Auto) Select "Paper Size" if different than Auto Select
You can also determine if the machine needs paper by checking the icons above the Paper size buttons
2 sided to 2 sided copies
1 sided to 2 sided copies
5
Quick Use Guide - Page 8
Type your fax number including 9 to get an outside line, select "OK" at the top . (You can use the Touch panel or the Numerical keyboard)
Your number will be displayed. Press the "green" Start button Your Fax will then be Sent.
8
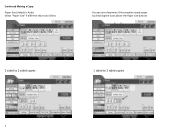
Chapter 4: Sending a Fax
Select the Facsimile button to switch to enter a fax number. Select "Manual Entry" on Touch Panel to Fax Mode.
Quick Use Guide - Page 9
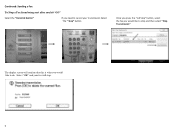
Select "OK" and your transmission Select The " Stop" button. Continued: Sending a Fax
To Stop a Fax from being sent after you hit "GO"
Select the "Facsimile button"
IF you need to cancel your fax will stop and then select "Stop Transmission"
The display screen will confirm that this is what you would like to do. Once...
Quick Use Guide - Page 10
Duplex (2 Sided Print)
Staple
10
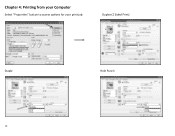
Hole Punch Chapter 4: Printing from your Computer
Select "Properties" button to access options for your print job.
Quick Use Guide - Page 11
Select "OK" to your main properties page. Continued Printing from your Computer
Locked Print (Secure Print)
Select Locked Print in the drop down box as shown
Select the Details button to enter your user ID and Password
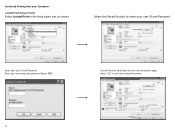
Enter your user ID and Password Enter your user name and password Select "OK"
You will then be taken back to print you locked document.
11
Quick Use Guide - Page 12
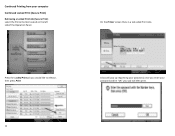
..., once you would like to release, then press Print
12
A box will then print. On the Printer screen there is a tab called Print Jobs
Press the Locked Print job you enter your password and hit "OK" your computer
Continued Locked Print (Secure Print)
Retrieving a Locked Print Job (Secure Print) select the Printer button located on the left sideof...
Quick Use Guide - Page 13
... select "OK" All of your jobs at one time Select all of the jobs that you can release all of your Locked Print jobs will print
13 Continued Printing from your computer Continued Locked Print (Secure Print)
If you are sending mulitple Locked Print jobs to the printer, you would like to release and select the...
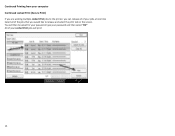
Quick Use Guide - Page 14
... the Bypass Tray (Manual Feed Tray)
Select the "Properties" button on , paper source you are printing on your job
14 When printing labels or thick Paper you must select "Bypass tray" & "Thick 1", Once you have selected " Bypass tray" and " Thick 1" , select "OK"
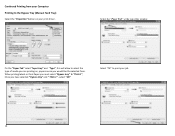
... Tab" at the top of the window
On the "Paper Tab" select "Input tray" and "Type", this will allow to print your print driver.
Quick Use Guide - Page 15
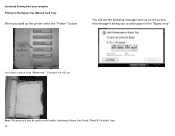
... the Bypass Tray (Manual Feed Tray)
When you to print Lables, letterhead, Heavy Card Stock (Think) & Printable Tabs
15
Note: This process is also be used to place paper in the "Bypass tray"
Once paper ... printer select the "Printer" button
You will see the following message come up on the screen, this message is placed in the "Bypass tray" Your print job will start.
Similar Questions

Fax Memory Full Error
How do we clear a fax memory error off the printer
How do we clear a fax memory error off the printer
(Posted by Angel2syd1 3 years ago)

How To Clear Fax Memory On Ricoh Aficio Mp 4000
(Posted by triscarrie 9 years ago)

How Do I Clear Fax Memory Ricoh Aficio Spc232sf Manual
(Posted by Jeppadele 9 years ago)

How Do I Clear Fax Memory
How do I clear the fax when it says fax memory will be full
How do I clear the fax when it says fax memory will be full
(Posted by fionap79663 10 years ago)