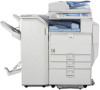
Ricoh Aficio MP 5001 Support Question
Ricoh Aficio MP 5001 Support Question
Find answers below for this question about Ricoh Aficio MP 5001.Need a Ricoh Aficio MP 5001 manual? We have 4 online manuals for this item!
Question posted by tateca on May 16th, 2014
How To Setup Scan To Drive On A Ricoh Aficio Mp 5001
The person who posted this question about this Ricoh product did not include a detailed explanation. Please use the "Request More Information" button to the right if more details would help you to answer this question.
Current Answers
Answer #1: Posted by freginold on May 16th, 2014 4:39 PM
freginold

Member since:
December 20th, 2011 Points: 23,254,995

Member since:
December 20th, 2011 Points: 23,254,995
Hi, to set up scanning to a folder, you will first need to create and share a folder on your computer. The procedure for doing that depends on what type of operating system you are using (Windows XP, Windows Server 2012, Mac OS X 10.8, etc.). Basically you will need to create a folder to scan to, and then share it and give at least one user account permission to read and write to that folder. This article will show you how to do that in Windows XP:
- How to create a shared folder in Windows XP
Once you have set up the folder, this article will guide you through linking to the folder from your MFP:
- How to link to a network share folder from a Ricoh Aficio MP series copier
After everything is set up, follow these steps to scan a document or image to your folder:
- Press the Scanner button
- Place your document(s) in the document feeder or on the glass
- Select the Folder tab, if it isn't already selected
- Select your folder from the list of programmed destinations, or enter a new one using the Manual Entry button
- Press the Start button
Related Ricoh Aficio MP 5001 Manual Pages
Quick Start Guide - Page 1
www.ricoh-usa.com
Ricoh Product Line Segment 2 thru 6
MP/5000/5001, MP C5000/C6000/C6501, MP7000/8000, MP6001/7001, MP8001/9001, MP907EX
This guide is not intended to replace your users manual, features and options will vary by machine type, model and finisher type installed.
Quick Start Guide - Page 3
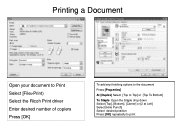
Printing a Document
Open your document to Print Select [File>Print) Select the Ricoh Print driver Enter desired number of copiers Press [OK]
To add any finishing options to the document
Press [Properties]
At [Duplex] Select [Top to Top] ...
Quick Start Guide - Page 6
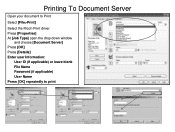
Printing To Document Server
Open your document to Print
Select [File>Print]
Select the Ricoh Print driver Press [Properties] At [Job Type] open the drop down window
and choose [Document Server] Press [OK] Press [Details] Enter user Information:
User ID (if applicable) or leave blank File Name Password (if applicable) User Name Press [OK] repeatedly to print
Quick Start Guide - Page 9
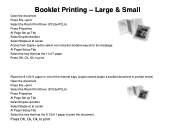
... cannot staple a booklet document in portrait mode) Open the document Press File >print Select the Ricoh Print Driver (PCL5e/PCL6) Press Properties At Page Set up Tab Select Duplex>booklet Select Staple>2 at center At Paper Setup Tab Select the tray that has the 8 1/2x11 paper to print
Booklet Printing - Press OK...
Quick Start Guide - Page 10
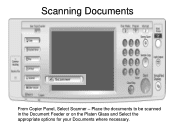
Place the documents to be scanned in the Document Feeder or on the Platen Glass and Select the appropriate options for your Documents where necessary. Scanning Documents
From Copier Panel, Select Scanner -
Quick Start Guide - Page 11
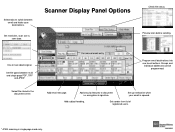
...
Check file status. Add subject heading. Add email message.
encryption & signature.
Set file types between email and folder scan destinations.
For manual email entry
Program email destinations into one touch buttons. Preview scan before sending.
Groups and
individual addresses can be programmed.
Select tabs to document i.e. Add security features to switch between...
Quick Start Guide - Page 12

Select [E-mail] or [Folder] Tab 3. Place Originals in Feeder or on your operating system and device.) Your display may vary depending on Glass 5. Press [Start]
(Note: Screenshots are provided for reference purposes only. Select destination [email address or folder location
4. At copier Screen Press [Scanner]
2. Basic Scanning
1.
Quick Start Guide - Page 13
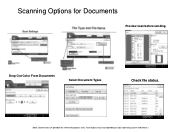
Scanning Options for reference purposes only.
Drop Out Color From Documents
Select Document Types
Check file status.
(Note: Screenshots are provided for Documents
Preview scan before sending. Your display may vary depending on your operating system and device.)
Quick Start Guide - Page 18

... can send single document to one or more users simultaneously. Use The Original Feed type to select 2 sided when originals are 2 sided and copier
Will scan and send both sides. When Networked, users have the option of Copier
Use to Store a FAX Destination
Users can print automatically, selectively,
for faxing documents...
User Guide - Page 2

See page 2 for easy viewing. Understanding Your Ricoh Control Panel
To access system administrator tools and counter information
Clears screen to default settings
The program button allows you to store
frequently used job ...
User Guide - Page 14

... to replicate images, center images, invert images or duplicate images
Copy Quality -
used to adjust contrast and image background erase color, change or adjust color
Scan Position - Used for hole-punching, stapling or binding
Stamps -
used for cleaning edges and borders, page centers
Edit Image -
Edit/Stamp or Edit/Color Tab...
User Guide - Page 22
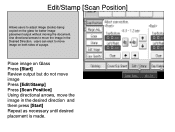
...Press [Start] Review output but do not move image Press [Edit/Stamp] Press [Scan Position] Using directional arrows, move image on the glass for better image placement output without... directional arrows to adjust image (books) being copied on both sides of a page. Edit/Stamp [Scan Position]
Allows users to move the image in the desired direction and them press [Start] Repeat as necessary until ...
User Guide - Page 40

Document Server Usage
Documents may be scanned or Printed to Document Server for: -Confidential Printing -Print and Hold -Sample Printing -Forms printing -File Merge (different types) -Electronic Distribution -HIPPA Compliancy -Label Printing -Cost Savings
User Guide - Page 41
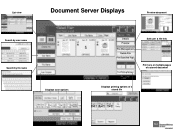
List view
Document Server Displays
Preview document
Search by user name Search by file name Displays scan options
Details Preview File Management Delete File Print Specified Page
To Printing Screen
Edit user & file Info
Print one or multiple pages of a stored document
Displays printing options of a stored file
User Guide - Page 60
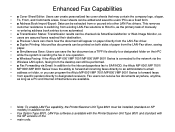
...removes • customer resistance to switching from existing LAN-Fax solutions to Ricoh's, as the primary task of manually • re-entering address book entries...9632; Fax Forwarding via Email: In addition to the inbound paperless fax to SAF/HDD, the Aficio MP 6001/MP 7001/ • MP 8001/MP 9001 Series' have the ability to forward all incoming faxes directly to an administrator's email •...
Troubleshooting Guide - Page 2
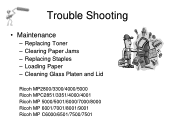
Loading Paper - Clearing Paper Jams - Replacing Toner - Cleaning Glass Platen and Lid
Ricoh MP2800/3300/4000/5000 Ricoh MPC2851/3351/4000/4001 Ricoh MP 5000/5001/6000/7000/8000 Ricoh MP 6001/7001/8001/9001 Ricoh MP C6000/6501/7500/7501 Replacing Staples - Trouble Shooting
• Maintenance
-
Troubleshooting Guide - Page 17
Clearing Jams MP 3300, 2800, 2500, 2851, 3351, 3500 4000, 4001, 4500, 5000, 5001
Reference Guide - Page 3
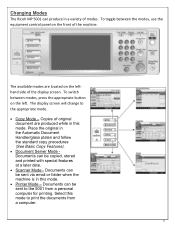
The display screen will change to print the documents from a personal computer for printing. Changing Modes
The Ricoh MP 5001 can produce in the Automatic Document Handler/glass platen and follow the standard copy procedures (See Basic Copy Features... the modes, use the equipment control panel on the left . Select this mode. Documents can be sent to the 5001 from a computer.
3
Reference Guide - Page 7
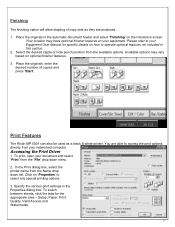
...down list. To switch between sheets, click the tabs for specific details on the interactive screen. Setup, Paper, Print Quality, Valid Access and Watermarks.
7
You are produced. 1. Place the originals... operate optional features not included in the Properties dialog box. Print Features
The Ricoh MP 5001 can also be used as they are able to select any special printing options...
Reference Guide - Page 8
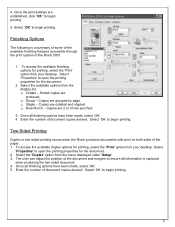
...user can adjust the position of the document and margins to begin printing. Select the available options from the menu displayed under 'Setup'. 3.
Select the 'Duplex' option from the display list. Select 'OK' to ensure all information is a summary of some .... Enter the number of the paper. 1. Select 'OK' to begin printing.
8 Enter the number of the Ricoh 5001.
1. Collate -
Similar Questions


