
ProForm 620 E Elliptical Support Question
ProForm 620 E Elliptical Support Question
Find answers below for this question about ProForm 620 E Elliptical.Need a ProForm 620 E Elliptical manual? We have 1 online manual for this item!
Question posted by Jbayse on May 29th, 2016
Dropped A Washer In The Wheel When Putting Handle Portion Together .
dropped a washer in the wheel when putting the handle portion together. How so we get it out? Will it ruin the machine if it can't come out
Current Answers
Related ProForm 620 E Elliptical Manual Pages
English Manual - Page 2
... IDENTIFICATION CHART 7 ASSEMBLY 8 HOW TO USE THE ELLIPTICAL 18 FCC INFORMATION 29 MAINTENANCE AND TROUBLESHOOTING 30 EXERCISE GUIDELINES 32 PART LIST 35 EXPLODED DRAWING 37 ORDERING REPLACEMENT PARTS Back Cover LIMITED WARRANTY Back Cover
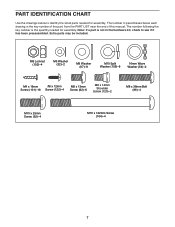
WARNING DECAL PLACEMENT
This drawing shows the location(s) of ICON Health & Fitness, Inc.
2 If a decal is a registered trademark of...
English Manual - Page 3

.... Before beginning any worn parts immediately.
8. do not arch your physician. Do not use the elliptical in a controlled way.
14. Do not put the elliptical in serious injury or death. Over exercising may affect the accuracy of heart rate readings. The heart rate monitor is intended only as described in the front and rear...
English Manual - Page 6

... the serial number decal are labeled in . (66 cm) Handlebar Accessory Tray
Tablet Holder
Console Upper Body Arm Heart Rate Monitor
Pedal Roller
Handle Leveling Foot
Wheel Ramp Handle
Ramp
6 The 620 E elliptical provides an impressive selection of features designed to make your benefit, read this manual carefully before contacting us. Length: 5 ft. 8 in. (173...
English Manual - Page 7
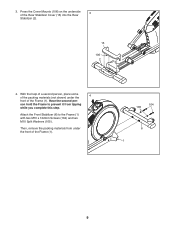
... be included. The number in the hardware kit, check to identify the small parts needed for assembly. M8 Locknut (102)-4
M5 Washer (32)-2
M8 Washer (97)-8
M10 Split Washer (105)-8
16mm Wave Washer (54)-2
M4 x 16mm Screw (101)-16
#8 x 12mm Screw (122)-4
M8 x 13mm Screw (82)-6
M8 x 14mm Shoulder
Screw (120)-2
M8 x 38mm Bolt...
English Manual - Page 8

... product.
1
• activates your product.
2. Have the second person hold
the Frame to the Frame (1) with two M10 x 122mm Screws (104) and two M10 Split Washers (105). Do not dispose of upgrades and offers
Note: If you finish all parts in a cleared area and remove the
packing materials.
English Manual - Page 9
...) on the underside of the Frame (1).
105
104
6 1
9 son hold the Frame to the Frame (1) with two M10 x 122mm Screws (104) and two M10 Split Washers (105). Then, remove the packing materials from tipping
while you complete this step.
3. Have the second per-
Attach the Front Stabilizer (6) to prevent it from...
English Manual - Page 10
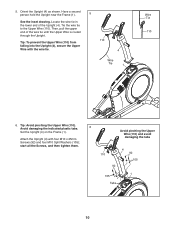
...: To prevent the Upper Wire (110) from falling into the Upright (4), secure the Upper Wire with four M10 x 25mm Screws (92) and four M10 Split Washers (105);
Attach the Upright (4) with the wire tie.
110 4
Wire
Tie
1
Wire Tie 110
6. start all the Screws, and then tighten them.
110
Avoid pinching...
English Manual - Page 11
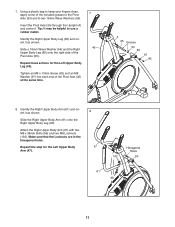
... it as shown. 7. Identify the Right Upper Body Leg (60) and orient it as shown. Slide a 16mm Wave Washer (54) and the Right Upper Body Leg (60) onto the right side of the Pivot Axle (35) at the same...).
8 47
Hexagonal Holes
102
60
61 96
11 Tighten an M8 x 13mm Screw (82) and an M8 Washer (97) into each end of the Pivot Axle (35). Identify the Right Upper Body Arm (61) and orient...
English Manual - Page 13
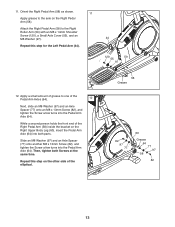
... the Right Pedal Arm (58). Slide an M8 Washer (97) and an Axle Spacer (77) onto another M8 x 13mm Screw (82), and tighten the Screw a few turns into the Pedal Arm Axle (64).
11. Apply a small amount of grease to one of the elliptical.
58 Grease
82 97 77
60 Grease
64...
English Manual - Page 15
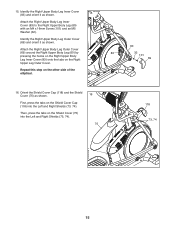
...Cover (83) to the Right Upper Body Leg (60) with an M4 x 16mm Screw (101) and an M5 Washer (32).
Attach the Right Upper Body Leg Outer Cover
(69) around the Right Upper Body Leg (60) by
83... the hooks on the Right Upper Body
Leg Inner Cover (83) onto the tabs on the other side of the elliptical.
16.
Then, press the tabs on the Shield Cover Cap (118) into the Left and Right Shields (73,...
English Manual - Page 18
... eliminated.
Pull on the wheels.
Do not place any other electronic components.
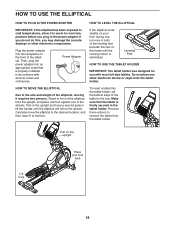
HOW TO USE THE ELLIPTICAL
HOW TO PLUG IN THE POWER ADAPTER
IMPORTANT: If the elliptical has been exposed to cold... and have a second person lift the handle until the rocking motion is properly installed in the tray. Power Adapter
HOW TO MOVE THE ELLIPTICAL
Due to remove the tablet from the tablet...
English Manual - Page 19

... in the frame. Then, step off the higher pedal first. HOW TO EXERCISE ON THE ELLIPTICAL To mount the elliptical, hold the handlebars or the upper body arms and step onto the pedal ...ramp handle, and lower the ramp to the desired incline level.
It is in the lower position. Note: The elliptical does not have a free wheel; Push the pedals until they begin to move until the pedals come to...
English Manual - Page 20
..., you reach your personal goals.
Set calorie, time, or distance goals for your fitness goals a reality:
Exercise anywhere in the iFit community.
20
Upload your workout results to the iFit cloud and track your progress by competing against other users in the ...
English Manual - Page 21

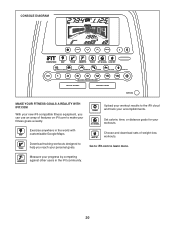
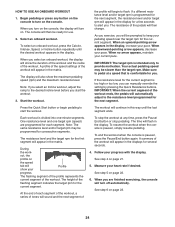
...selected, see page 24. HOW TO USE THE MANUAL MODE 1. The console will display continuous exercise feedback. You can show the following workout information:
21 To find which unit of measurement is a... console offers an array of features designed to your favorite music or audio books while you exercise. When you use the manual mode, see page 25. The console also offers a selection...
English Manual - Page 22
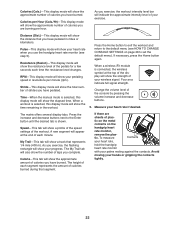
...full signal strength. Change the volume level of calories burned during that segment.
As you exercise, the flashing rectangle will show the distance that represents 1/4 mile (400 m). Calorie-This... approximate number of calories you are
sheets of plas- Calories per hour.
As you exercise, the workout intensity level bar will show the approximate number of your wireless signal.
...
English Manual - Page 24
...
24 The resistance of the workout will appear in the displays for several seconds. 4. As you exercise, you . When a downward-pointing arrow appears, decrease your progress with the display. IMPORTANT: The ...in the matrix. Each workout is divided into one target rpm (speed) are finished exercising, the console will continue in this way until the desired workout appears in the display...
English Manual - Page 25
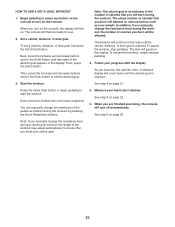
... . Then, press the increase and decrease buttons next to the Enter button to ensure that you are finished exercising, the console will burn during the workout by pressing the Quick Resistance buttons. See step 5 on various factors...count down until the name of calories that you exercise, the calories, time, or distance display will pause in the display. As you meet your weight.
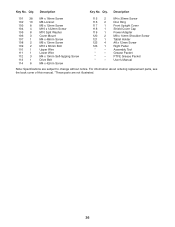
English Manual - Page 35
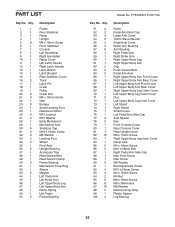
... Handlebar Right Handlebar Ramp Cover Left Latch Handle Right Latch Handle Latch Button Latch Bracket Rear Stabilizer Cover ...Track Latch Pin Crank Pulley Crank Arm M4 x 10mm Screw Idler Bumper Small Leveling Foot Resistance Motor M10 Locknut M10 Washer Eddy Mechanism Mechanism Axle Stabilizer Cap M10 x 19mm Screw M5 Washer Leveling Foot Wheel...
English Manual - Page 36
...
103
8
104
4
105
8
106
3
107
1
108
2
109
2
110
1
111
1
112
3
113
1
114
6
M4 x 16mm Screw M8 Locknut M6 x 12mm Screw M10 x 122mm Screw M10 Split Washer Cover Mount M4 x 48mm Screw M6 x 13mm Screw M10 x 60mm Bolt Upper Wire Lower Wire M4 x 19mm Self-tapping Screw Drive Belt M4 x 42mm Screw...
English Manual - Page 40

... or fitness for which warranty claims are made must be responsible for a minimal handling charge. All repairs for a particular purpose are shipped while the product is shipped to ...to the product. If replacement parts are limited in China © 2015 ICON Health & Fitness, Inc. If the product is under normal use or performance of incidental or consequential damages....
Similar Questions

Seat Brake Handle Assembly
Installed handle as instructed screw holes facing the floor and handle in upright position. Seat rel...
Installed handle as instructed screw holes facing the floor and handle in upright position. Seat rel...
(Posted by wjkjr28688 1 year ago)

Proforn Xp 440 R Exercise Bike Adjustment Handle
The adjustment handle does hold position selected, move forward or back
The adjustment handle does hold position selected, move forward or back
(Posted by raystan 4 years ago)
Putting Together Pro-form C840 Model No. 153321 Part 49 Missing
Does anyone know where I can find part 49 for a Pro-form C840 weight bench model 831.153321?It is a ...
Does anyone know where I can find part 49 for a Pro-form C840 weight bench model 831.153321?It is a ...
(Posted by catrunningelk 5 years ago)

Where And How Do I Put Batteries In My Proform Cardiocrosstrainer800 Ellipitcal
how do I put batteries in my proform cardio crosstrainer 800?
how do I put batteries in my proform cardio crosstrainer 800?
(Posted by laurenkaden 6 years ago)

Adjustment Handle Noice
The adjustment handle makes an extremely loud noise when I disengage it and sounds like it is breaki...
The adjustment handle makes an extremely loud noise when I disengage it and sounds like it is breaki...
(Posted by robblake1 7 years ago)