
Pioneer PRO FPJ1 Support Question
Pioneer PRO FPJ1 Support Question
Find answers below for this question about Pioneer PRO FPJ1 - HD Elite 1080p LCoS Front Projector.Need a Pioneer PRO FPJ1 manual? We have 1 online manual for this item!
Question posted by mkmrad on March 30th, 2012
Pioneer Pro Fpj1 Not Turning On
simply not turning on? Power connected; all else good. Was working fine ...
Current Answers
Related Pioneer PRO FPJ1 Manual Pages
User Manual - Page 4

...power line surges.
- Unauthorized substitutions may result in fire, electric shock, or other products (including amplifiers) that your dealer.
- When connecting...projector could be operated only with the type of the lightsource lamp. This plug will often require extensive work... in impaired eyesight.
- The product should turn off the power of any way. Do not place combustibles behind...
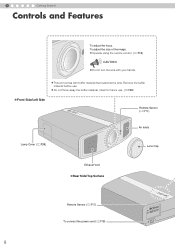
User Manual - Page 8
...)
Lens Cap
Exhaust Vent „Rear Side/Top Surface
Remote Sensor (pP11) To connect the power cord (pP18)
8
z Do not throw away the buffer material, retain for future use . z Operate using the remote control. (pP18)
CAUTION
z Do not turn the lens with buffer material that cushions the lens. To adjust the size of...
User Manual - Page 9
...
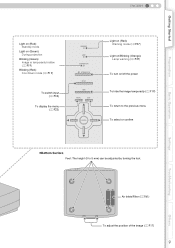
STANDBY/ON STANDBY/ON
INPUT
HIDE
MENU
EXIT
ENTER
Light on (Red): Warning mode (pP37)
Light on/Blinking (Orange): Lamp warning (pP37)
To turn on/off the power
To hide the image temporarily (pP19)
To return to the previous menu
To select or confirm
„Bottom Surface Feet: The height (0 to 5 mm...
User Manual - Page 10
1
Getting Started
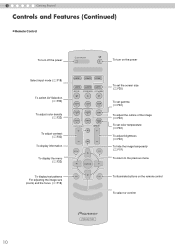
Controls and Features (Continued)
„ Remote Control
To turn off the power
To turn on the power
Select input mode (pP18)
To switch AV Selection (pP32)
To adjust color density (pP32)
To adjust contrast (pP32)
To display information
To display the menu (...
User Manual - Page 12
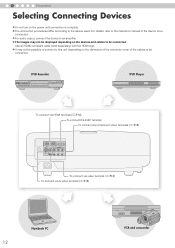
... details, refer to the instruction manual of the cables to be
connected. z The images may not be possible to connect to this unit depending on the power until connection is complete.
z The connection procedures differ according to an amplifier. 2
Preparation
Selecting Connecting Devices
z Do not turn on the dimension of the connector cover of the device to...
User Manual - Page 13

.../PB CR/PR
SYNC
G
B
R
VCR and camcorder
S-video cable (sold separately) To S-video input terminal
S-video output
Preparation
Basic Operation
Settings
Troubleshooting
Connecting via Component Video Cable
This unit
HD
RS-232C
OMPONENT
S-VIDEO VIDEO
Y
CB/PB CR/PR
SYNC
G
B
R
Component video cable (sold separately)
To component video input terminals
z Set "Video...
User Manual - Page 15
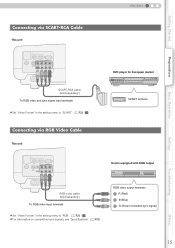
... video cable (sold separately) To RGB video and sync signal input terminals z Set "Video Format" in the setting menu to "SCART". (pP26 - Q)
Connecting via SCART-RCA Cable
This unit
HD
RS-232C
OMPONENT
S-VIDEO VIDEO
Y
CB/PB CR/PR
SYNC
G
B
R
SCART-RCA cable (sold separately)
To RGB video input terminals
z Set "Video...
User Manual - Page 16
... COMPONENT
S-VIDEO VIDEO
Y
CB/PB CR/PR
SYNC
G
B
R
34%
80%
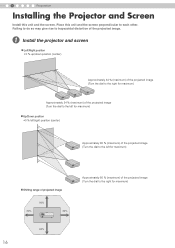
Approximately 80 % (maximum) of the projected image. A Install the projector and screen
„ Left/Right position *0 % up/down position (center)
Approximately 34 % (maximum) of the projected image (Turn the dial to the right for maximum)
Approximately 34 % (maximum) of the projected image...
User Manual - Page 18
...
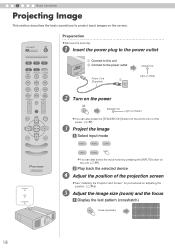
a Display the test pattern (crosshatch)
TEST
Press repeatedly
18
A Insert the power plug to the power outlet
A Connect to this unit B Connect to the power outlet
STANDBY/ON
A
Power Cord
(Supplied)
B
Light on (Red)
MENU
EXIT
ENTER
TEST
LIGHT
WARNING LAMP
STANDBY/ON
B Turn on the power
ON STANDBY/ON
Light on (Green)
C
z You can also select the...
User Manual - Page 19

...STANDBY/ON Light on (Red)
z The power cannot be turned off the power. (pP9)
z Put back the lens cap after it has been turned on the unit to turn off within approximately 90 seconds after use to...This function prevents the internal parts of lamp life.
z Pull out the power plug when the unit will not be turned off when the image is hidden
Adjust accordingly by pressing the up down the...
User Manual - Page 27

... 2.35:1 image will be shown in the original size.
The PC screen can also be configured from the remote control. (pP10, 20)
Source > V-Stretch (When HD video signals are being input)
T V-Stretch
When set to "On", the projected 2.35:1 image will be stretched vertically to 16:9.
Normal
Enlarges the PC signal...
User Manual - Page 30

...For normal circumstances, select this setting. (170 W)
High
Select this unit has been turned on. Japanese
English
English
Deutsch
German
Français
French
Español
Spanish
...
g Startup Logo
Sets whether to see the image in a bright room. (200 W)
z Changing the lamp power will not change the lamp time (lamp life). z The setting cannot be displayed from the remote control. (...
User Manual - Page 34

... do not need to external static or noises.
Power is turned on the screen.
Insert the power cord (plug) firmly.
The unit works when power is not supplied Is the power cord disconnected? Is the correct external input selected? Is the video image temporarily hidden? Remove the lens cap. Connect the AV device properly. Set the AV...
User Manual - Page 37

... has stopped, pull out the power plug from the power outlet. Action Turn on the power again.
6
7 z Check that nothing is blocking the air inlets.
8 z Check that , turn on the power again.
10
If the warning ...Lamp does not light up and unit is unable to project
4
Blinking
Light on
Lamp is turned off during projection
5
Lamp cover is removed
There is an error in the circuit operation 6...
User Manual - Page 38

...is
approximately 2000 hours. z Do not apply shock to clean the internal parts of 2000 hours is turned off, replace the lamp unit.
z The lamp life may not reach 2000 hours depending on the ... the color tone is indicated by the indicator. (pP36, 37)
CAUTION
z Pull the power plug from the power outlet. If the image is dark or the lamp is merely the average usable life of the lamp ...
User Manual - Page 43
... the supplied remote control.
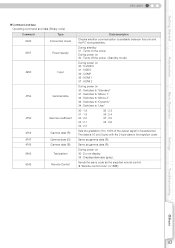
During power on 30 : Turns off the power. (Standby mode)
During power on 30 : S-VIDEO 31 : VIDEO 32 : COMP. 36 : HDMI 1 37 : HDMI 2
During power on 30 : Switches to ...During power on the power. Getting Started
Preparation
ENGLISH
„ Command and data Operating command and data (Binary code)
Command
Type
0000
Connection check
5057
Power supply...
User Manual - Page 46

...Examples
This section shows the communication examples of RS-232C.
„ Operating command
Type Connection check
Power (On)
Power (Off)
Input (COMP.)
Remote Control (MENU)
Gamma table (User)
Gamma coefficient...: 06 89 01 54 53 0A
Description Checks connection When power is turned on from standby mode When power is turned off (standby mode) from power-on mode When video input is set to component...
User Manual - Page 48

...cloth ; Take special notice of images on the top and bottom of the surface coating film. Turn on the usage and environment. Images can be adjusted and this unit, attach the buffer material ... so may lead to peeling of the lens for parts replacement varies greatly depending on the power occasionally and operate the unit. the
supplied cleaning cloth or other similar cloths. Transporting this ...
User Manual - Page 49

...49 Ceiling
„ Bottom Surface
4 locations
Air inlets
Precautions for Mounting
... mounting the unit with non-Pioneer ceiling fittings or when
z Depth of the screw holes (screw length) is not liable for any ...product damage caused by
specialist to ask your dealer or a
Pioneer is 30 mm. This may result in use all the 4 screw holes (M5 screws) to a...
User Manual - Page 50
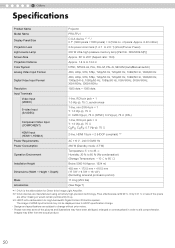
...576i, 576p, 720p/50 Hz, 720p/60 Hz, 1080i/50 Hz, 1080i/60 Hz, 1080p/24 Hz, 1080p/50 Hz, 1080p/60 Hz, VGA60Hz, SVGA60Hz, XGA60Hz, SXGA60Hz 1920 dots c 1080 ... Input (COMPONENT)
HDMI Input (HDMI 1, HDMI 2) Power Requirements Power Consumption
Operation Environment
Installation Height
Dimensions (Width c Height c Depth)
Mass Accessories
Projector PRO-FPJ1 D-ILA device 1 2 / 0.7" (1920 pixels c1080...
Similar Questions

How To Turn Power Off On A Pioneer Avh 1400dvd Radio
(Posted by IPhric 10 years ago)


Pioneer Elite Plasma Pro-ro4u No Signal When Connected Dish Sat Receiver.
(Posted by jadgjust4u 10 years ago)

Pioneer Xv-ev61 The Timer Just Blinks Doesnt Turn On Please Help
i already resoldered the other parts
i already resoldered the other parts
(Posted by nomermariano 12 years ago)