Pioneer AVIC-X920BT Support Question
Pioneer AVIC-X920BT Support Question
Find answers below for this question about Pioneer AVIC-X920BT.Need a Pioneer AVIC-X920BT manual? We have 2 online manuals for this item!
Question posted by hapgolic on October 23rd, 2013
If You Do The Bypass On A Pioneer Avic-x920bt Do You Need To Connect The
parking brake wire
Current Answers
Related Pioneer AVIC-X920BT Manual Pages
Owner's Manual - Page 1
... the important information that the navigation system is properly connected to your vehicle's parking brake and depending on your Authorized Pioneer Electronics retailer or call us at (800) 421-1404. Important Information for the User first! Operation Manual
FLASH MEMORY MULTIMEDIA AV NAVIGATION RECEIVER
AVIC-Z120BT AVIC-X920BT
Notice to all users: This software requires that you...
Owner's Manual - Page 2
...11 -
Ejecting an SD memory card (for AVIC-X920BT) 15 Inserting and ejecting an SD memory card 15 - X920BT) 17
2 En
- Connecting your model properly. Switching the map orientation 27...the instructions, keep this Pioneer product.
Inserting a disc (for AVICX920BT) 17
Plugging and unplugging a USB storage device 18 - Ejecting an SD memory card (for AVIC-X920BT) 15 - POI list)...
Owner's Manual - Page 9
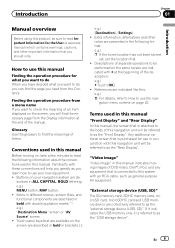
... in brackets [ ]:
e.g.) [Destination], [Settings]. ! If it indicates the USB memory only, it is connected to this system with double quotation marks " ": e.g.) "Destination Menu" screen or "AV Source" screen !... this navigation unit will find the meanings of the manual. Buttons on the screen, you need from a menu name If you want to use the navi- Any additional optional screen that...
Owner's Manual - Page 13
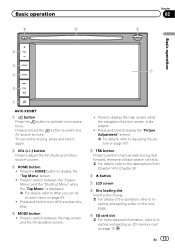
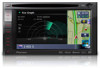
... the HOME button to activate voice operations. Press and hold the button to switch the AV source to mute. Basic operation
6
8
Chapter
02
9
Basic operation
2
3
7 4
5
1
AVIC-X920BT
1 button Press the button to display the "Top Menu" screen. ! Press to switch between the "Classic Menu" and the "Shortcut Menu" while the "Top Menu...
Owner's Manual - Page 15
... an SD memory card during data transfer can damage the SD memory card.
Pioneer accepts no liability for ejecting the media appear.
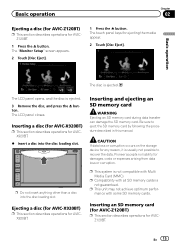
2 Touch [Disc Eject]. The "Monitor Setup" screen appears.
2 Touch [Disc Eject].
1 Press the h button. Ejecting a disc (for AVIC-X920BT)
p This section describes operations for AVICZ120BT.
1 Press the h button.
Be sure to...
Owner's Manual - Page 17
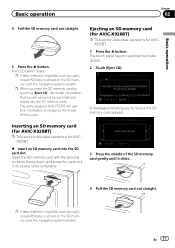
... information that you use this information to recognize the model that you to remove the SD memory card appears. Ejecting an SD memory card (for AVIC-X920BT)
p This section describes operations for ejecting the media appear. 2 Touch [Eject SD].
En 17
Inserting an SD memory card (for...
Owner's Manual - Page 145
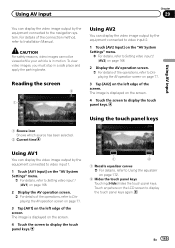
...the operations, refer to Displaying the AV operation screen on page 77.
3 Tap [AV1] on the left edge of the connection method, refer to display the touch panel keys again. CAUTION For safety reasons, video images cannot be viewed while your vehicle ... on the LCD screen to Installation Manual.
The image is in a safe place and apply the parking brake. For details of the screen.
Owner's Manual - Page 148
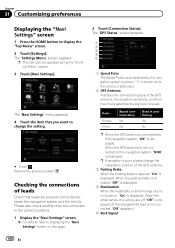
... the correct positions. 1 Display the "Navi Settings" screen.
= For details, refer to this navigation system, "OK" is not connected, "Off" appears.)
5 Back Signal
148 En When the small lamps of the GPS antenna.
3 Parking Brake When the parking brake is applied, "On" is received. p This can also be operated using the "Shortcut Menu" screen.
3 Touch [Navi...
Owner's Manual - Page 192
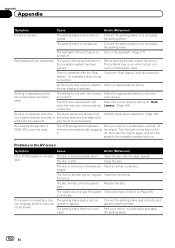
... view camera Select the appropriate setting for example a faulty wiring connection.
maged.
not be played Replace the disc.
Connect the parking brake lead correctly, and apply the parking brake. The parking brake cord is selected. Connect the parking brake cord, and apply
nected. Connect the parking brake cord, and apply the parking brake. the rear display is not con- There is...
Owner's Manual - Page 195
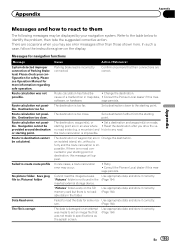
... is corrupt
Parking brake lead is not found in the folder.
no loadable data in the (Page 164) inserted external storage device. The destination or waypoint(s) are in map data, ! "Pictures" folder is incorrectly connected.
There are correct. Messages for more that was not possible.
The destination is impossible.
Consult the Pioneer Local dealer...
Owner's Manual - Page 224
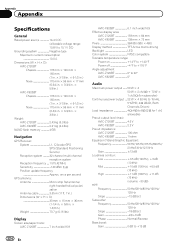
.... × 6-1/2 in.) Nose 170 mm × 96 mm × 11 mm (6-3/4 in. × 3-3/4 in. × 3/8 in.)
Weight: AVIC-Z120BT 2.43 kg (5.3 lbs) AVIC-X920BT 2.01 kg (4.4 lbs)
NAND flash memory 4 GB
Navigation
GPS Receiver: System L1, C/Acode GPS SPS (Standard Positioning Service) Reception system .......... 32-channel multi-channel reception system Reception frequency .... 1 575.42 MHz...
Owner's Manual - Page 225
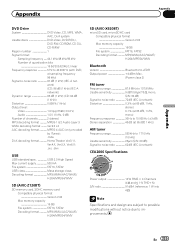
... card Compatible physical format Version 2.00 Max memory capacity 16 GB File system FAT16, FAT32 Decoding format MP3/WMA/AAC/WAVE/ H.264/MPEG4/WMV
SD (AVIC-X920BT)
microSD card, microSDHC card Compatible physical format Version 2.00 Max memory capacity 16 GB File system FAT16, FAT32 Decoding format MP3/WMA/AAC/WAVE/ H.264...
Installation Manual - Page 2
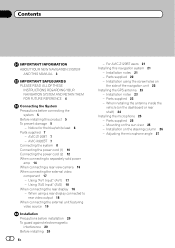
... Installation notes 21 - Parts supplied 23 - Parts supplied 25 - AVIC-X920BT 7 Connecting the system 8 Connecting the power cord (1) 10 Connecting the power cord (2) 12 When connecting to
rear video output 18 When connecting the external unit featuring
video source 19
Installation Precautions before connecting the
system 5 Before installing this navigation system 21
- Installation...
Installation Manual - Page 5

... wires where they will not interfere with cable clamps or electrical tape. Failure to make it longer. Do not use an extension to do , the protection circuit (fuse holder, fuse resistor or filter, etc.) may become damaged, resulting in any of the vehicle's moving parts, especially the steering wheel, shift lever, parking brake...
Installation Manual - Page 7
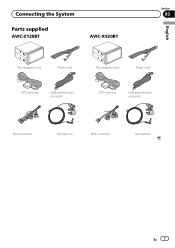
Connecting the System
Section
03
Parts supplied
AVIC-Z120BT
AVIC-X920BT
English
The navigation unit
Power cord
The navigation unit
Power cord
GPS antenna
USB and mini-jack connector
GPS antenna
USB and mini-jack connector
RCA connector
Microphone
RCA connector
Microphone
En 7
Installation Manual - Page 12
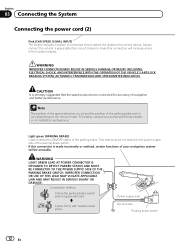
... circuit and the position of your authorized Pioneer dealer or an installation professional.
Clamp firmly with needle-nosed pliers.
Light green (PARKING BRAKE) Used to the power supply side of the parking brake switch. Power supply side Ground side
Parking brake switch
12 En CAUTION It is connected here to make this connection is made incorrectly or omitted, certain...
Installation Manual - Page 14
Section
03 Connecting the System
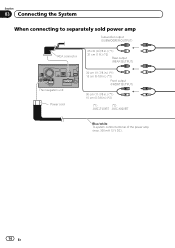
When connecting to separately sold power amp
Subwoofer output (SUBWOOFER OUTPUT)
RCA connector
25 cm (9-7/8 in.) (*1) 31 cm (1 ft.) (*2)
Rear output (REAR OUTPUT)
The navigation unit Power cord
30 cm (11-7/8 in.) (*1) 15 cm (5-7/8 in.) (*2)
Front output (FRONT OUTPUT)
30 cm (11-7/8 in.) (*1) 15 cm (5-7/8 in.) (*2)
(*1)
(*2)
AVIC-Z120BT AVIC-X920BT
Blue...
Installation Manual - Page 16
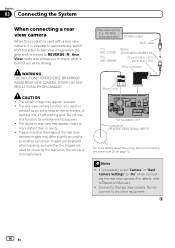
...wiring, refer to Connecting the power cord (2) on trailers, or backing into a tight parking spot. Notes ! Do not connect to the rear view camera. Please note that the edges of the rear view camera images may appear reversed. !
ND-BC4) (sold separately) To video output
RCA cable
(*1) AVIC-Z120BT
(*2) AVIC-X920BT...Camera Settings" to "On" when connecting the rear view camera. (For ...
Installation Manual - Page 18

... a location that enables the driver to watch the video source while driving. Section
03 Connecting the System
Using "AV2 Input" (AV2)
The navigation unit
When connecting the rear display
The navigation unit
(*1)
20 cm (7-7/8 in.) (*1) AVIC-Z120BT
23 cm (9 in.) (*2)
(*2)
AVIC-X920BT
RCA connector
Yellow (VIDEO INPUT)
Red, white (AUDIO INPUT)
RCA cables (sold separately...
Installation Manual - Page 19

...
Blue
RCA connector
20 cm (7-7/8 in.) (*1) 23 cm (9 in "AV Settings" to "EXT" when connecting the external unit. (For details, refer to set "AV2 Input" in .) (*2)
Yellow (VIDEO INPUT)
IP-BUS cable (sold separately)
Black
RCA cable (sold separately)
To IP-BUS output
To video output
Pioneer external unit (sold separately)
(*1)
(*2)
AVIC-Z120BT AVIC-X920BT
!
Similar Questions

Avic X920bt Unit Wireless Remote Ready
Is a Pioneer Avic X920BT wireless remote ready? If so which remote do I need? And is their anything ...
Is a Pioneer Avic X920BT wireless remote ready? If so which remote do I need? And is their anything ...
(Posted by scarface2001fmf 1 year ago)


How To Bypass Parking Brake Wire On Pioneee Avic-x930bt
(Posted by pizzciphe 10 years ago)

My Ford Kuga Is Fitted With A Pioneer Avic X920bt System.
I cannot listen tothe radiowith the ignition off only with the power button pressed which activates ...
I cannot listen tothe radiowith the ignition off only with the power button pressed which activates ...
(Posted by Sheene150 11 years ago)

Pioneer Avic-x920bt
I havePioneer AVIC-X920BT, i was wondering when I hook my ipod touch up to it if why the Netflix vid...
I havePioneer AVIC-X920BT, i was wondering when I hook my ipod touch up to it if why the Netflix vid...
(Posted by PRETTYBRWN78 12 years ago)