
Pfaff hobbymatic Support Question
Pfaff hobbymatic Support Question
Find answers below for this question about Pfaff hobbymatic.Need a Pfaff hobbymatic manual? We have 2 online manuals for this item!
Question posted by michaelkfriedman on October 27th, 2013
How Do I Thread The Machine?
The person who posted this question about this Pfaff product did not include a detailed explanation. Please use the "Request More Information" button to the right if more details would help you to answer this question.
Current Answers
Answer #1: Posted by TommyKervz on October 27th, 2013 9:13 PM
TommyKervz

Member since:
January 10th, 2013 Points: 17,776,803

Member since:
January 10th, 2013 Points: 17,776,803
Greetings. The pdf User Manual on the link below should be able to walk you through precisely (with figures)
http://www.helpowl.com/manuals/Pfaff/hobbymatic/184572
http://www.helpowl.com/manuals/Pfaff/hobbymatic/184572
Related Pfaff hobbymatic Manual Pages
Owner's Manual - Page 1

A
Hobbymatic 800., 801, 802, 803, 806, 807 instruction book
Owner's Manual - Page 2
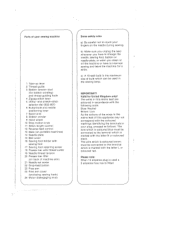
..., 802 to 807 Selecting stretch stitches, 806 and 807 Utility stitches, models 802 to 807 Stretch stitches, models 806, 807 Thread tensions Changing the needle Reverse sewing Dropping the machine feed Changing the sewing foot Sewing feet Special sewing feet Buttonhole settings Sewing buttonholes Fitting detachable workplate Changing the light bulb Cleaning and oiling Trouble shooting
Page...
Owner's Manual - Page 4
... N or coloured black. Please note: When 13 amperes plug is marked with the coloured markings identifying the terminals in your sewing machine
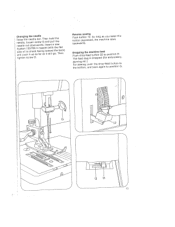
1 Take-up lever 2 Thread guide 3 Bobbin tension stud
(for bobbin winding) and thread guiding hook 4 Zigzag-stitch lever 5 Utility- b) Make sure you unplug the lead whenever you have to change the needle...
Owner's Manual - Page 5

... and 806 place it on the bed plate, and on both sides of the hinge
catches properly in its original position.
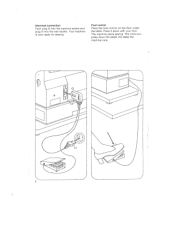
Before putting the machine away after sewing replace the receptacle in the slot. J 1 Foot control receptacle Remove this proce dure, making sure the bottom of the cover (G), move them back up...
Owner's Manual - Page 6
Press it down the pedal, the faster the
machine runs.
2 Foot control Place the foot control on the floor under the table. Electrical connection Push plug G into the machine socket and plug H into the wall socket. Your machine is now ready for sewing. The machine starts sewing.
The more you press down with your foot.
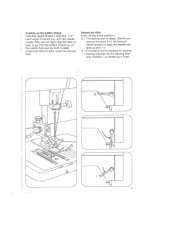
Owner's Manual - Page 8
... the knob in the opposite direction to the right for winding. Pass the thread from the spooi around the bobbin a few times and push the bobbin to re-engage the sewing mechanism. Re engage the mechanism.
4 Bobbin winding
Disengage the sewing mechanism. After bobbin winding, turn the stop motion knob towards you start...
Owner's Manual - Page 10
... it slightly to back.
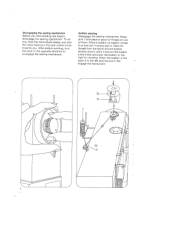
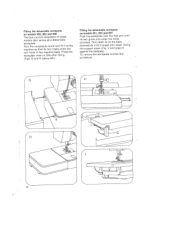
6 Draw the thread from front to the right behind guide G. Pass the thread around the tension stud and pull it through thread guiding hook 3, thread guide 2 and from the spool through guide H.
Pull the thread from the right into needle thread tension 19. Upper threading
Raise the sewing foot and the take -up lever.
Owner's Manual - Page 11
... up again and the take -up lever 1.) H = The sewing foot is up the bobbin thread Hold the needle thread a little taut. Presser bar litter Lever 20 has three positions. N
E_
I is marked by a notch.
7- Pull the bobbin thread out of the needle hole and lay both threads toward you
remove the work, turn the balance...
Owner's Manual - Page 12
... to cut them downwards to set at mark G on models 806 and 807.
/- N
7
\
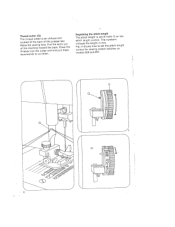
8 Regulating the stitch length The stitch length is an oblique slot lRoofacitashteeedtmheaatcsthehiwenienbgatocwfkoaoortfd. Thread cutter (G) The thread cutter is set the stitch length control for sewing stretch stitches on the stitch length control.
Owner's Manual - Page 14
....). The utility-
and stretch-stitch 5 should only be turned in the red sector on the machine and
explained on mTisutw(tnahtshhtiondiaeeteelddnciiecthltevgyeatlFa-rhattspetierpegeaiaed8opr.nnn)0zued.ec6iinsaglsoSrstzartagsertanrrrentregeedeitdnstct-tehcpsch8noettho0hhin-tsn7eiscsyndtsthpimictitattincuhctblghgcetheoeohvlutleres1oeert(se1ndsl.ttageepohttsTeceohetttushhocFsrsseetnritiegoibtdl...
Owner's Manual - Page 17
...,hnsoielhg1tous3otnti0sthsedh/eee7uoand0pwnnl5kesenaceswHrbfdeaaaflnwcarrei.rdenesTGag.dshlaIteeoinntnwsd(wewhairlpiortltdulhadlgltotnhhtt.heeheweTebfhlaaectnk) tighten screw G. As long as you button depressed, the machine
keep sews
this
backwards. embroidery,
darning etc.) For sewing, push the the bottom, and back
drop-feed button again to position
to The feed dog...
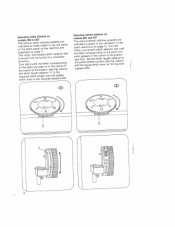
Owner's Manual - Page 22
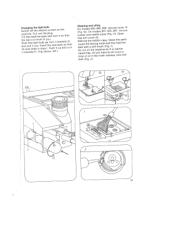
... 802 and 806 The foot control receptacle of these models also serves as a detachable
workplate. I) and press it to the machine so that its two guide pins enter the holes provided. Swing the support down a little after fitting.
(Figs. Turn the... detachable workplate
on , the back downwards until its two haoks enter the two holes in the machine base. Press the workplate down (Fig.
Owner's Manual - Page 23
... and needle plate
remove cover 15 803, 807: remove (Fig. Insert the new its pins slide in front of you. Clean round the sewing hook and the
the parts machine
fDdneraoeondpnceowo-tifftrohoeiliela.thisnAeolftlhtmyebaorcuhuhosihohnakev(eFraaisgtco.eitwId)i.oas ymisnaopiwuntteaand
then (Fig. Pull out the plug. H>. Remove the bobbin case. J).
19 G). Changing the Switch off...
Owner's Manual - Page 24
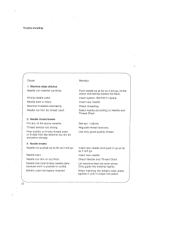
... side facing toward the back. Wrong needle used .
2. Needle too thin for thread used . Needle bent and strikes needle plate because work alone. Check Needle and Thread Chart. Machine skips stitches Needle not inserted correctly.
Poor-quality or knotty thread used, or thread that has become too dry by excessive storage.
3. Needle breaks Needle not...
Owner's Manual - Page 25
... Tension out of feed dog. Feed dog dropped. (Reverse-feed control is at all Lint has accumulated between tooth rows of adjustment. Use first-class thread only.
Thread too thick, knotty or hard. Thread machine properly and check both tensions. Remove needle plate and clean out lint.
4
Cause:
Remedy:
4. Seam is disengaged...
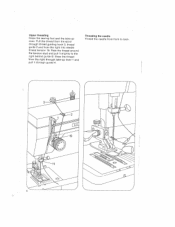
Owner's Manual - Page 13

Turn the hand wheel towards you and sew a stitch until both threads towards the right under the sewing foot, (approx 10 cm).
und Unterfaden nach rechts unter den Nä... inferiore: Tenere fermo
1 fib superiore. Place both needle and take-up lever are up the bobbin thread: Hold the needle thread taut. Close free-arm cover 119. Chiudere be capot 119. Remontée du fil infé...
Owner's Manual - Page 18

... Ia touche 123. As long as you hold this button the machine sews back wards.
J 15 Finchè II tasto rimane premuto Ia macchina cuce indietro. La machine coud en arrière aussi longtemps que a touche est maintenue en bas. Reverse sewing Press button 123. Solange die Taste gedrückt wird, nä...
Owner's Manual - Page 23

...-edge stitch
L Feather stitch Elastic decorative stitch
M Honeycomb stitch Elastic stitch
All stitches and stitch combinations are listed in the stitch program chart on your machine determine the programs and combinations that can be sewn.
Owner's Manual - Page 67

... and push it up as far as it through the bobbin tension stud. Only guide the material lightly. Insert thicker needle.
Check threading. Machine skips stitches Needle not inserted correctly. Machine threaded improperly. Seam is pushed or pulled. Thread too thick, knotty or hard.
Remedy:
Push needle up as far as it will go . Bobbin...
Owner's Manual - Page 68

... control is at all
Lint has accumulated between tooth
Remove needle plate and clean out lint.
Remove thread ends and put a drop of feed dog. Fundamental rules
Before exchanging either sewing foot or needle, Never run a threaded machine unless there is particularly important
switch off when children are around.
) rows of oil into hook...
Similar Questions

Threading Machine
How do you thread the top thread on the Phaff hobbymatic 91
How do you thread the top thread on the Phaff hobbymatic 91
(Posted by Jruther9632 2 years ago)

Manual For Pfaff 787-788 Threading Machine
Page 7 of the above manual which is a copy that came with my used machine indicates to thread the *r...
Page 7 of the above manual which is a copy that came with my used machine indicates to thread the *r...
(Posted by naomiroark12 8 years ago)

Threading Hobbymatic 916
pleas show diagram of thread path in hobbymatic 916, or detailed explanation. We do not have the man...
pleas show diagram of thread path in hobbymatic 916, or detailed explanation. We do not have the man...
(Posted by jjdutton1 8 years ago)
Missing Stitches. Hobbymatic 939.
I have solved the problem of the thread breaking by changing the needle. However now when straight s...
I have solved the problem of the thread breaking by changing the needle. However now when straight s...
(Posted by Inarestorer 9 years ago)

Problem Upper Presser Foot On Pfaff Hobbymatic 935 Sewing Machine
The upper presser foot on my Pfaff Hobbymatic 935 will not lower completely. I lowered the arm but t...
The upper presser foot on my Pfaff Hobbymatic 935 will not lower completely. I lowered the arm but t...
(Posted by Anonymous-118282 10 years ago)