
Pfaff hobbymatic Support Question
Pfaff hobbymatic Support Question
Find answers below for this question about Pfaff hobbymatic.Need a Pfaff hobbymatic manual? We have 2 online manuals for this item!
Question posted by Anonymous-118282 on August 14th, 2013
Problem Upper Presser Foot On Pfaff Hobbymatic 935 Sewing Machine
The upper presser foot on my Pfaff Hobbymatic 935 will not lower completely. I lowered the arm but the foot itself no longer comes down completely. I was making a quilt & suddenly the presser foot is slightly raised above the fabric. I checked everything I could, but nothing helps.
Current Answers
Answer #1: Posted by Barbara9ob on February 18th, 2020 2:45 PM
Barbara9ob

Member since:
February 18th, 2020 Points: 0
Member since:
February 18th, 2020 Points: 0
I'm looking at a Pfaff Hobbymatic 919, (not exactly the same, but) it has the same problem. I called a technician recomemded by a sewing store. He said he though it meant that the machine had not been serviced in a long time it would cost $60 ti completely service, which he thought should take care of the problem.
Another place charges $90 for servicing. But now that I hear you had this problem I'm not sure I want to get this machine.
Another place charges $90 for servicing. But now that I hear you had this problem I'm not sure I want to get this machine.
Related Pfaff hobbymatic Manual Pages
Owner's Manual - Page 1

A
Hobbymatic 800., 801, 802, 803, 806, 807 instruction book
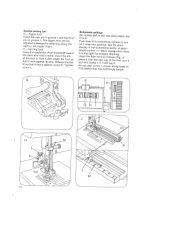
Owner's Manual - Page 2
...Foot control receptacle Electrical connection Foot control Disengaging motor Removing bobbin case and bobbin Disengaging the sewing mechanism Bobbin winding Inserting the bobbin Inserting the bobbin case Upper threading Threadingtheneedle Drawing up the bobbin thread Presser... sewing Dropping the machine feed Changing the sewing foot Sewing feet Special sewing feet Buttonhole settings Sewing ...
Owner's Manual - Page 4
... cover 16 Sewing foot holder with sewing foot 17 Sewing foot retaining screw 18 Presser bar with the coloured markings identifying the terminals in the sewing lamp. The wires in this mains lead are coloured in accordance with the i'ollowing code: Blue: Neutral Brown: Live As the colours of the wires in the mains lead of machine arm) 21 Needle...
Owner's Manual - Page 5

... on both sides of the hinge
catches properly in its original position. J 1 To replace the cover, reverse this receptacle from the machine for sewing. Foot control receptacle Remove this proce dure, making sure the bottom of the cover (G), move them back up (H) and
then remove the cover (I). Removing the carrying case cover Open the...
Owner's Manual - Page 6
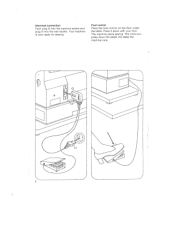
Foot control Place the foot control on the floor under the table. The machine starts sewing.
Press it down the pedal, the faster the
machine runs.
2 Your machine is now ready for sewing. The more you press down with your foot. Electrical connection Push plug G into the machine socket and plug H into the wall socket.
Owner's Manual - Page 8
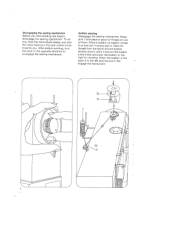
... it around the bobbin a few times and push the bobbin to the left and remove it to the right for winding. Bobbin winding
Disengage the sewing mechanism. Re engage the mechanism.
4 After bobbin winding, turn the stop motion knob towards you start winding the bobbin, disengage the...
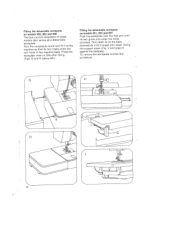
Owner's Manual - Page 10
... lever 1 and pull it slightly to back.
6
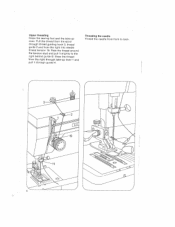
Draw the thread from the right into needle thread tension 19. Pass the thread around the tension stud and pull it through guide H. Threading the needle Thread the needle from front to the right behind guide G. Upper threading
Raise the sewing foot and the take -up lever...
Owner's Manual - Page 11
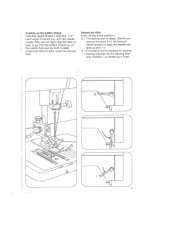
... bobbin thread Hold the needle thread a little taut. N
E_
I is lowered for sewing.
= Darning position for the darning foot only. G = The sewing foot is raised. (Before you until the needle moves down and up again and the take -up lever 1.) H = The sewing foot is marked by a notch.
7-
Presser bar litter Lever 20 has three positions. Drawing up .
Turn...
Owner's Manual - Page 12
...length in mm. roDrbkraarwo.utthe threads into the cutter slot and pull them .
N
7
\
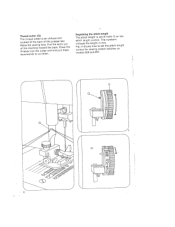
8 Thread cutter (G) The thread cutter is set the stitch length control for sewing stretch stitches on the stitch length control.
Fig. tPhthueellpbtrhaeecskswe. Regulating the stitch length The stitch length is an oblique slot lRoofacitashteeedtmheaatcsthehiwenienbgatocwfkoaoortfd. H shows how to cut...
Owner's Manual - Page 16

... 3 and 5. The higher the number, the tighter the tension. J = Upper tension too loose or lower tension too tight.
The correct lower tension Let the bobbin case with a full bobbin hang down by the thread.... should gradually move downwards when you jerk your hand upwards lightly. Lower tension H = Regulating screw.
Turn it left for a looser tension, or right for a tighter tension. ...
Owner's Manual - Page 17
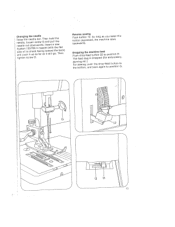
....rdenesTGag.dshlaIteeoinntnwsd(wewhairlpiortltdulhadlgltotnhhtt.heeheweTebfhlaaectnk) tighten screw G. embroidery,
darning etc.) For sewing, push the the bottom, and back
drop-feed button again to position
to The feed dog is dropped (for
position H. Reverse sewing Push button 12. Dropping the machine feed Push drop-feed button 22 to G.
'4
GH
13
As long...
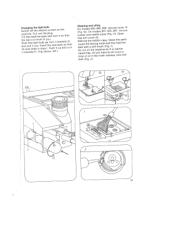
Owner's Manual - Page 20
... the back and hold it rests against screw N. Set the stitch
and
density in groove J. Move zigzag-stitch 4 to into
buttonhole symbol G position. Special sewing feet G Zipper foot Insert the rear pin in groove I, and the front pin in the buttonhole sector of stitch
length control 11. Insert the pin of the...
Owner's Manual - Page 22
... arm until it snaps into place. Turn the receptacle round and fit it
against the bedplate. Turn catch G on models 800, 802 and 806 The foot ...control receptacle of these models also serves as a detachable
workplate. Swing the support down a little after fitting.
(Figs. To remove the workplate reverse this
proced ure.
4HJ
\ ilHIl
..
...
18 I) and press it to the machine...
Owner's Manual - Page 23
Push the light bulb up and
G that
the top is in slots I. G). Open
free arm cover 24. Push it
towards H. (Fig. J).
19 On models 801, screws and needle plate
...(Fig. Remove the bobbin case. Changing the Switch off the
light bulb electric current
to
the
machine. Pull out the plug. Tilt the machine back and turn
it
so
that turn it and pull it towards bulb so up , turn
...
Owner's Manual - Page 25
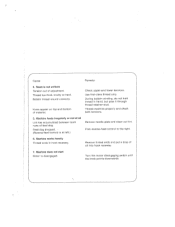
... bobbin winding, do not hold thread in hook raceway.
Remove needle plate and clean out lint.
Machine works heavily Thread ends in hand, but pass it through thread retainer stud. Machine feeds irregularly or not at left.)
Check upper and lower tensions. Turn the motor disengaging switch until the knob points downwards. 4
Cause:
Remedy:
4.
Owner's Manual - Page 13

... towards you and sew a stitch until both threads towards the right under the sewing foot, (approx 10 cm...). Pull out the bobbin thread by means of the needle
thread.
Chiudere be sportebbo 119. Girare ii volantino in
avanti e cucire un punto finché ago e
eva tendifilo siano di nuovo in posizione
nut
re con lb fib superiore II fib
4 Ober- Close free-arm...
Owner's Manual - Page 40

...it fib sopra il gancio 0 posteriore, tenderlo bone e fissarbo nel gancio anteriore P. Attach the buttonhole foot. During sewing, arrow Q runs along scale A. This is how the buttonhole length is held in tab P at...Set the stitch density at range 3 for buttonhole sewing. J
37 lnserire come segue 1 fib rinforzo: appoggiare it tasto C. Knoptioch einstellen Taste C tippen. Insert a gimp thread...
Owner's Manual - Page 68

... a drop of feed dog. Feed dog dropped. (Drop-teed control is a foot. Fundamental rules
Before exchanging either sewing foot or needle, Never run a threaded machine unless there is at all
Lint has accumulated between tooth
Remove needle plate and clean out lint.
Machine runs with difficulty Thread ends in hook raceway. Cause:
Remedy:
5. If you...
Owner's Manual - Page 75

... Darning fabric and wool
Knitted edge toot
93-035957-91 For sewing knitted materials
Teflon foot
98-694 801 -00 For sewing plastic materials
Faicy-stitch toot
98-694 879-00 For sewing fancy patterns Use a coin to loosen the screw of the sewing foot holder.
They can
be obtained from your dealer at an extra...
Owner's Manual - Page 76

...)
Inserting the bobbin
Inserting the bobbin case
Needle chart
Needle thread tension Operating the foot control
Presser bar lifter
Program table
Reverse sewing
Safety rules
Seam-like zipper closure
Setting stretch stitches Setting the needle position for straight...and stretch-stitch combinations Work support/accessory box
Zippers for fancy stitches
Topstitching
Upper threading Utility-
Similar Questions

I'm Trying To Make A Button Hole, The Sewing Machine Is Not Advancing The Fabric
(Posted by paulinegp22 4 years ago)

Turning The Flywheel Is Very Stiff When Lifting The Needle. There Is A High- Pi
The flywheel is very stiff when lifting the needle.There is a high-pitched squeal while machine is r...
The flywheel is very stiff when lifting the needle.There is a high-pitched squeal while machine is r...
(Posted by carmit 6 years ago)

I Have A Pfaff Creative 7570 Machine. The Presser Foot Does Not Stay Down Tight
How do I fix the presser foot to stay down tightly
How do I fix the presser foot to stay down tightly
(Posted by Barbsewnsew 9 years ago)


Fancy Stitching
How do I set fancy stitches on Pfaff hobbymatic 935, 955
How do I set fancy stitches on Pfaff hobbymatic 935, 955
(Posted by sistersue17 10 years ago)