
Pfaff hobbylock 797 Support Question
Pfaff hobbylock 797 Support Question
Find answers below for this question about Pfaff hobbylock 797.Need a Pfaff hobbylock 797 manual? We have 1 online manual for this item!
Question posted by shs1964 on February 22nd, 2014
Which Needles To Insert And Which Thread Guides To Use?
The person who posted this question about this Pfaff product did not include a detailed explanation. Please use the "Request More Information" button to the right if more details would help you to answer this question.
Current Answers
Related Pfaff hobbylock 797 Manual Pages
Owner's Manual - Page 3

... Adjusting the stitch length Adjusting the differential teed Disengageing the upper knife Disengageing the overedge looper Adjusting the machine for two-thread chainstitch seam Inserting the workpiece guide plate Adjusting the seam width Changing the sewing foot Sewing rolled hems Changing the needles Changing the lower knife Changing the upper knife Changing the light bulb Cleaning the...
Owner's Manual - Page 5

... 33 Two-thread chainstitch looper 34 Thread guides behind the carrying
handle 35 Seam width adjustment knob
behind work support 15
27
31 Controls of the sewing machine
1 Foot pressure regulating dial 2 Thread guide 3 Carrying handle 4 Left needle thread tension dial 5 Right needle thread tension dial 6 Right looper thread tension dial 7 Left looper thread tension dial 8 Looper thread tension dial...
Owner's Manual - Page 6

... the power source. Do not place any objects on a special sewing table. Then connect the mains plug to a power source. j Electrical connection Use this machine only on a flat surface or on the foot control. Connecting the foot control: Insert the plug of the control in the machine socket.
The accessories are illustrated on page 41.
Owner's Manual - Page 8

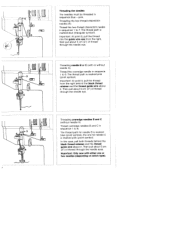
Carrying handle and thread guides behind it: Insert fingers into the guide bar. Installing the thread spool stand Loosen clamp screw a little and pull washer up guide bar and align it so that the thread guides are exactly above the spool holders. Pull up to the screw head. Tighten clamp screw. Insert the five thread spool holders. Push the thread guiding part into...
Owner's Manual - Page 10

...the respective thread into the
corresponding guides and tension discs. Needle thread tension (pink)
Diagram B shows threading of the thread tensions.
Remove the needles that are indicated. Thread the machine in the following sequence:
1.
Left looper (yellow) 3. Chainstitch looper (mauve) 4. Needle thread tension (blue) 5. Diagram C shows threading of the thread guides behind...
Owner's Manual - Page 14
...Then pull about 5 cm (2") of thread through the needle eye. The thread path is marked pink (point symbol). pink. Then pull about 5 cm (2") of thread through the needle eye.
- In this case, pull both threads behind the black thread retainer and the thread guide wire above it . Threading the needles The needles must be threaded in sequence 1 to 7. Important: Only sew with or without...
Owner's Manual - Page 16

... the respective color symbol. Only for stitch type 6 (needles B and C), the standard thread tension N for needle B must be set opposite the blue triangular symbol. Only for the blue thread tension there are two standard settings: When using needle A (only for two-thread chainstitch.
-j Setting the standard thread tension The thread tension to 22). The mauve tension is only needed...
Owner's Manual - Page 17

.... Insert test fabric up to the rear, under the presser foot Make sure that threads have inter locked correctly. Hold thread ends with your left hand while turning hand wheel with your right hand in the illustration.
Ic
the threads must be made. Raise sewing foot lever 20. Sewing test
After threading, a sewing test test should be guided to...
Owner's Manual - Page 19

... stitches over the seam just sewn without cutting the thread chain.
For knit fabrics, a crochet needle can be used to extremely thick can be processed. On this machine, all kinds of seam.
Or:
Sew about 2 turns. When sewing thin or medium fabrics, the screw of the upper knife holder must be loosened by about 5 cm (2) beyond...
Owner's Manual - Page 20

... stt h underside
'- triangular symbol pink = point symbol green -= point symbol yellow = point symbol mauve = triangular symbol
Application examples: Same as stitch type 1 and 2 but with needles A and C
Thread tensions: blue = triangular symbol pink = point symbol green = point symbol yellow = point symbol mauve = triangular symbol
Application examples. I
stitch top side
I
I
Two...
Owner's Manual - Page 25
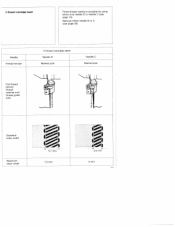
seam width
72mm
5mm Needle Thread tension
3thread overedge seam Needle B Marked pink
Needle C Marked pink
Pull thread behind thread retainer and thread guide wire. Remove either only needle B or needle C (see page 35). I
l
Standard seam width
Maximum
.
3-thread overedge seam
Threethread sewing is possible by using either needle B or C (see page 12).
Owner's Manual - Page 32

... little. For sewing the next seam, insert the correct needles When inserting the workpiece guide plate, make sure it back to the standard position 2 to the machine: Open the ...thread chainstitch seam can be sewn I
After sewing the two-thread chainstitch seam, the following adjustments must be made to 6. Now the overedge looper is level with the needle plate. Inserting the workpiece guide...
Owner's Manual - Page 36

... bulk threads and one bulk thread and two polyester threads 120-140. green tension polyester thread 120-140 for pink, green, and yellow thread tensions
Threading path:
1 right looper, green path 2. left looper Pink thread tension, needle thread
approx. Rolled hem with polyester thread (ill. 1 and 2, page 33)
Preparation of the sewing machine:
Needle:
remove needle A and B
Sewing foot...
Owner's Manual - Page 37

... knife, see page 29.
-J Changing the needles Pull out the mains plug. An incorrectly inserted needle will cause thread breakage and skipped stitches.
'i
Changing the knives Knives are used on these machines: System 130/705 H or 15 x 1 H Although the correct needle size depends on the material and the thread size used, we recommend needle size 14. Loosen the set screw...
Owner's Manual - Page 40

... plug. Close and fasten housing cover.
Inserting the light bulb:
Insert the new bulb (15 Watt max.) with the accessories to remove dust and lint from the tensions. Close the tension cover. Cleaning thread tensions: Fold the tension cover down. Behind it, the light bulb of the sewing light is situated.
-3
Removing the light...
Owner's Manual - Page 41

One to be oiled only once or twice a month. The bushings and other important moving parts are made of special material and need to two drops of high-quality sewing machine
oil are sufficient for oiling. Oiling the machine:
Every time before you take the machine into operation, you should apply a little oil to the places indicated.
Owner's Manual - Page 42

'ing prob'ems and solutions
se machines have been iiade. Sewing problems
developed for light materials) (pages 14, 20, 21, 22). Solution
Turn foot pressure regulating dial clockwise to incorrect threading. Insert new needle correctly (see pages 7-12). Thread correctly (see pages 8 and 35).
Needle not fully inserted. Incorrect needle used .
Incorrect stitch formation
trect setting...
Owner's Manual - Page 43

3
4 5 /___)
8
0
9
- Specifications: Highest sewing speed Seam width Stitch length Sewing foot Lubrication Needle system Needle size Dimensions Weight
Accessories
1 Screwdriver 2 Screwdriver 3 Lint brush 4 Tweezers 5 Lower knife 6 Thread unreeling disc 7 Needles 8 Sewing machine oil 9 Rolled hem presser foot 10 Thread spool net (see page 42)
Optional accessories, see pages 42 to 44, available ...
Owner's Manual - Page 44

Place the prepared hem under guide -2-, Folded edge -4- so that part -3-
Useful for synthetic thread which tends to become loose, unravel and slip down.
2
1, 3
Sewing foot for blind-hemming operations
Prepanng the sewing machine
Differential
feed setting: set at - (see page 27)
Needle:
remove needles A and B
Sewing foot: engage blind-hemming foot
Seam width: "N"
...
Owner's Manual - Page 45

...Fig. 1
material
pearls
Ii
2
1
needle B
1-1.5mm
Fig. 2
j
Pearl sewing toot (Fig. 1)
Tcohrisdss.pTechieaslefosoewt iisngusoepderfoartioatntsacahriengcaprreiaerdls,ouspt awnigthlens,eesdtrlaessB
tapes, lead or C only.
Thread tension: pink = -3 to -5 green = -1 to-3 yellow = +2 to +3
The needle should enter the fabric 1 to the fabric edge, needle C must be used within
the
range
of...
Similar Questions

Searching For Part Of The Pfaff Hobbylock 797 Overlooking 5 Cottons Pressure Foo
Searching for part of Pfaff Hobbylock 797 overlooking 5 cottons pressure foot where 2 needles are
Searching for part of Pfaff Hobbylock 797 overlooking 5 cottons pressure foot where 2 needles are
(Posted by free2matilda 3 years ago)
Needle Shaft Set Screw
I lost the set screw that holds the needles to the needle shaft. Could you please tell me the type o...
I lost the set screw that holds the needles to the needle shaft. Could you please tell me the type o...
(Posted by vickiathome 3 years ago)

No Thread Guide At Needle On Pfaff 145
Hi,I recently bought a Pfaff 145-H4 and it doesn't appear to have a "loop" or "guide" near the needl...
Hi,I recently bought a Pfaff 145-H4 and it doesn't appear to have a "loop" or "guide" near the needl...
(Posted by tmnd777 4 years ago)

Threading Piaf 7550 Sewing Machine
I received this machine without a manual. No luck downloading it and YouTube videos weren't clear. I...
I received this machine without a manual. No luck downloading it and YouTube videos weren't clear. I...
(Posted by Nwegmann 8 years ago)
I Was Gifted A Hobbylock 797 Without The Thread Spool Stand. Need One!
I need to replace the thread sppol stand and all parts thereof. I've been searching for hobbylock pa...
I need to replace the thread sppol stand and all parts thereof. I've been searching for hobbylock pa...
(Posted by simplimage12 9 years ago)