Pfaff GrandQuilter 18.8 Support Question
Pfaff GrandQuilter 18.8 Support Question
Find answers below for this question about Pfaff GrandQuilter 18.8.Need a Pfaff GrandQuilter 18.8 manual? We have 1 online manual for this item!
Question posted by patshoup on April 2nd, 2015
Stitch Problem
I purchased a used grand quilt 18.8, it was a demonstrator, used very little but have set it up and having problems with the stitch not catching. We checked the encoders, changed the o rings which were bad, changed the needle, rethreaded it, checked the bobbin, oiled everthing from owners manual. Not sure what else I can do. I did change thread as it was always fraying and breaking.
Current Answers
Related Pfaff GrandQuilter 18.8 Manual Pages
Owner's Manual - Page 2
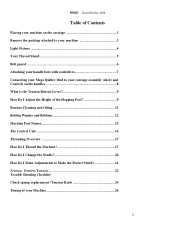
... the carriage 3 Remove the packing attached to your machine 3 Light Fixture ...4 Your Thread Stand 5 Belt guard ...6 Attaching your handle bars with...Machine Part Names 15 The Control Unit 16 Threading Overview 17 How Do I Thread the Machine 17 How Do I Change the Needle 20 How Do I Make Adjustments to Make the Perfect Stitch 21 Tension, Tension, Tension 22 Trouble Shooting Checklist Check...
Owner's Manual - Page 3
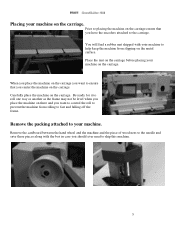
... way or another as the frame may not be level when you place the machine on there and you have the encoders attached to prevent the machine from slipping on the metal surface. Remove the packing attached to ship this machine.
3 You will find a rubber mat shipped with the box in case you should...
Owner's Manual - Page 4
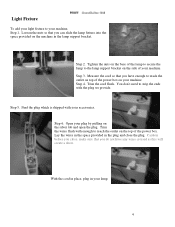
...with your plug by pulling on the top of your lamp.
4 Open your accessories. Light Fixture
To add your light fixture to your machine. You don't need to reach the outlet on top of the power box on the side of the power box. Caution before you ... , make sure that you do not have enough to strip the ends with enough to the lamp support bracket on your machine, Step 1.
Owner's Manual - Page 5
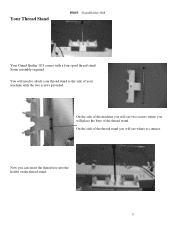
... stand you will see two screws where you will see where to the side of the machine you can insert the thread tree into the holder on the thread stand.
5
On the side of your machine with a four spool thread stand. Your Thread Stand
Your Grand Quilter 18.8 comes with the two screws provided.
Owner's Manual - Page 6
... sensor and the belt.
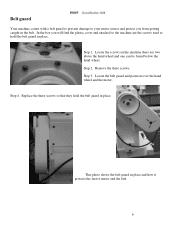
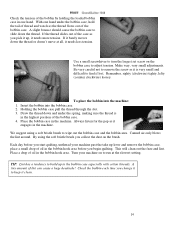
6 In the box you will find the plastic cover and attached to the machine are two above the hand wheel and one can be found below the hand wheel. Step 3. Replace ... to hold the belt guard in place. Step 4.
Step 1. Locate the screws on the machine there are the screws used to your motor sensor and protect you from getting caught in the belt. Locate the belt guard...
Owner's Manual - Page 7
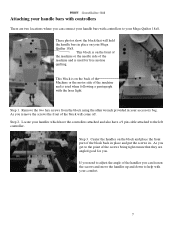
...the block will hold the handle bars in . This block is on the back of the Machine or the motor side of the machine and is used for you get to the point of the screws being tight ensure that will come off. ... bag. Attaching your handle bars with controllers
There are angled good for free motion quilting. Step 2. This block is used when following a pantograph with your comfort.
7
Owner's Manual - Page 8

... will have a cable that the stitch regulations will work. This is not used at the back of your machine. You will need to use the supplied Handle Bar Cable (9 ...Grand Quilter 18.8 to your Carriage Assembly (Deck) and Controls on the Handles
For one year after the purchase of the Pfaff GrandQuilter 18.8 longarm sewing machine, we will repair or replace (at our option), without the encoders...
Owner's Manual - Page 9
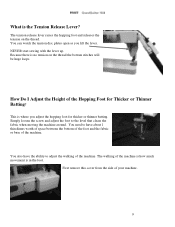
...the tension on the thread the bottom stitches will be huge loops. You can...the level that clears the fabric when moving the machine around. Because there is where you lift the lever.
Simply...and adjust the foot to adjust the walking of the machine. First remove this cover from the side of the ...foot. How Do I Adjust the Height of your machine.
9 You also have about 1 thin dimes worth of space between...
Owner's Manual - Page 10
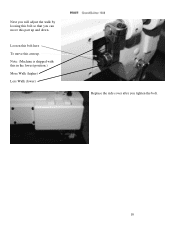
Note: (Machine is shipped with this in the lowest position.) More Walk (higher) Less Walk (lower)
Replace the side cover after you can move this arm up and down. Next you will adjust the walk by loosing this bolt so that you tighten the bolt.
10 Loosen this bolt here To move this part up .
Owner's Manual - Page 11
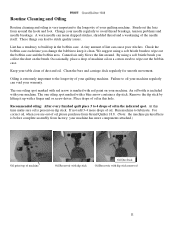
.... Check the bobbin case each time you are out of oil in the bobbin case. Clean the bars and carriage deck regularly for smooth movement. Oiling is extremely important to the longevity of your warranty. Recommended oiling: After every finished quilt place 3 to 4 drops of oil please purchase from Grand Quilter 18.8. (Note: the machine pictured...
Owner's Manual - Page 12
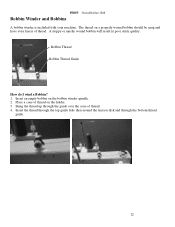
... around the tension disk and through the guide over the cone of thread. 4. A sloppy or mushy wound bobbin will result in poor stitch quality. Insert an empty bobbin on the holder. 3. Bobbin Winder and Bobbins
A bobbin winder is included with your machine.
Bring the thread up through the bottom thread
guide.
12
Owner's Manual - Page 13
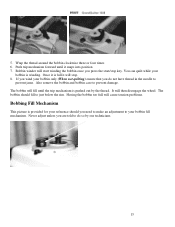
It will stop key. Having the bobbin too full will cause tension problems.
Bobbing Fill Mechanism
This picture is full it snaps into position 7. Never ... adjustment to prevent damage. Wrap the thread around the bobbin clockwise three or four times 6. 5. You can quilt while your
bobbin is pushed out by our technicians.
13 Once it is provided for your reference should fill ...
Owner's Manual - Page 14
... hold the tail of thread and watch as you begin quilting. Use a small screwdriver to keep it needs less tension.
Insert the bobbin into the machine: 1. Each day before you pick it up, it ... setting. Draw the thread down the thread. We suggest using the soft bristle brush you change it to turn the largest set screw on the brush. Canned air only blows the lint around. Check the...
Owner's Manual - Page 15
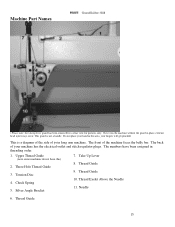
... 3. Silver Angle Bracket
7. Thread Guide 10. The front of your hand in place, extreme head injury may occur. Do not place your machine has the electrical outlet and stitch regulator plugs. Check Spring 5. Thread Guide 9. Thread Guide
15 The numbers have this area, your fingers will get pinched)
This is not a handle. Thread...
Owner's Manual - Page 16
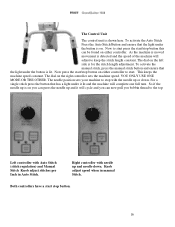
... controller. So if the needle up is shown here. YOU ONLY USE ONE MODE OR THE OTHER. Now to start press the start/stop button.
16 The dial on the right controller sets the machine speed. Knob adjust speed when in Auto Stitch.
The Control Unit
The control unit is on you bobbin thread...
Owner's Manual - Page 20
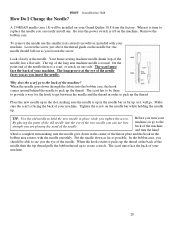
...; A 134RSAN needle (size 18) will go.
the needle should be there to provide a way for the hook to pick up the thread.
On the point end of the needle there is facing the back of the needle. Put the needle down in the center of your machine. Your home sewing machine needle shank (top...
Owner's Manual - Page 21
... you need to Make the Perfect Stitch? For this goal is needle deflection related to press and sew multiple layers together while the machine head is moving while the needle is on the bobbin, then you use the same color thread on my quilt? The technique all long arm machines use different colors of war with each...
Owner's Manual - Page 22
... by too little top tension. If the take up bar after finishing your needle in poor stitch quality.
Has anything else. Top Thread Breaking Check to see if there is coming off the spool freely. Loose Top Stitch Is the tension lever handle down ? Have I oiled my machine regularly? Is the quilt too...
Owner's Manual - Page 23
.... Sometimes the smallest pieces of the Machine Check for some time, replace the needle. After stitching and releasing the backing fabric the top will make the quilt top pucker. Repeat until stitch quality is too tight. Be sure it has been used for lint or other debris on the back. Check the needle. A finger tip distance between...
Owner's Manual - Page 25
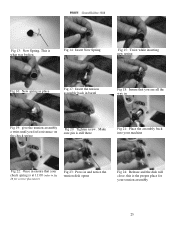
... pin is still there
Fig 21: Place the assembly back into your machine
Fig 22: Once in ensure that you feel resistance on the check spring
Fig 20: Tighten screw. this is at 11:00 (refer to...
Fig 16: New spring in place
Fig 17: Insert the tension assembly back in barrel
Fig 18: Insure that your check spring is the proper place for correct placement)
Fig 23: Press in
Fig 19: give the...
Similar Questions

I Need A Side Cover For My Grandquilter 18.8. Where Can I Purchase One?
(Posted by mbellavia 2 years ago)

Where To Get Replacement Encoder For Pfaff 18.8 Grand Quilter
(Posted by debbypollock 3 years ago)
I'm Trying To Make A Button Hole, The Sewing Machine Is Not Advancing The Fabric
(Posted by paulinegp22 3 years ago)

Parts For Grandquilter 18.8
I need a motherboard for my GrandQuilter 18.8 longarm sewing machine. I have been told that TIN lizz...
I need a motherboard for my GrandQuilter 18.8 longarm sewing machine. I have been told that TIN lizz...
(Posted by micheledgreen49 5 years ago)

The Sewing Machine Will Say Calibrate Embroidery Unit. I Click The Check Mark T
when I click on calibrate the sewing machine goes into thinking mode & it just does it for a long ti...
when I click on calibrate the sewing machine goes into thinking mode & it just does it for a long ti...
(Posted by Anonymous-156748 8 years ago)