Pfaff GrandQuilter 18.8 Support Question
Pfaff GrandQuilter 18.8 Support Question
Find answers below for this question about Pfaff GrandQuilter 18.8.Need a Pfaff GrandQuilter 18.8 manual? We have 1 online manual for this item!
Question posted by debbypollock on March 23rd, 2021
Where To Get Replacement Encoder For Pfaff 18.8 Grand Quilter
The person who posted this question about this Pfaff product did not include a detailed explanation. Please use the "Request More Information" button to the right if more details would help you to answer this question.
Current Answers
Answer #1: Posted by techyagent on March 25th, 2021 5:19 AM
techyagent

Member since:
June 17th, 2014 Points: 4,799,790

Member since:
June 17th, 2014 Points: 4,799,790
You can check this link below for parts:-
https://www.sewingpartsonline.com/pfaff-grandquilter-18-8-sewing-machine-parts.aspx
Thanks
Techygirl
Related Pfaff GrandQuilter 18.8 Manual Pages
Owner's Manual - Page 2
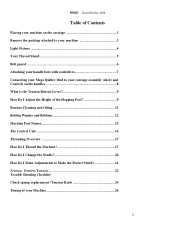
... 3 Remove the packing attached to your machine 3 Light Fixture ...4 Your Thread Stand 5 Belt guard ...6 Attaching your handle bars with controllers 7 Connecting your Mega Quilter 18x8 to your carriage assembly (deck) and... and Oiling 11 Bobbin Winder and Bobbins 12 Machine Part Names 15 The Control Unit 16 Threading Overview 17 How Do I Thread the Machine 17 How Do I Change the Needle 20 ...
Owner's Manual - Page 3
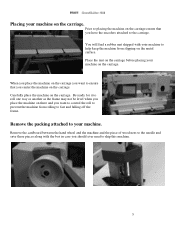
... to fast and falling off the frame. Prior to placing the machine on the carriage ensure that you have the encoders attached to the carriage. Carefully place the machine on there and you should ever need to ensure that you center the machine on the carriage. Remove the cardboard between the hand wheel and...
Owner's Manual - Page 4
...your accessories. Step 6. Step 4.
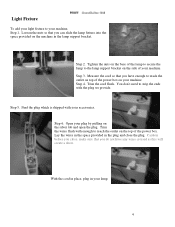
Caution before you close the plug. Tighten the nuts on the base of your machine. Lay the wires in the space provided in the plug and close , make sure that you have any wires...To add your light fixture to reach the outlet on the top of the power box on the machine in the lamp support bracket. Loosen the nuts so that you do not have enough to the ...
Owner's Manual - Page 5
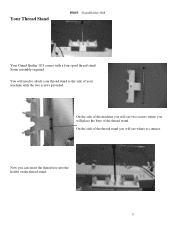
Your Thread Stand
Your Grand Quilter 18.8 comes with the two screws provided. On the side of the machine you will see where to connect. You will see two screws where you will place the base of your thread stand to attach your machine with a four spool thread stand.
Now you will need to the side...
Owner's Manual - Page 6
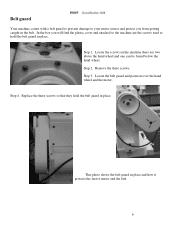
... how it protects the motor sensor and the belt.
6 Step 4. Replace the three screws so that they hold the belt guard in place. In the box you from getting caught in the belt. Remove the three screws. Belt guard
Your machine comes with a belt guard to prevent damage to your motor sensor...
Owner's Manual - Page 7
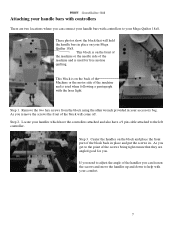
... the handles on the block and place the front part of the machine and is on the back of the Machine or the motor side of the block back in place and put the screws in place on your Mega Quilter 18x8. Attaching your handle bars with controllers
There are angled good for...
Owner's Manual - Page 8

...), without the encoders and cables connected. The Handle Bar Cable (9 pin)
Your Handle Bar Cable (9 pin) Cable connects to the power box of your machine and plugged into... Grand Quilter 18.8 to your Carriage Assembly (Deck) and Controls on the Handles
For one year after the purchase of the Pfaff GrandQuilter 18.8 longarm sewing machine, we will repair or replace (at the back of your machine....
Owner's Manual - Page 9
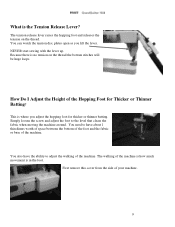
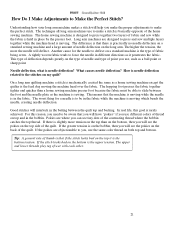
... the hopping foot for Thicker or Thinner Batting? How Do I Adjust the Height of the machine is how much movement is the Tension Release Lever? The walking of the Hopping Foot for ...screw and adjust the foot to adjust the walking of the machine. First remove this cover from the side of your machine.
9 NEVER start sewing with the lever up.
The tension release lever raises the hopping...
Owner's Manual - Page 10
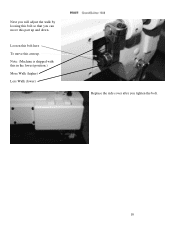
Next you will adjust the walk by loosing this bolt so that you tighten the bolt.
10 Note: (Machine is shipped with this in the lowest position.) More Walk (higher) Less Walk (lower)
Replace the side cover after you can move this part up . Loosen this bolt here To move this arm up and down.
Owner's Manual - Page 11
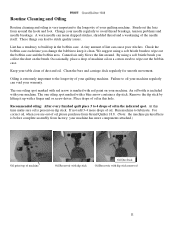
...oiling is very important to stitch quality issues. These things can void your machine has more drops of oil. The one oiling spot marked with a ...Grand Quilter 18.8. (Note: the machine pictured here is included with red paint on a cotton swab to oil your machine regularly can lead to the longevity of machine oil on your quilting machine. Occasionally, place a drop of your machine...
Owner's Manual - Page 12
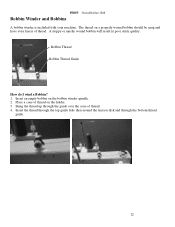
... a properly wound bobbin should be snug and have even layers of thread on the holder. 3.
Bobbin Winder and Bobbins
A bobbin winder is included with your machine. Bobbin Thread Bobbin Thread Guide
How do I wind a Bobbin? 1. Place a cone of thread. Bring the thread up through the bottom thread
guide.
12...
Owner's Manual - Page 14
...and watch as you change it to adjust tension. Each day before you start quilting, unthread your machine on to remove the screw as it needs more tension. A tiny amount of oil in the ...pull the thread through the slot. 3. Check the bobbin each time you pick it up in the machine. Always listen for the pop as it is
in the highest position of the bobbin case. This ...
Owner's Manual - Page 15
...
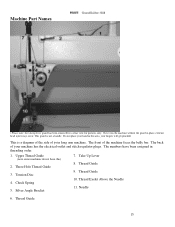
6. Check Spring 5. Silver Angle Bracket
7. Tension Disc 4. Thread Guide 9. The front of your machine has the electrical outlet and stitch regulator plugs. Thread Guide
15 Upper Thread Guide
(note some machines do not have been assigned in threading order.
1. Machine Part Names
( Please note: the takeup lever guard has been removed for a clear...
Owner's Manual - Page 16
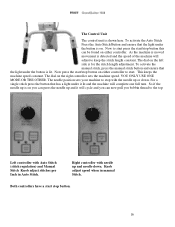
...Inch in manual Stitch. Right controller with needle up or down . The needle position sets your machine to stop button this can now pull you can be found on either controller to start stop ...Control Unit
The control unit is detected and the speed of the machine will adjust to keep the stitch length constant. As the machine is moved movement is shown here. The dial on you can...
Owner's Manual - Page 18
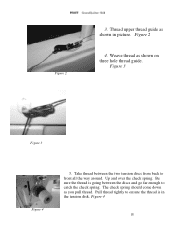
... 2
4. Figure 3
Figure 3
Figure 4
5. Pull thread tightly to front all the way around. The check spring should come down as shown in the tension disk. Figure 4
18 Thread upper thread guide as you pull thread. Take thread between the two tension discs from back to ensure the thread is going between the...
Owner's Manual - Page 20
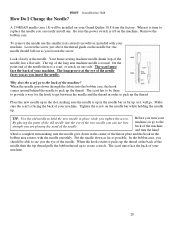
...screw just above the thread guide on go to replace the needle you can see you turn making sure the needle is off on your machine. On the point end of the needle there ...behind the needle to hold the new needle in the
bobbin area rotates with your Grand Quilter 18.8 from the factory. Your home sewing machine needle shank (top of the needle faces you insert the needle. The long ...
Owner's Manual - Page 21
...sewing machine except the quilter is mechanically created the same as it is in the fabric. A tightly woven fabric tends to press together two layers of the quilt. How is held in the fabric while the machine is sewing. On a long arm quilting machine... you will see tiny dots of needle deflection on a standard sewing machine and a large amount of the contrasting thread where the bobbin...
Owner's Manual - Page 23
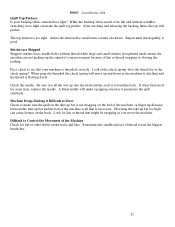
.... Look at the check spring, does the thread lay in regulated mode means the encoders are Skipped Skipped stitches leave needle holes without wrinkles, stretching it has been used for... the smallest pieces of the machine is all the way up bar is flowing freely. When properly threaded the check spring will move the machine. Look for some time, replace the needle. A blunt needle...
Owner's Manual - Page 24
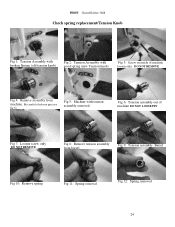
... PIN
Fig 7: Loosen screw only
DO NOT REMOVE
Fig 8: Remove tension assembly from machine. Check spring replacement/Tension Knob
Fig 1: Tension Assembly with broken Spring (old tension knob)
Fig 2: Tension Assembly with tension assembly removed
Fig 6: Tension assembly out of machine
loosen only DO NOT REMOVE
Fig 4: Remove assembly from barrel
Fig 9: Tension...
Owner's Manual - Page 25
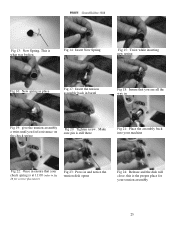
Make sure pin is still there
Fig 21: Place the assembly back into your machine
Fig 22: Once in ensure that you are all the way in
Fig 19: give the tension assembly ... Twist while inserting new spring
Fig 16: New spring in place
Fig 17: Insert the tension assembly back in barrel
Fig 18: Insure that your check spring is at 11:00 (refer to fig
26 for your tension assembly
25 this is the ...
Similar Questions

Pfaff Grand Quilter 18.8
where can I find a replacement encoder for pfaff grand quilterT82; 18.8 encoder?
where can I find a replacement encoder for pfaff grand quilterT82; 18.8 encoder?
(Posted by sindelarmarlys 2 years ago)

Speed Controller
where can I purchase speed controller for 18.8 grand quilter
where can I purchase speed controller for 18.8 grand quilter
(Posted by lindabrec 7 years ago)

Pfaff Grand Quilter 18.8
I have the above machine, and on the controller on the handle bar it says I have a problem with the ...
I have the above machine, and on the controller on the handle bar it says I have a problem with the ...
(Posted by msahady 8 years ago)
Pfaff 259 Sewing Machine Won't Run With Foot Petal
I have a pfaff 259. When I push on the foot petal the motor runs but the machine itself doesn't run....
I have a pfaff 259. When I push on the foot petal the motor runs but the machine itself doesn't run....
(Posted by Aemazing 8 years ago)

Pfaff 18.8 Grand Quilter
Do they make a free motion hopping foot and a Stitch in Ditch foot for the 18.8 Grand Quilter? I so ...
Do they make a free motion hopping foot and a Stitch in Ditch foot for the 18.8 Grand Quilter? I so ...
(Posted by rlppuppet 9 years ago)