Pfaff GrandQuilter 18.8 Support Question
Pfaff GrandQuilter 18.8 Support Question
Find answers below for this question about Pfaff GrandQuilter 18.8.Need a Pfaff GrandQuilter 18.8 manual? We have 1 online manual for this item!
Question posted by bgenesaal on May 19th, 2018
Wiring Harness For Speed Control For Pfaff 18.8 Auto Stitch
my auto stitch vertical encoder has stopped working. The horizontal stitch works fine. It seems the connection has been totally lost between the encoder and the machine. Where can I purchase a new harnessing wire? I have gone through the list of trouble shooting items such as cleaning the encoder and track, and have unplugged and re-plugged in everything. So I suspect the harnessing wire or the connecting mechanism for it has been damaged . so my next idea is replacing the cable, or the encoder, unless you have some other things for me to try. Beverly Saal
Current Answers
Related Pfaff GrandQuilter 18.8 Manual Pages
Owner's Manual - Page 2
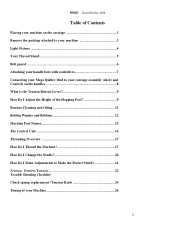
...attached to your machine 3 Light Fixture ...4 Your Thread Stand 5 Belt guard ...6 Attaching your handle bars with controllers 7 Connecting your Mega Quilter 18x8 to your carriage assembly (deck) and Controls on the ...Machine Part Names 15 The Control Unit 16 Threading Overview 17 How Do I Thread the Machine 17 How Do I Change the Needle 20 How Do I Make Adjustments to Make the Perfect Stitch...
Owner's Manual - Page 3
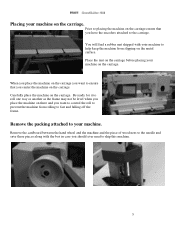
... the metal surface. When you place the machine on the carriage you center the machine on the carriage. Carefully place the machine on the carriage ensure that you have the encoders attached to ensure that you want to control the roll to prevent the machine from rolling to your machine on the carriage. Prior to the needle...
Owner's Manual - Page 4
...your machine. You don't need to strip the ends with enough to reach the outlet on the top of the power box on your lamp.
4
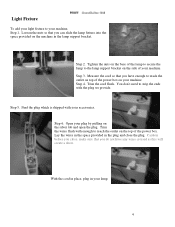
Trim the wires flush with the plug we provide. Lay the wires ... 2. Step 5. Caution before you can slide the lamp fixture into the space provided on the machine in your machine. Light Fixture
To add your light fixture to your plug by pulling on the silver tab and...
Owner's Manual - Page 5
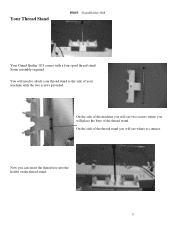
... the base of the thread stand. Now you will need to attach your thread stand to connect. On the side of your machine with a four spool thread stand. You will see where to the side of the machine you can insert the thread tree into the holder on the thread stand.
5
Your Thread...
Owner's Manual - Page 6
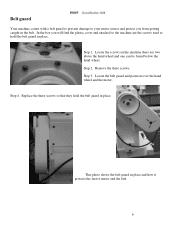
...screws so that they hold the belt guard in place. Belt guard
Your machine comes with a belt guard to prevent damage to the machine are two above the hand wheel and one can be found below the hand...three screws. This photo shows the belt guard in the belt. Step 1. Locate the screws on the machine there are the screws used to hold the belt guard in place. Step 3.
In the box you...
Owner's Manual - Page 7
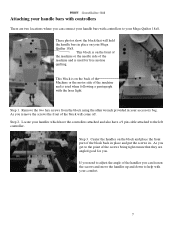
... 1. Center the handles on the front of the machine or the needle side of the machine and is on the block and place the front part of the handles you . This block is used for you can connect your handle bars with controllers to your comfort.
7
These photos show the block that they are...
Owner's Manual - Page 8

... your handle bar have a sheet with care. You will work. Connecting your Grand Quilter 18.8 to your Carriage Assembly (Deck) and Controls on the Handles
For one year after the purchase of the Pfaff GrandQuilter 18.8 longarm sewing machine, we will repair or replace (at our option), without the encoders and cables connected. Such damage is routed to the power box of...
Owner's Manual - Page 9
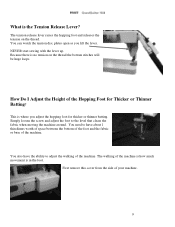
... need to have the ability to the level that clears the fabric when moving the machine around. NEVER start sewing with the lever up. This is no tension on the thread. The tension release lever raises the hopping foot and releases the tension on the thread the bottom stitches will be huge loops.
Owner's Manual - Page 11
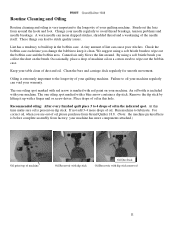
... stick. Brush out the fuzz from Grand Quilter 18.8. (Note: the machine pictured here is marked with a finger nail or screw driver.
At this hole. If not add 3-4 more components attached.)
Oil point top of oil please purchase from around . A worn needle can cause poor stitches. Remove the dip stick by lifting it clean...
Owner's Manual - Page 13
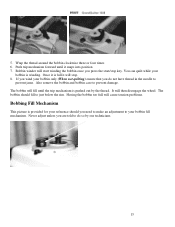
.... Also remove the bobbin and bobbin case to your reference should fill to just below the rim. Having the bobbin too full will stop key. It will start /stop . 8. Push trip mechanism forward until the trip mechanism is winding. The bobbin should you press the start winding the bobbin once you need...
Owner's Manual - Page 15
... not have been assigned in threading order.
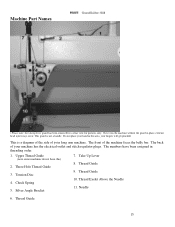
1. Tension Disc 4. Thread Guide 9. The numbers have this area, your machine has the electrical outlet and stitch regulator plugs. Thread Eyelet Above the Needle 11. This guard is a diagram of the side of your hand in place, extreme head injury may occur. ...
Owner's Manual - Page 16
... one full turn.
Now to start press the start .
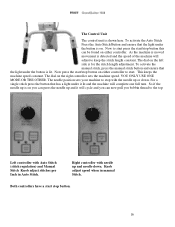
Both controllers have a start stop with Auto Stitch (stitch regulation) and Manual Stitch Knob adjust stitches per Inch in manual Stitch. This keeps the machine speed constant. The dial on the left side is on . To activate the Auto Stitch Press the Auto Stitch Button and ensure that the light under the button is lit...
Owner's Manual - Page 18
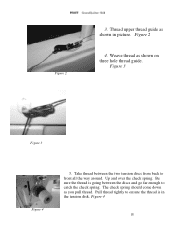
... shown on three hole thread guide. Take thread between the discs and go far enough to front all the way around. Figure 3
Figure 3
Figure 4
5. Figure 4
18 Pull thread tightly to ensure the thread is going between the two tension discs from back to catch the check spring. Be sure the thread...
Owner's Manual - Page 20
...of your
machine.
20
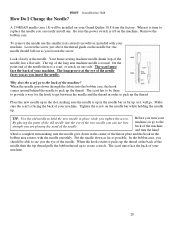
TIP: Use the old needle to create a stitch. The scarf must face the back of your machine.
Look ...new needle you can easily install one side. A 134RSAN needle (size 18) will go. The long groove at the needle. Make sure the scarf is facing the back of your
By placing the point of the needle. Tighten the screw on your machine. Your home sewing machine...
Owner's Manual - Page 21
... the bobbin catches the top thread. In real life, this reason, you need to the stitches on the type of needle and type of the home sewing machine.
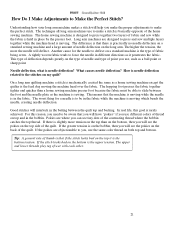
Understanding how your long arm machine makes a stitch will interlock in the fabric while the machine is designed to slide between the quilt top and backing. The home...
Owner's Manual - Page 22
...layers for the needle to penetrate and make controlled starts and stops, practice being consistent in poor stitch quality.
Lower and the quilt will not create a good stitch. Check to see if there is a ...the needle? Did you need correct tension on the quilt held between the quilt and the machine bed. Turn the thread tension disk clockwise ¼ turn. Remember the upper and lower...
Owner's Manual - Page 23
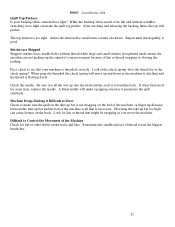
... of the Machine Check for some time, replace the needle. First, check to make sure the quilt on the bed of lint or thread stopping or slowing the reading. Repeat until stitch quality is not...on the track and bars. While the backing fabric needs to Control the Movement of thread create the biggest headaches.
23 After stitching and releasing the backing fabric the top will make the quilt ...
Owner's Manual - Page 24
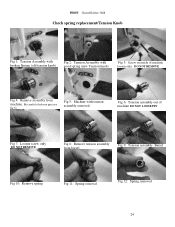
Be careful of release pin (see
fig 6)
Fig 5: Machine with good spring (new Tension knob)
Fig 3: Screw on inside of machine DO NOT LOOSE PIN
Fig 7: Loosen screw only
DO NOT REMOVE
Fig 8: Remove tension assembly from machine. Check spring replacement/Tension Knob
Fig 1: Tension Assembly with broken Spring (old tension knob)
Fig 2: Tension Assembly...
Owner's Manual - Page 25
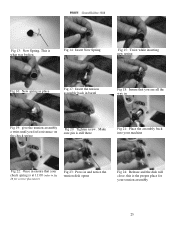
... broken
Fig 14: Insert New Spring
Fig 15: Twist while inserting new spring
Fig 16: New spring in place
Fig 17: Insert the tension assembly back in barrel
Fig 18: Insure that your tension assembly
25 Make sure pin is still there
Fig 21: Place the assembly back into your machine
Fig 22: Once in...
Owner's Manual - Page 26
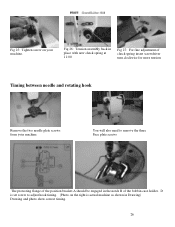
...Remove the two needle plate screws from your machine. D is actual machine as shown in Drawing) Drawing and photo ...show correct timing.
26 Fig 25: Tighten screw on the right is set screw to remove the three Face plate screws
The protecting flange of the position bracket A should be engaged in place with new check spring at 11:00
Fig 27: For fine...
Similar Questions

I Am Looking For A Wiring Diagram For A Pfaff 262 Sewing Machine.
I need to replace the motoer in my Pfaff 262 sewing machine. Since I will be doing this for the firs...
I need to replace the motoer in my Pfaff 262 sewing machine. Since I will be doing this for the firs...
(Posted by dtuttle424 10 months ago)

Pfaff Grand Quilter 18.8
where can I find a replacement encoder for pfaff grand quilterT82; 18.8 encoder?
where can I find a replacement encoder for pfaff grand quilterT82; 18.8 encoder?
(Posted by sindelarmarlys 2 years ago)

Where To Get Replacement Encoder For Pfaff 18.8 Grand Quilter
(Posted by debbypollock 3 years ago)
My1473 Cd Stopped Working After Being ...'overhauled' I Have Tried A New Foot Pe
i have tried a new foot pedal to no avail when i tried to remove the top cover the bobbin winder par...
i have tried a new foot pedal to no avail when i tried to remove the top cover the bobbin winder par...
(Posted by jamieperro 4 years ago)
Speed Controller
where can I purchase speed controller for 18.8 grand quilter
where can I purchase speed controller for 18.8 grand quilter
(Posted by lindabrec 7 years ago)