
NordicTrack Elite 7700 Treadmill Support Question
NordicTrack Elite 7700 Treadmill Support Question
Find answers below for this question about NordicTrack Elite 7700 Treadmill.Need a NordicTrack Elite 7700 Treadmill manual? We have 1 online manual for this item!
Question posted by anibemal on May 12th, 2014
Elite 7700 Model Just Started Making A Very Loud Howling Noise While Lowering.
We bought Elite 7700 model 5 months ago. It just started making a very loud howeling noise. We called tech support and were told that it is NORMAL. No further discussion, suggestion to lubricate etc. Very rude guy there at Nordic. Anybody has this problem? any suggestion what lubricant to use?
Current Answers
Related NordicTrack Elite 7700 Treadmill Manual Pages
English Manual - Page 1

USER’'S MANUAL www.nordictrack.com
Model No. 831.24937.0 Serial No.
Write the serial number in this manual before using this manual for reference. CUSTOMER CARE
For service at any time, go to www.nordictrackservice.com. MT Please do not contact the store. Or call 1-800-TO-BE-FIT (1-800-862-3348) Mon...
English Manual - Page 3
... appropriate exercise clothes while using the treadmill.
19. Athletic support clothes are standing on page 22. If the control system is especially important for persons over age 35 or persons with pre-existing health problems.
12. Never start the treadmill while you are recommended for personal injury or property damage sus- The treadmill is the responsibility...
English Manual - Page 4
... with respect to proper grounding of the mast and supporting structure, grounding of the lead-in wire to an antenna discharge unit, size of grounding conductors, location of electric shock, do so by placing objects under the treadmill.
25. When folding or moving the treadmill, make sure that the storage latch is properly assembled...
English Manual - Page 8
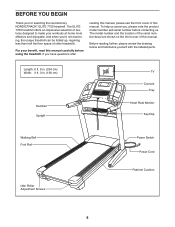
... not exercising, the unique treadmill can be folded up, requiring less than half the floor space of this manual, please see the front cover of other treadmills. The model number and the location of the serial number decal are shown on the front cover of features designed to make your benefit, read this manual.
The ELITE 7700 treadmill...
English Manual - Page 10

...and register
1
your product.
•• activates your product.
2. Start both Screws, and then tighten them. Make sure that the power cord is normal. If there is an oily substance on the treadmill, wipe it off with two 5/16" x 3/4" Screws (1).
ASSEMBLY
... screwdriver To avoid damaging parts, do not have Internet access, call Customer Care (see the front cover of the treadmill.
English Manual - Page 11
Start
all four Screws, and then tighten them.
76
1 84
1 84
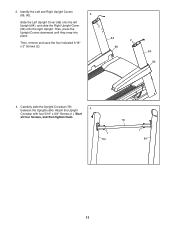
11 Attach the Upright
4
Crossbar with four 5/16" x 3/4" Screws (1). Then, press the Upright Covers downward ...
English Manual - Page 12
... console
7
assembly. Attach the two Handrails (74) to the Upright Crossbar (76)
with
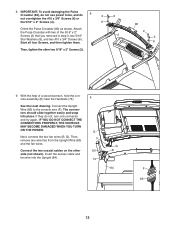
the Truss Head Screws (24). Remove and discard the four indicated screws (E). Start all four Screws, and then tighten them.
84
6. Then, remove and discard the two indicated screws (C).
74 78
84
2 74 B 83 8
C
84
7.
Then, remove the...
English Manual - Page 13
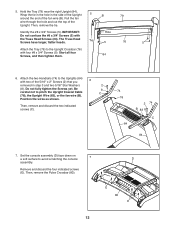
... the two fan wires (B, G). Connect the two coaxial cables on the other two 5/16" x 2" Screws (2).
80 2 6 8
2
9. Insert the excess cable and fan wire into place. Start all four Screws, and then tighten them.
Then, tighten the other side (not shown).
Then, remove any wire ties from the Upright Wire (83) and...
English Manual - Page 14
..." x 2" Screws (2) and four
10
D
5/16" Star Washers (8).
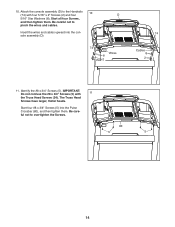
10. The Truss Head
Screws have larger, flatter heads. Be careful not to overtighten the Screws.
80
5
5
14 Start four #8 x 3/4" Screws (5) into the console assembly (D).
74
Wires 8 2
74
Cables 8 2
11. Attach the console assembly (D) to the Handrails (74) with
11
the Truss Head Screws...
English Manual - Page 15
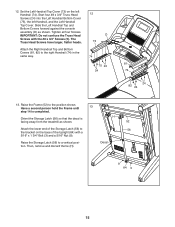
.... Have a second person hold the Frame until
13
step 14 is facing away from the treadmill as shown.
Decal
9 84 3
15 Slide the Left Handrail Top and
Bottom Covers forward against....
Tighten all four Screws. H 52
Attach the lower end of the Upright (84) with the #8 x 3/4" Screws (5). Then, remove and discard the tie (H).
12. Start four #8 x 3/4" Truss Head
12
Screws (24...
English Manual - Page 17
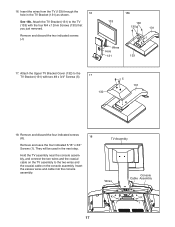
... the two wires and the coaxial cable on the TV assembly to the TV Bracket (131) with the four M4 x 12mm Screws (130) that you just removed.
Insert the excess wires and cable into the console assembly. 16.
English Manual - Page 18
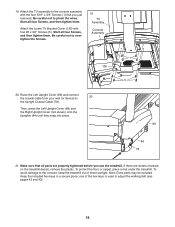
Attach the Lower TV Bracket Cover (135) with the four 5/16" x 3/4" Screws (1) that all four Screws, and then tighten them ....Extra parts may be included. Start all four Screws, and then tighten them . Start all parts are sheets of plastic on the treadmill decals, remove the plastic. Make sure that you use the treadmill. To avoid damage to the console, keep the treadmill out of the hex keys...
English Manual - Page 21

...a plastic bag or other end of mild soap.
Make sure that
the logo is causing a problem, try...medical conditions such as described, move it slightly lower or higher on your body a few inches .... do not expose it with people who have normal heart rhythms. Heart rate reading problems may keep... does not function properly, try relocating the fitness equipment.
21 Wrap the heart
rate monitor ...
English Manual - Page 33

...If you exercise, plug ...this passcode.
Adjust the volume level using the treadmill. To enable a passcode, touch the Enable ...enter the following these instructions, go to support.iFit.com for a set the CD player...the browser, touch the globe button near the lower left corner of time desired. HOW TO USE...on the console. Then, select a website. make sure that the audio cable is entered.
...
English Manual - Page 34

...lower to the minimum incline level, and then return to calibrate the incline system. To avoid damaging the treadmill, do not turn back on the screen.
6.
Touch the Calibrate Incline button. Touch the Cancel button to return to view information about the model and version of the treadmill...treadmill.
3. This will show information about your exercise... starting position. The treadmill ...
English Manual - Page 35

... will show a list of networks appears, touch the desired network.
If you are having problems connecting to an encrypted network, make sure that the checkbox on the screen. Note: The iFit mode supports unsecured and secured (WEP, WPA, and WPA2) encryption.
To exit the wireless network mode, touch the back button on...
English Manual - Page 37

...Press the List button to select normal, wide, cinema, or zoom image as the audio setting language. Press the Aspect button repeatedly to view a list of channels. Make sure to view information about labeling... previous menu.
Press the Fav button to adjust closed captioning. See step 4 on the treadmill and hold the remote control near the TV. HOW TO REPLACE THE BATTERIES IN THE REMOTE...
English Manual - Page 38

.... Select Channel List to adjust and personalize television settings. Highlight a channel and press Enter to make a selection.
1. The Audio menu offers numerous features for adjusting the TV display. Press the ...and down in the TV memory and select settings for channels again.
Select Picture to start the auto scan. Do not remove the key while the television is reached. Select Setup...
English Manual - Page 44

... For aerobic exercise, adjust the intensity of your exercise until your heart rate is not a medical device.
WORKOUT GUIDELINES
Warming Up—-Start with pre-...exercise problems.
EXERCISE FREQUENCY
To maintain or improve your heart rate as you exercise; Remember, the key to success is the key to make exercise a regular and enjoyable part of your physician. For detailed exercise...
English Manual - Page 52
... this manual)
LIMITED WARRANTY
IMPORTANT: To protect your fitness equipment with an extended service plan, see page 7. To help us :
•• the model number and serial number of the product (see the... other warranty beyond that vary from the date of purchase. ICON’'s obligation under normal use , or costs of removal or installation; This warranty will automatically be prepared to...
Similar Questions

I Just Started Putting Together Our New Gx 4,7 And When I Installed The Seat
adjustment brake lever, it was at an extreme angle, like the brake axel is 30 degrees off. It also d...
adjustment brake lever, it was at an extreme angle, like the brake axel is 30 degrees off. It also d...
(Posted by thehosmerfamily 8 years ago)

Treadmill Will Not Start. Ifit Keeps Loading
(Posted by christyr862 8 years ago)

My Nordic Track Elite 7700 Is Not Going The Correct Speed.
My Nordic track starts very slow and I have to push against with force to get the treadmill up to a ...
My Nordic track starts very slow and I have to push against with force to get the treadmill up to a ...
(Posted by spbuchanan 9 years ago)

Nordictrack Treadmill Makes Loud Noise And Jerks
loud clunking noise comes from left frot of motor. causes belt to seem to slip but upon further insp...
loud clunking noise comes from left frot of motor. causes belt to seem to slip but upon further insp...
(Posted by tmazzone17 9 years ago)

Does Nordic Track Elite 7700 Has Google Maps Workout.
(Posted by allstarkry 10 years ago)