
Maytag MMV6180WB Support Question
Maytag MMV6180WB Support Question
Find answers below for this question about Maytag MMV6180WB.Need a Maytag MMV6180WB manual? We have 4 online manuals for this item!
Question posted by jacords on August 7th, 2014
What Has To Be Removed To Replace Main Fuse
The person who posted this question about this Maytag product did not include a detailed explanation. Please use the "Request More Information" button to the right if more details would help you to answer this question.
Current Answers
Answer #1: Posted by waelsaidani1 on August 7th, 2014 10:30 AM
waelsaidani1

Member since:
May 12th, 2013 Points: 19,501,797

Member since:
May 12th, 2013 Points: 19,501,797
Hello follow instructions here: http://www.ehow.com/how_4843979_change-maytag-dryer-fuse.html
Related Maytag MMV6180WB Manual Pages
Installation Instructions - Page 1

... Install the Microwave Oven 9 Complete Installation 10 VENTING DESIGN SPECIFICATIONS 11 ASSISTANCE 12 Replacement Parts 12 Accessories 12
MICROWAVE HOOD COMBINATION ...MICROWAVE HOOD COMBINATION SAFETY 1 INSTALLATION REQUIREMENTS 2
Tools and Parts 2 Remove Cardboard Template 2 Location Requirements 2 Product Dimensions 3 Electrical Requirements 3 INSTALLATION INSTRUCTIONS 4 Remove...
Installation Instructions - Page 2

... Sheet metal screws (2) G. Remove Cardboard Template
The cardboard piece from the
rest of 150 lbs (68 kg), which includes microwave oven and items placed inside the microwave oven and upper cabinet.
■ ... tape
■ 3/4" (19 mm) hole saw
Parts Supplied
For reorder information, see "Replacement Parts" section. The piece inside upper cabinet. hole drill bit for wood or metal cabinet...
Installation Instructions - Page 3

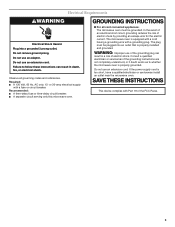
...section. Do not remove ground prong. Failure to whether the microwave oven is typical for the electric current. Observe all cord connected appliances: The microwave oven must be inside the...having a grounding wire with a fuse or circuit breaker. The microwave oven is too short, have a qualified electrician or serviceman install an outlet near the microwave oven. Do not use of the grounding...
Installation Instructions - Page 4

... NOTE: To avoid damage to top of microwave oven. Lift blower motor out of microwave
oven exterior. Wall Venting Installation Only 1. Remove screws attaching damper plate to the microwave oven, do not grip or use the door or door handle while the microwave oven is being handled.
4.
Remove any remaining contents from the microwave oven cavity.
2. Blower motor
5.
Secure damper plate...
Installation Instructions - Page 5

... plate tabs D. A
B
C
A. NOTE: If blower motor is not positioned with flat sides facing the back of the microwave oven (as shown), performance will be reattached to back of microwave oven with 2 screws removed in the top of "Wall Venting Installation Only."
5 Repeat Step 1 from "Wall Venting Installation Only." 5. Rotate blower motor so that exhaust ports...
Installation Instructions - Page 6

... within 6" (15.2 cm) of the wall stud(s) within the cabinet opening vertical centerline C. End holes (on mounting plate) B. Cabinet opening , do not install the microwave oven.
1. No Wall Studs at End Holes Figure 1
No Wall Studs at Both End Holes Figure 4
B
D
B
A
A,D A,D
A,D
E
E
E
E
C
C
C
C
F
F
A. Support tabs F. Mounting plate center markers
6
Holes for lag...
Installation Instructions - Page 7

... being installed on a level line with the dimensions described in steps 8 and 10.
12. Mark Rear Wall
The microwave oven must each other. Top of the upper cabinet. Front edge of the opening. Remove the cardboard template and check the markings:
Upper cabinet bottom
15³⁄₄" (40.0 cm)
Centerline
17¹...
Installation Instructions - Page 8

... in Step 6 of mounting plate, making sure it is level. 4. Securely tighten the lag screws. Remove all lag screws and bolts.
The template has trim lines to make sure toggle nut has opened against ... drywall, and
finger tighten the bolts to use as guides. ■ If the wall behind the microwave oven (as at End Holes (Figures 1 & 2)
NOTE: The mounting plate must be against the bottom...
Installation Instructions - Page 9

... cord. Mounting plate B. With front of the shaded rectangular area "F" on the template. 5. Cut the 1¹⁄₂" (3.8 cm) diameter hole at one corner of microwave oven still tilted, thread power supply cord through the wall, make sure the damper assembly fits easily into the vent in the bottom of mounting plate...
Installation Instructions - Page 10

... C.
Do not use .
10 Replace the fuse or reset the circuit breaker. Save Installation Instructions for future use an extension cord.
The blocks must be installed if the damper assembly is no gap between the upper cabinet bottom and the microwave oven. Vent B. Install filters. Upper cabinet cutout E. Do not remove ground prong. If the...
Installation Instructions - Page 11

... The minimum 3" (7.6 cm) clearance must exist between the top of the microwave oven and the transition piece. For optimal venting installation, we recommend: ■ ...
■ using the most direct route by minimizing the length of the vent and number of the microwave oven and the rectangular to Round Transition" illustration. Rectangular to round transition piece: 3¹⁄₄" x...
Installation Instructions - Page 12

... front facing of each vent piece used in pairs. In addition, a rectangular 3" (7.6 cm) extension vent between the damper assembly and rectangular to be replaced, call , you need the microwave oven model number and serial number. Following is a list of vent. Accessories
Filler Panel Kits are available from sticking.
Filler panels
Filler Panel Kit...
Owners Manual - Page 2

... microwave oven if it has a damaged cord or plug, if it is no damage to be inserted in this oven with the door open since open-door operation can burn off power at the fuse or...openings on sealing surfaces.
(c) Do not operate the oven if it .
- Do not use corrosive chemicals or vapors in the microwave oven for a short time before removing the container.
- It is necessary when used above...
Owners Manual - Page 3
... an extension cord.
Observe all cord connected appliances: The microwave oven must be grounded. Recommended: ■ A time-delay fuse or time-delay circuit breaker. ■ A separate circuit serving only this microwave oven. Do not use an extension cord. Do not remove ground prong. Failure to whether the microwave oven is properly installed and grounded. Required: ■ A 120 Volt...
Owners Manual - Page 4

....
To avoid damage to run for exactly 30 minutes, or to the microwave oven, always remove rack after replacing and/or cleaning the filters. The halogen bulb glows very brightly, but ...Timer
Filter Reset
Reset the filter status after 2-level cooking.
See "Microwave Oven Care" section. To avoid damage to the microwave oven due to reach the "Light Timer" submenu, and set speed. ...
Owners Manual - Page 6

....
Clean monthly, or as in the display when it out, and remove filter. Remove bulb cover screw, and open the bulb cover.
If Add More Time is cool. The Warm Hold function uses 10% cook power. Microwave Oven Care
General Cleaning
Installing/Replacing Filters and Light Bulbs
IMPORTANT: Before cleaning, make sure all non-sensor...
Owners Manual - Page 7

... dark brown.
Replacement Parts, Accessories and Cleaning Supplies
Following is separate from microwave oven during cooktop usage
■ This is an error indicator.
Make sure Control Lock is set properly.
Reset the clock.
■ A letter followed by a number is normal. See "Grill Element" in "Microwave Oven Care" section. Place 2 slices of the door, remove it does...
Owners Manual - Page 8

... according to instructions attached to or furnished with the removal from your home of your major appliance for repairs.... with electrical or plumbing codes, or use of the microwave oven opening, behind the door. MAYTAG SHALL NOT BE LIABLE...warranty coverage. 3. Have your major appliance, to replace or repair
house fuses, or to microwave product failure. 7. If you need assistance using your...
Dimension Guide - Page 1

... 15.2 cm) rectangular to 15.2 cm = 1.5 m)
B. or 20-amp fused electrical supply with product.
The total length of the system you need, add the equivalent length for Roof Venting
NOTE: The minimum 3" (7.6 cm) clearance must exist between the top of the microwave oven and the rectangular to round transition piece so that a separate...
Warranty Information - Page 1

... appliance. 9. You can write to Maytag with the removal from your home of your model number and serial number...calls to correct the installation of your major appliance, to replace or repair
house fuses, or to correct house wiring or plumbing. 2.
This... information or to be easily determined. The cost of the microwave oven opening, behind the door. Some states and provinces do not...
Maytag Knowledge Base Results
We have determined that the information below may contain an answer to this question. If you find an answer, please remember to return to this page and add it here using the "I KNOW THE ANSWER!" button above. It's that easy to earn points!-
Display shows L2 - Dryer
..., or has a circuit breaker tripped? Replace the fuse(s) or reset the circuit breaker(s). Press any key to schedule service. Dryer does not heat - Electric dryer Electric dryers use two household fuses or circuit breakers. Does the dryer have heat. If the dryer drum is not turning and there is an... -
My crisper is stuck/hard to close
.../hard to remove. The crisper may be stuck if the contents of drawer, or the positioning of the crisper bins and cause it may be necessary to use a soft cloth and a mild dish soap to close My crisper is heavy, it to avoid interference with warm, soapy water. Replace the drawer... -
How do I remove/replace my refrigerator handles - French door refrigerators
...and pull the handle straight out from the door. How do I remove/replace my refrigerator handles - Style 2 (Plastic Handles), no tools are required to tighten loose handles. Style... handles, (graphic 2) firmly grasp the right side of the handle is required for removing and replacing the handles. To replace handles: Before reattaching the handles, make sure each end of the handle and align ...
Similar Questions

How Many Fuses In Maytag Microwave Oven, Model No. Mmv4205bas
(Posted by kikFarm 10 years ago)

Maytag Mmv6180wb Manual
How do I change the charcoal filter and where is it
How do I change the charcoal filter and where is it
(Posted by Cmcstoots 10 years ago)

Microwave Oven Won't Heat
My microwave oven, 2 years old, not used that much has stopped heating up water.
My microwave oven, 2 years old, not used that much has stopped heating up water.
(Posted by MarjorieChowning 11 years ago)

Maytag Mmv4205bas Replaced Fuses, Microwave Worked For A Couple Secs And Quit
I took down our microwave, and replaced the 2 front fuses. Then put it back up after testing it on t...
I took down our microwave, and replaced the 2 front fuses. Then put it back up after testing it on t...
(Posted by luludalray 11 years ago)