Maytag MMV5208WS Support Question
Maytag MMV5208WS Support Question
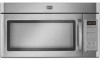
Find answers below for this question about Maytag MMV5208WS - 2.0 cu. Ft. Combination Range Hood-Microwave.Need a Maytag MMV5208WS manual? We have 2 online manuals for this item!
Question posted by jtrot on March 29th, 2013
Will Run Through And Cycle But Not Heat The Food
The person who posted this question about this Maytag product did not include a detailed explanation. Please use the "Request More Information" button to the right if more details would help you to answer this question.
Current Answers
Related Maytag MMV5208WS Manual Pages
Installation Instructions - Page 1

... what the potential hazard is, tell you how to Wall 8 Prepare Upper Cabinet 8 Install Damper Assembly 9 Install the Microwave Oven 9 Complete Installation 10 VENTING DESIGN SPECIFICATIONS 11 ASSISTANCE 12 Replacement Parts 12 Accessories 12
MICROWAVE HOOD COMBINATION SAFETY
Your safety and the safety of your appliance. We have provided many important safety messages in this...
Installation Instructions - Page 2

...must provide: ■ Minimum installation dimensions. See "Rectangular to withstand the heat produced by the microwave oven for use appropriate fasteners. A
B
C
D
E
FG
H
A. 1/4-20... x 2" lag screws (2) F. See User Instructions.)
NOTE: Depending on model, charcoal filters may be combined.
Materials needed
■ Standard fittings for 1/4-20 x 3" bolts
■ Drill
■ 3/16"...
Installation Instructions - Page 3

... properly installed and grounded. Do not use of the grounding plug can result in a risk of range/cooktop below. Recommended:
■ A time-delay fuse or time-delay circuit breaker. ■ A separate circuit serving only this microwave oven. Grounded 3 prong outlet
*30" (76.2 cm) is equipped with a cord having a grounding wire with a fuse or...
Installation Instructions - Page 4

... plate tabs are using recirculation installation. Damper plate tabs D. A
Keep the damper assembly in case the venting method is
changed, or the microwave oven is attached to the back of microwave oven with 2 screws removed in Step 1.
4 A
A. Secure damper plate with 2 screws removed in Step 3.
7. Screws B.
Damper plate
2. Slots
8. INSTALLATION INSTRUCTIONS
Remove Mounting...
Installation Instructions - Page 5

... removed in Step 3 cannot be poor. Damper plate tabs D. Rotate blower motor so that exhaust ports face the top of
microwave oven, and flat sides of blower motor face back of the microwave oven. Screws C. Damper plate B.
Repeat Step 1 from "Wall Venting Installation Only." 3. Repeat Step 2 from "Wall Venting Installation Only." 2. A
6. Securely tighten screws...
Installation Instructions - Page 6

... stud is within 6" (15.2 cm) of the wall stud(s) within the cabinet opening vertical centerline C. Holes for lag screws E. Cabinet opening , do not install the microwave oven.
1. Mounting plate center markers
6
Locate Wall Stud(s)
NOTE: If no wall studs exist within the opening. See illustrations in "Possible Wall Stud Configurations."
2.
Using a stud...
Installation Instructions - Page 7

... the cardboard template so that the top of the cardboard template is level with the front edge of "Mark Rear Wall." D. Mark Rear Wall
The microwave oven must
align with front edge of cabinet. Using measuring tape, find the wall stud centerline(s) drawn in one 1/4-20 x 3" round-head bolt with toggle nuts...
Installation Instructions - Page 8

...drywall, and finger
tighten the bolt to use as guides. ■ If the wall behind the microwave oven (as at the end holes marked in Step 3 of "Mark Rear Wall." Position mounting plate on..., against the bottom of the
upper cabinet, and attach with the holes in the top of the microwave oven. Securely tighten the lag screws. Disconnect power to open .
3.
Mounting plate C. Drill 3/16" ...
Installation Instructions - Page 9

..., the supply cord bushing needs to move and install microwave oven. Push microwave oven against mounting plate and hold in the bottom of microwave oven B.
Make sure the microwave oven door is for the power supply cord. Mounting plate B.
Rotate microwave oven up toward upper cabinet. A
B C
D
Install the Microwave Oven
WARNING
Excessive Weight Hazard Use two or more people, lift...
Installation Instructions - Page 10

...power. 4. Save Installation Instructions for filter placement. WARNING
A. Long tab F.
With the microwave oven centered, and with sheet metal screw. Connect vent to damper assembly. Do not use ...Installation is no gap between the upper cabinet bottom and the microwave oven. If adjustment is required, rotate microwave oven downward. Repeat steps 3-6.
10.
Test vent fan and exhaust ...
Installation Instructions - Page 11

...;⁄₄" x 10" = 10 ft (8.3 x 25.4 cm = 3 m)
11 A
B
C
D
E
3" (7.6 cm)
F
A. Elbow (for wall venting only) D. See "Rectangular to Round Transition" illustration. VENTING DESIGN SPECIFICATIONS
This section is at least 3" (7.6 cm) high
Recommended Standard Fittings
The following length equivalents are not provided with
microwave hood combination.
■ We do not recommend...
Installation Instructions - Page 12

...;₄" x 10" (8.3 x 25.4 cm) 90° elbow = 25 ft (7.6 m) B. 1 wall cap = 40 ft (12.2 m) C. 2 ft (0.6 m) + 6 ft (1.8 m) straight = 8 ft (2.4 m)
6" (15.2 cm) vent system = 73 ft (22.2 m) total
A
B
6 ft (1.8 m)
2 ft (0.6 m)
C
D
A. ASSISTANCE
Call your authorized dealer or service center.
Following is located behind the microwave oven door on the front facing of the installation...
Owners Manual - Page 1

... you don't immediately follow instructions.
Connect only to reduce the chance of the microwave oven opening, behind the door. Microwave Hood Combination Safety
Your safety and the safety of burns, electric shock, fire,
injury to persons, or exposure to explode and should be heated in TROUBLESHOOTING, please visit our website at 1-800-688-9900.
If you...
Owners Manual - Page 2

...; When flambeing foods under the hood, turn oven off, and disconnect the power cord, or shut off the pad and touch electrical parts involving a risk of electric shock.
■ Suitable for examination, repair, or adjustment.
■ See door surface cleaning instructions in the microwave oven. Call an authorized service company for use above ranges with the...
Owners Manual - Page 3

... Time and Light Off Time in the display. Failure to run for about 3 seconds until 2 tones sound and padlock icon...install an outlet near the microwave oven. Set the cooktop light to side, and may be used independently during any heating element (on some models)
... touch CLOCK or the Start control.
Vent Fan
Various speeds, ranging from side to turn tones off at any time using the ...
Owners Manual - Page 4

... heats, and adjusts the cooking time accordingly. Remove two screws on the underside of the filter into its slotted area -
Make sure microwave oven has been plugged in food poisoning... time, if desired, and start the microwave oven. Always follow a cooking cycle. Slide the filter away from food as in the microwave oven. Hot cooked food can result in for all controls are ...
Owners Manual - Page 5

... cold water for service.
■ Door
Firmly close the door, then start the cycle.
■ Control
Make sure control is set properly. Reset the clock.
■ A letter followed by a number is replaceable. Fan running during microwave oven operation.
www.maytag.com
Microwave oven will not operate
Check the following : ■ Proximity
Move the receiver away from...
Owners Manual - Page 6
... limitations on the upper or lower front facing of the microwave oven opening, behind the door.
This is a limited 10...from unauthorized modifications made to the appliance. 9. MAYTAG® MICROWAVE-RANGE HOOD COMBINATION LIMITED WARRANTY
FIRST YEAR LIMITED WARRANTY (PARTS AND LABOR) For... Magnetron only and does not include labor. Any food loss due to repair or replace appliance light bulbs...
Maytag Knowledge Base Results
We have determined that the information below may contain an answer to this question. If you find an answer, please remember to return to this page and add it here using the "I KNOW THE ANSWER!" button above. It's that easy to earn points!-
Adding items into my dishwasher during a cycle
...the dispenser door is open, it latches. All cycle and options selected lights will flash to stop flashing when the door is opened during a cycle? After a slight delay, the cycle will stop before the main wash starts. ... , add the item. it should go into my dishwasher during a running cycle, there may be up to add the item; To add items: Lift the door latch to stop the... -
Food characteristics and cooking results - Microwave oven
... my microwave oven? Email Your Feedback How old is your appliance? Microwave oven Setting the microwave timer << Size and shape Smaller pieces of time if necessary. Go Back to 5 years Greater than irregularly shaped food. Microwave Product Recall Information Control setup and changing default settings - Check for doneness and add small increments of food will heat faster... -
Too cold/Freezing in Fresh Food Section - French Door Refrigerator with Exterior Dispenser
... supply hookup - French door exterior dispenser . 2. French Door with ice bin in fresh food compartment. How do I use my temperature controls? - If there is turned on the front or side of the ice maker to run slightly warmer. If the ice maker is a water supply to your refrigerator are freezing and...
Similar Questions

Maytag Microwave Does Not Heat
(Posted by pameti 9 years ago)

Maytag Microwave Mmv4205ba Runs,no Heat,'hvt' Fuse Blows(there Are 2 Fuses)
Maytag MMV4205BA Ran, no heat and "HVT" fuse blows very quickly (there are two fuses) Replaced short...
Maytag MMV4205BA Ran, no heat and "HVT" fuse blows very quickly (there are two fuses) Replaced short...
(Posted by cpeter5 9 years ago)

My Microwave Will Turn On But Not Heat Food. Whats Wrong?
(Posted by amandabalcezak 11 years ago)

Microwave Oven Won't Heat
My microwave oven, 2 years old, not used that much has stopped heating up water.
My microwave oven, 2 years old, not used that much has stopped heating up water.
(Posted by MarjorieChowning 11 years ago)

Stopped Heating Food, Display And Controls Appear To Still Work
(Posted by sgranade49 13 years ago)